Over the years I’ve trusted Archiware P5 to protect large storage systems by copying to tape archives. It really is the best system for my clients. It works. I’ve used it to restore entire failed storage. Backups are great. Restores are better!
And Archiware have been great to entertain my feature requests and ideas for making P5 do what I wanted. Mostly extending the cli (and API) to help monitor the system with MunkiReport and a variety of shell scripts. (GitHub)
software versus hardware
Eventually after a long happy service you may find yourself needing to migrate the physical server to a new host when it is too old to get macOS updates.
Yes, Linux VM(and virtual private servers or VPS) are more common today than « Mac servers » but back in the day when Apple ruled the VFX world (remember Shake?!) and everyone ran Xsan fibre channel storage on Xserve raids, we also ran Mac servers with Apple’s Xserve hardware. Well that’s no longer the state of the Mac universe but we have these lovely mac minis for those who build small post-production studios and a running a Mac “server” is easier than learning Windows or Linux or even docker OS which you have to maintain. (Mac mini DevOps, it’s a thing. Ask Alex!)
Imagine physical servers on premise watching over and backing up on site storage using a tape library. Yes! It’s true, LTO tape systems to backup and archive post production storage is very standard. This is the way.
So there you are, one day you find a Mac that’s a bit old and needs to be upgraded. Maybe you’re smart and careful so you know it needs macOS updates. Yes it’s working but how many years of not being recent enough to get security updates are you going to risk running a “a perfectly working system”?or maybe you want 10gbe or something faster. Upgrade all the things. And while buying a new Mac might be easy (not with all the ram you want maybe but still) now what? Software Migration time.
Migration of the backup and archive server is easy right? Well easy enough. Move the databases over to the new Mac, make sure your license is correct for the new hardware and off you go.
documentation for the nation
Since I wanted to double check my fuzzy memory I checked with Archiware’s website and found a link in their support to my most excellent colleague David Fox’s JPY website with migration instructions. Excellent. Good start.
In my case I wanted to tweak the instructions for mac server migration versus Linux and I wanted to call out making sure all the archive indices were backed up properly so I revised his excellent list to be more specific to my scenario.
Warning: this is the point when you realize that I’m going to mention another app I built. The inflection point in the blog. No, it was wasn’t vibe coded. It was seriously hand crafted and mostly artisanal. In this case, my P5 Export app has existed for a while and it emerged as a way to easily schedule SQL export and analysis of historical archive jobs.
I had a shell script and a bundle of sql statements. And it worked but I wanted an easy way for my clients to use it so that’s where that app started. Well, even before that I had a lot of TSV exported inventory files and no real idea of what was in them. So there was a whole adventure with Jupyter notebooks and Python and that was fun and cool and worked briefly but it was so bespoke that it could not be used anywhere.
why? What are we doing this for?
My sql tools transformed the data into trends and reporting to see what and how much was archived. It was great. But it was a shell script and could only be wielded by the magician. So then it became an app. And a menu bar app too. That was my favourite part. An app. In the menu bar. It’s awesome.
more more more
Eventually I added my other export scripts which extracted useful info from my P5 archives: how many tapes I had and what were they, and what was in each one. Useful scripts made their way into my app. Report all the things.
All this info is in Archiware P5 but not always the way you want to see it
Recently Archiware have added dashboards to P5 and it’s a great addition and it hopefully means that I won’t have to support any hacks using bash and sql for much longer.
Ultimately my app feature update to P5 Export today came down to a planned migration and some cli instructions for backing up the backup and archive databases. Why do it once manually when you can automate and make it work for everyone better. It’s a classic IT mantra. So of course it made perfect sense to include backups of the backups in my app too.
why not regularly backup and export useful data intelligence from your archives. Make them work for you. You need P5 Export if you use Archiware P5, and you should, then check out the rest of my P5 helper tools. For making the most of your archives. Code.matx.ca
While all my post production and media colleagues from around the world gather for NAB to discuss cool new storage hardware, and awesome backup and archive software (shout out to Archiware !!) I have been coding steadily at home working on my Media Trust Tools. Today I’m releasing v2.2. build 2 with many new features to help media professionals load up their camera cards and walk away, knowing they can Copy, Trust then Verify the results.
Coding Features and Building Products
What a fun learning experience it has been these last few months becoming a software developer and product manager.
My apps solve real world client problems, so keeping the features aligned with their workflow is the goal. You need to capture (ingest) camera footage on a lot of different camera cards after a film shoot, and you need to do a lot of it, and copy it everywhere safely and securely. That takes a special kind of software. Multi-source and multi-destination aware with ways of proving and certifying the copy afterwards. Show me the receipts!
While coding non stop with a little help from my AI friends I’ve been extending and expanding my existing apps and cli workflows into native macOS apps for my clients. Testing in production is crucial, proving that your code and apps work and make sense for end users. Along the way I’ve learned about creating shared code frameworks to optimise apps that share logic and features, creating tests in the code so original features don’t regress when new features are added, and a lot about Swift and Xcode and AI helper tools (Anthropic Claude is the best, while OpenAI’s Codex is not far behind).
Coding Tools Are Overconfident
In 5 months of Swift coding and building and testing Mac apps to do media copy things, it can be struggle to remain focussed on the specific features your clients need while accommodating various workflows. I found the trick is to iterate a lot, making small changes, only adding one or two features at a time, using git feature branches to test, using local git repos and remote GitHub main repos. And for sanity, lots of features and goals and next steps documentation to keep some ideas for tomorrow while I focus on today’s testing goals. Using Claude and Codex to tech audit each other helps, and review documentation vs actual code.
“The bug fixes you declared fixed were over confident in their declarations” said one AI tool of the fixes it documented to patch the bugs it created.
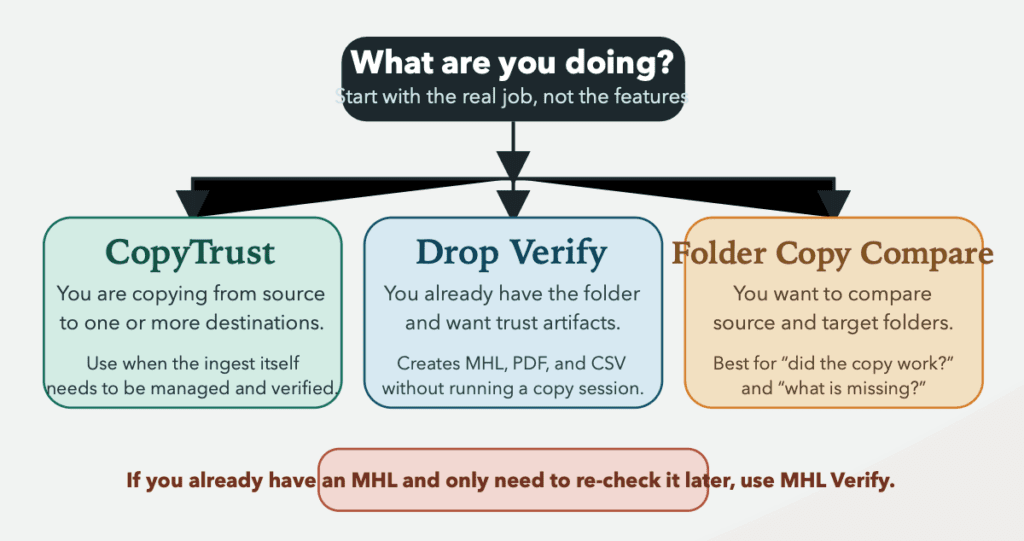
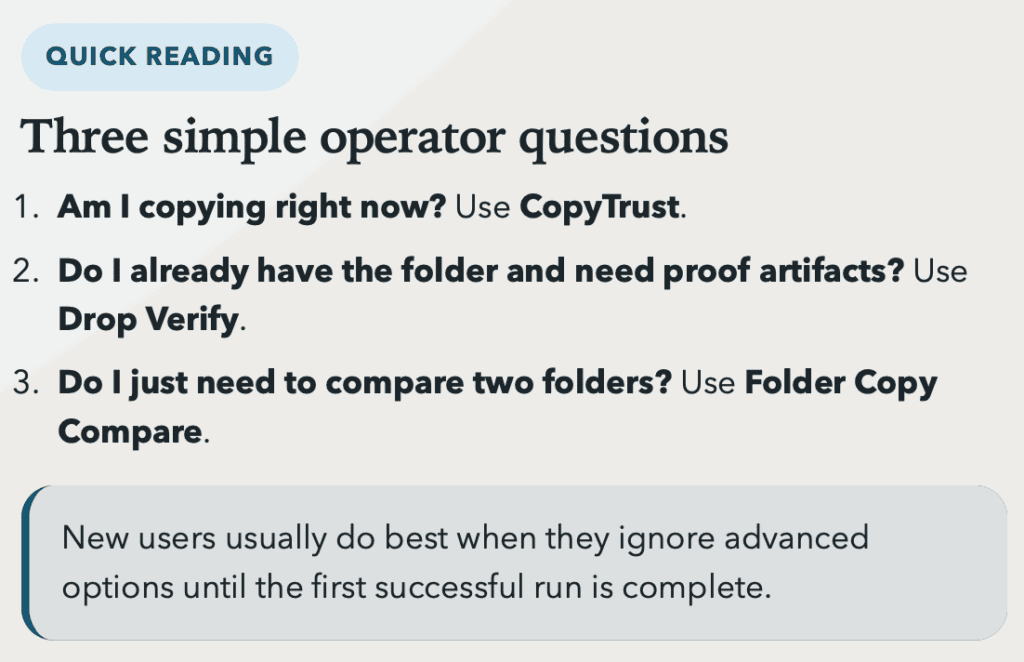
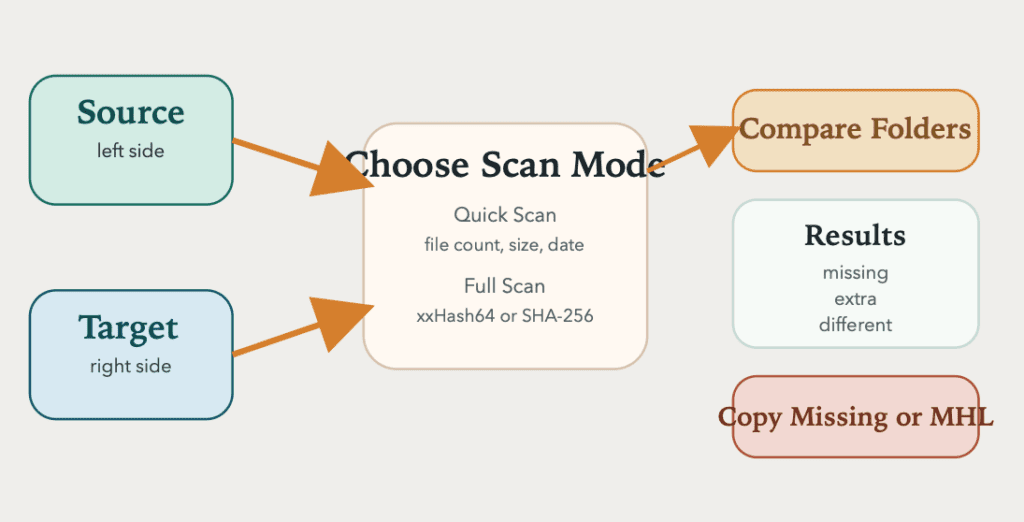
Adding to my apps to help manage Archiware P5 archives, I now have tools for camera card ingest workflows (CopyTrust) and MHL (media hash list) verification (MHL Verify, Drop Verify) and simpler sanity checks for copies made with other apps (Folder Copy Compare).
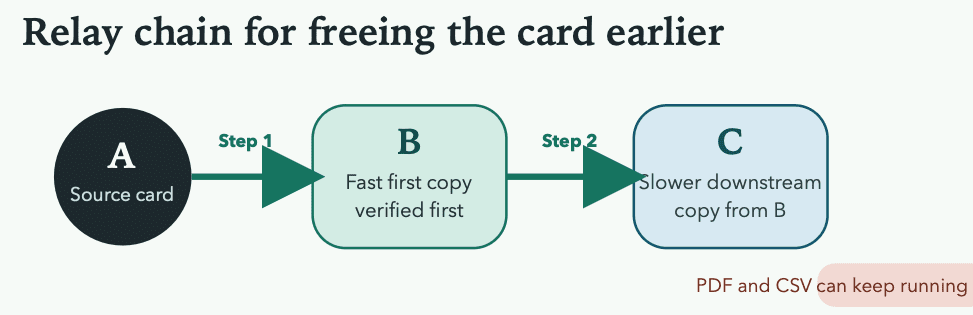
I’ll keep adding features when requested by my end users and keep testing in production. Right now with v.2.2 build 2 just released I can test the new relay chain feature which allows users to copy to the first and fastest storage then copy verified copies onwards to additional storage. With sending to Archiware P5 archives on LTO automatically in the future. Keep that planning list up to date of features to be considered once testing is happy these current features work properly. One thing at a time.
See the Archiware P5 apps and Final Cut Pro helper apps at code.matx.ca and more details for the Media Trust Tools specifically in GitHub.
Why I stopped worrying and built my own MHL verification apps
If you work in post-production long enough, you learn a simple truth:
Copying files is easy.
Trusting those copies is the hard part.
That is a big part of why I have been building tools at code.matx.ca for archive, verification, and post-production workflows. A lot of my recent work has been around practical trust tools for media handling: tools that help answer questions like:
Did this copy actually complete properly?
Are these media files still identical to the originals?
Can I prove that later?
Can I hand this off to someone else with confidence?
That is where MHL Verify and Drop Verify come in.
Why MHL matters
An MHL is a Media Hash List.
In practical terms, it is a manifest file that records hashes and metadata for media files so you can later verify whether the files still match. It is one of the clearest ways to move from “I think this copy is fine” to “I checked this copy against a known manifest.”
That matters on real jobs.
Media moves constantly:
from card to shuttle drive
from shuttle to RAID
from RAID to editorial
from editorial to archive
from archive back to restore
from one vendor or facility to another
At every stage, something can go wrong. Files can go missing. A copy can be incomplete. A file can change. Folder structure can drift. And sometimes everything looks fine until you actually verify it.
MHL helps catch that.
It is especially useful because it is not just some private internal log from one app. It is a real workflow format with broad industry relevance. If you want to read more about it, these are good starting points:
Sometimes you just want to drag a folder onto an app and get the trust artifacts you need.
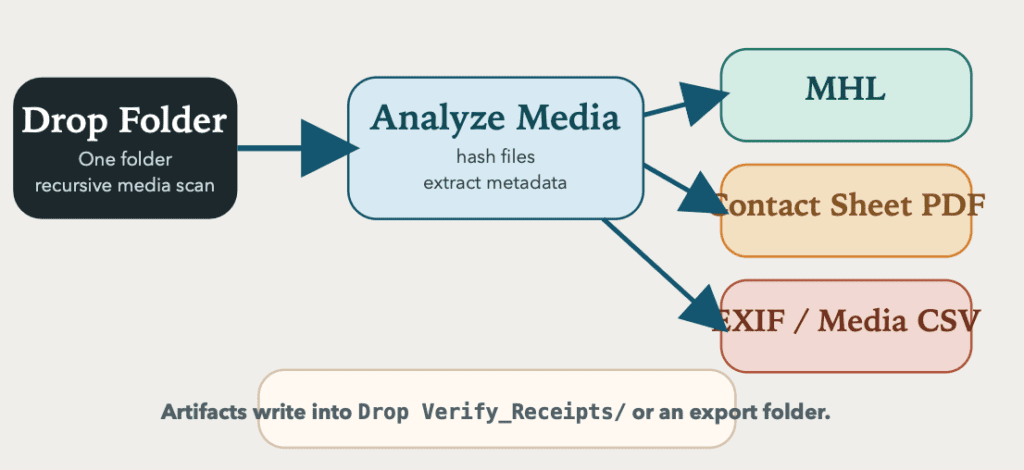
That is what Drop Verify is for.
Drop Verify is a simple one-folder tool that recursively scans media files and generates:
an MHL
a contact sheet PDF
an EXIF camera metadata CSV
So if you have already copied media and want to package it with useful reporting and verification artifacts, Drop Verify gives you a fast way to do that.
It is intentionally lightweight.
You drop in a folder, it does the work, and you get a clean artifact package you can keep with the media or send along with a handoff.
Why I built MHL Verify
Once you have an MHL, the next question is:
“Do these files still match it?”
That is the job of MHL Verify.
MHL Verify is for loading an existing MHL and checking a media set against it. That MHL might have been created by:
Drop Verify
another one of my tools
CopyTrust
Silverstack
OffShoot
YoYotta
another MHL-capable app
This makes it useful both for your own workflows and for incoming material from someone else.
If a vendor sends you media plus an MHL, MHL Verify gives you a direct way to test what you received.
If you created the MHL yourself with Drop Verify, MHL Verify becomes the follow-up tool for re-checking later copies, archive restores, or client-delivery storage.
For added bonus: I added a MHL QuickLook plugin with MHL Verify. Install one and you get both. Quickly view an MHL with QuickLook then open in MHL Verify.
How the two apps fit together
The simplest way to think about them is this:
Drop Verify creates the trust package
MHL Verify verifies the trust package
That separation is useful.
It keeps the workflow easy to explain:
Use Drop Verify to create an MHL and supporting artifacts from a folder.
Use MHL Verify to verify that MHL now or later.
Re-run verification on another drive, another machine, or another copy whenever you need confidence.
That can be useful for:
archive checks
delivery confirmation
transfer QA
post-copy validation
restoration testing
chain-of-custody confidence
How to test these apps
If you want to try them in a practical way, here is a simple test workflow.
Test 1: Create and verify your own MHL
Take a folder of media files.
Open Drop Verify.
Drop the folder into the app.
Let it generate:
MHL
contact sheet PDF
EXIF metadata CSV
Open MHL Verify.
Load the MHL created by Drop Verify.
Verify the same folder.
That gives you a clean baseline test: the manifest was just created, and the files should match.
Test 2: Verify a second copy
Duplicate that media folder to another drive or another location.
Open MHL Verify.
Load the original MHL.
Verify the copied folder.
Now you are using the MHL the way it is meant to be used: as a trust record across copies.
Test 3: Intentionally break something
Copy a media folder.
Change one file name, remove one file, or replace one file.
Run MHL Verify against that altered copy.
This is a great sanity check because it proves the verification layer is doing real work instead of just producing reassuring green text.
Test 4: Use Drop Verify for reporting only
Even when you already trust the copy, Drop Verify is useful for generating:
a contact sheet for visual review
a metadata spreadsheet for logging or production notes
a fresh MHL for your own package or archive workflow
That makes it handy not just as a verification tool, but as part of media prep and documentation.
Where CopyTrust fits in
There is also a third tool in this family: CopyTrust.
CopyTrust is the bigger ingest and verification app in this project. It is aimed at more advanced workflows and is growing toward a more complete camera-ingest model.
The direction there is a multi-source, multi-destination copy and verification tool with:
copy testing
MHL creation
MHL verification
receipt generation
stronger ingest workflow support
So in a way, these tools are becoming a small ecosystem:
Drop Verify for simple folder-based artifact generation
MHL Verify for focused manifest verification
CopyTrust for broader ingest and copy-validation workflows
Why I am making these tools
Because trust in media handling still matters, maybe more than ever.
Storage gets bigger. Copy workflows get faster. Teams get more distributed. But the underlying need stays the same: we need practical ways to know whether our files are actually what we think they are.
That is what these tools are for. Trust, but verify.
If you want to follow along with these tools and the rest of my post-production and archive work, you can find them at code.matx.ca.
A future blog post about using AI tools in production is coming up soon, but in the meantime building apps to solve everyday problems continues in my post-production video creation creative world. I’m the storage, workflow, backups, Mac management, techno healer. My clients are the creatives. They make cool stuff, so we have to safeguard it.
And while I don’t archive often, when I do, I use Archiware P5 🤩
And yes, that’s a joke because my clients backup and archive everyday and restore just as much. So keeping the P5 servers healthy is my job. And to help with this I made a P5 Health Check menu bar app (as well as mac app and bash script). To check drive cleaning status and uptime and a few things. In case anyone wants to be alerted of these things in the Menu bar. I know I want to know.
And for the fancy new Media List restore feature in P5 v.8 (which is very useful!) I created a FCPXMLD to FCPXML converter because the File -> Export menu in Final Cut Pro will give you a directory with XML inside of it, but I wanted to find those and rename them for use in P5 Archive, So yeah another app. Useful tools I use, my clients use, and now you can too.
Managing a fleet of macOS devices through SimpleMDM often requires constant vigilance over security updates, encryption status, and OS versions. What started as a practical shell script for checking device security status evolved into a full-featured native macOS application. This is the cold/flu season inspired adventure of a crazy idea that a simple shell script could become a Swift app and live in the Mac App Store.
With enough help from friends and current AI tools those fever dreams can become real. Join us on a long detailed rant from a 278-line Bash script to a modern SwiftUI app with secure credential management, intelligent caching, and a semi-decent and mostly functional user interface.
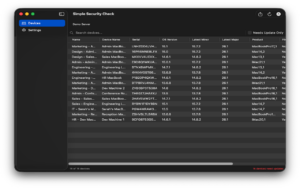
Simple Security Check app with test data
The Beginning: A Shell Script Solution
The original tool was born from a simple need: cross-reference SimpleMDM device data against the SOFA (Simple Organized Feed for Apple Software Updates) macOS security feed to identify which devices needed macOS updates. The shell script was straightforward but capable enough to export a spreadsheet for clients to review in a simple presentation:
```bash

#!/usr/bin/env bash

set -euo pipefail


# Fetch devices from SimpleMDM

# Compare against SOFA feed

# Export CSV reports

```
What the Shell Script Did Well
The shell script handled several complex tasks more or less efficiently:
1. **API Pagination**: Properly implemented cursor-based pagination for SimpleMDM’s API, handling potentially thousands of devices across multiple pages with retry logic and exponential backoff. Note: the very first version I posted didn’t do this at all, but thanks to a reminder from a helpful MacAdmin I remembered I needed to implement pagination and do it properly. Thanks!
2. **Smart Caching**: Cached both SimpleMDM device lists and SOFA feed data for 24 hours, reducing API calls and improving performance.
3. **Comprehensive Security Tracking**: Monitored FileVault encryption, System Integrity Protection (SIP), firewall status, and OS version compliance.
4. **Flexible Exports**: Generated three types of CSV reports and full JSON exports with timestamps, automatically opening them in the default applications.
5. **Version Intelligence**: Compared devices against both their current major OS version’s latest release and the maximum compatible OS version for their hardware model.
The Pain Points
However, the shell script approach had limitations:
– **API Key Management**: The API key had to be entered each time or set as an environment variable—no secure storage mechanism.
– **Single Account**: No support for managing multiple SimpleMDM accounts or environments.
– **Limited Search**: Finding specific devices required opening CSVs and using spreadsheet search.
– **No Visual Interface**: Everything was command-line based, requiring users comfortable with terminal operations.
– **Manual Execution**: I had to remember to run it periodically.
The script even had a TODO comment acknowledging its destiny:
```bash

# to do: make into a native swift/swiftUI app for macOS

# with better UX saving multiple API key entries into

# the keychain with a regular alias
“`
The Transformation: Building a Native macOS App
The decision to create a native macOS application wasn’t about abandoning what worked—it was about preserving that core functionality while addressing its limitations. And most importantly, being nerd-sniped by a colleague saying why not make it into a Swift app using current AI tools. I thought I could try it. How hard could it be? haha. What do I know about Swift, and what do I know about what is possible? Let’s see. The goal was clear: maintain 100% feature parity with the shell script while adding the convenience users expect from modern macOS software. And simplicity. I wanted a simple app to use to make all our lives easier. At least, this one part.
Architecture Decisions
The app was built using SwiftUI with a clear separation of concerns:
**AppState.swift** – The Brain
```swift

@MainActor

class AppState: ObservableObject {

    @Published var apiKeys: [APIKeyEntry] = []

    @Published var devices: [SimpleMDMDevice] = []

    @Published var sofaFeed: SOFAFeed?

    @Published var searchText = ""

    @Published var showOnlyNeedingUpdate = false

}

```
This centralized state manager coordinates all data operations, making the UI reactive and keeping business logic separate from presentation.
**KeychainManager.swift** - Secure Storage

```swift

class KeychainManager {

    func saveAPIKey(_ key: String, for alias: String) throws {

        // Store in macOS Keychain with kSecAttrAccessibleWhenUnlocked

    }

}

```
One of the shell script’s biggest weaknesses became one of the app’s strongest features. API keys are now stored securely in macOS Keychain, never exposed in plain text, and protected by the system’s security model.
**DatabaseManager.swift** - Intelligent Caching

```swift

class DatabaseManager {

    func getCachedDevices(forAPIKey alias: String) -> [SimpleMDMDevice]? {

        // Query SQLite with 24-hour cache validation

        // Indexed for fast search

    }

}

```
The file-based JSON caching from the shell script evolved into a SQLite database with indexed search capabilities. Each API key gets its own cached dataset, and the 24-hour cache duration from the original script was preserved.
**APIService.swift** - Network Layer

```swift

class APIService {

    func fetchAllDevices(apiKey: String,

                        apiKeyAlias: String,

                        forceRefresh: Bool) async throws -> [SimpleMDMDevice] {

        // Same pagination logic as shell script

        // Same retry mechanism with exponential backoff

        // Same User-Agent header pattern

    }

}
“`
The API fetching logic was ported almost line-for-line from the shell script. The same pagination handling, the same retry logic, even the same User-Agent pattern. If it worked in Bash, it works in Swift. And the User-Agent pattern came from a helpful Issue submitted in GitHub about making the shell script a better part of the SOFA ecosystem. Thanks again!
What Got Better
**Multiple API Key Support**
The single biggest improvement was supporting multiple SimpleMDM accounts. IT administrators often manage multiple clients or environments. The app now stores unlimited API keys with custom aliases:
– “Production” for your main environment
– “Testing” for sandbox testing
– “ClientA“, “ClientB” for MSPs managing multiple organizations
Each API key appears as a tab in the interface, with separately cached data for instant switching.
**Real-Time Search and Filtering**
The shell script required exporting to CSV and searching in a spreadsheet. The app provides instant, full-text search across all device attributes:
```swift

var filteredDevices: [SimpleMDMDevice] {

    var result = devices


    if showOnlyNeedingUpdate {

        result = result.filter { $0.needsUpdate }

    }


    if !searchText.isEmpty {

        result = result.filter { device in

            name.localizedCaseInsensitiveContains(searchText) ||

            deviceName.localizedCaseInsensitiveContains(searchText) ||

            serial.localizedCaseInsensitiveContains(searchText) ||

            // ... and more fields

        }

    }


    return result

}

```
Type a serial number, see the device instantly. Toggle “NeedsUpdate” to focus on out-of-date machines. Sort by most columns with a click. Note: I did run into a limitation with the number of sortable columns in the Swift code, many iterations and trials and eventually I found something that worked. Yeah Swift!
**Automatic Refresh with Progress**
The shell script required manual execution. The app handles refresh automatically:
– Background refresh respects the 24-hour cache
– Progress indicators show API fetch status
– Force refresh option bypasses cache when needed
– Errors display in-app with clear messaging
What Stayed the Same (Intentionally)
Certain aspects of the shell script were functional and useful so they were copied in the app:
**Export Format Compatibility**
The CSV exports use the exact same format as the shell script:
The 24-hour cache validity period was retained. It’s a sensible balance between API rate limiting and data freshness for device management.
**SOFA Integration Logic**
The algorithm for matching devices against SOFA feed data remained identical:
1. Build a lookup table of latest OS versions by major version
2. Match each device’s hardware model against SOFA’s compatibility data
3. Determine both “latest for current major” and “latest compatible overall”
This dual-version approach is valuable for planning: devices might be current on macOS 13.x but capable of running macOS 15 or macOS 26. It’s good to know.
Technical Highlights
Security Model
The app runs fully sandboxed with carefully scoped entitlements:
API keys use Keychain with `kSecAttrAccessibleWhenUnlocked`, meaning they’re protected when the Mac is locked.
Data Flow
1. **Launch**: Load API key metadata from UserDefaults, actual keys from Keychain
2. **Refresh**: Check SQLite cache validity, fetch from APIs if needed
3. **Process**: Merge SimpleMDM and SOFA data using the same algorithm as the shell script
4. **Cache**: Store in SQLite with timestamp and API key association
5. **Display**: Render in SwiftUI Table with reactive filtering
Test Mode Feature
A unique addition not in the shell script: a test mode that generates dummy devices for demonstrations and screenshots:
```swift

func toggleTestMode() {

    testModeEnabled.toggle()


    if testModeEnabled {

        let demoEntry = DummyDataGenerator.createDemoAPIKeyEntry()

        apiKeys.insert(demoEntry, at: 0)


        let dummyDevices = DummyDataGenerator.generateDummyDevices(count: 15)

        // ... process with real SOFA data

    }

}

```
This allows testing the full UI without a SimpleMDM account—perfect for App Store screenshots or demos. And it turns out a requirement for the App Store review process since the alternative was giving them API keys to real data to test with, which I could not do, of course, and which brought us to generating test data. A perfect plan.
Lessons Learned
What Worked
**Preserve the Core Logic**: The shell script’s API handling, caching strategy, and data processing were good enough and worked. Porting them to Swift rather than redesigning saved time and avoided regressions.
**Prioritize Security from Day One**: Building Keychain integration first made everything else easier. API keys are sensitive, and getting that right early prevented technical debt.
**SwiftUI for Rapid UI Development**: Building the table view, settings panel, and navigation in SwiftUI was dramatically faster than AppKit would have been. But since my experience was using an app like Platypus for simple app creation using SwiftUI was definitely more flexible and possible with help from current tools.
What Was Challenging
**Async/Await Migration**: The shell script’s sequential curl calls had to become proper async Swift code with structured concurrency.
**SQLite in Swift**: While more powerful than file caching, setting up proper SQLite bindings and schema management added complexity. and app sandbox rules moved the location of the cache and added a wrinkle in testing.
**Tab-Based Multi-Account UI**: The shell script only handled one API key. Designing an intuitive interface for switching between multiple accounts required several iterations.
– **One account to many**: Support for unlimited SimpleMDM accounts. Good for testing.
– **Terminal to GUI**: From command-line to native macOS interface
The app isn’t just a shell script wrapped in a window—it’s a giant leap into Swift app production which challenged me enormously for troubleshooting and app testing. This app is a small step in the code adventures that await us all when we want to take an idea, from shell code to Mac app.
Future Enhancements
While the current version achieves feature parity and then some, there’s room to grow:
– **Scheduled Auto-Refresh**: Background fetching on a schedule
– **Push Notifications**: Alerts when devices fall out of compliance
– **Export Automation**: Scheduled exports to specific directories
– **Custom Filters**: Save filter configurations for different report types
– **Device Groups**: Tag and organize devices into custom categories
– **Trend Analysis**: Historical tracking of fleet compliance over time
This is not the end
The journey from shell script to native app demonstrates that nerd-sniping does work and we can be pushed to try new things. The shell script’s core logic—its API handling, caching strategy, and data processing—was already ok, somewhat decent, and at least functional. The leap to all Swift was about making that functionality more accessible, more secure, while making testing and troubleshooting more difficult and confusing, but also a valuable learning opportunity. Xcode 26.1 has some basic code fixing abilities that we tested many times. It helped!
For IT administrators managing Mac fleets, the app delivers what the script did (device security monitoring and reporting) with what the script couldn’t (multi-account support, instant search, secure credential storage, and a native interface).
The script’s final TODO comment has been fulfilled:
```bash

# to do: make into a native swift/swiftUI app for macOS

# with better UX saving multiple API key entries into

# the keychain with a regular alias

```
*Built with SwiftUI, powered by the same bad logic that served IT admins well in its shell script form, now with the wild woodland scent of a native macOS application.*
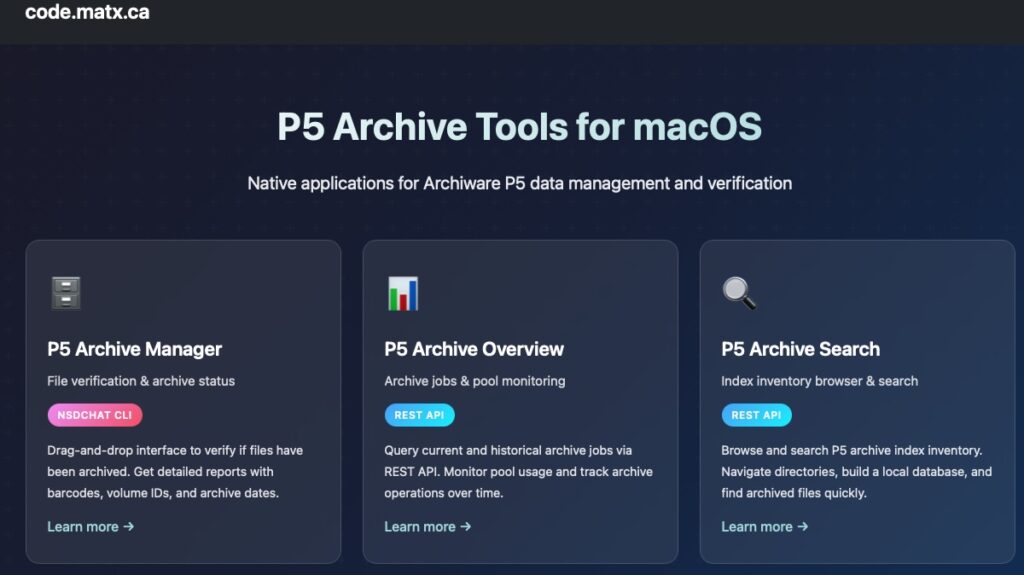
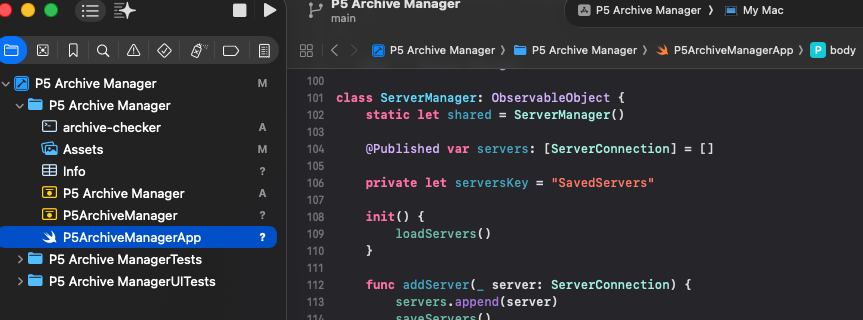
I’m building tools to help me and my clients work with Archiware’s amazing and awesome P5 Archive product. It’s great. It archives, it restores, it has a great web UI, and it’s always getting better. So why build apps? Sometimes you want something different, in my case my clients wanted spreadsheets. Yup. Data in a sheet. To look at. So I poked at P5’s databases via cli (see P5 Archive Manager) and with the REST API. Here are the results, two new apps P5 Archive Overview and P5 Archive Search.
https://code.matx.ca/ is code on GitHub + Mac apps that help manage data in Archiware P5
Why API? And not cli
Usually the cli (command line interface) is perfect for working in Terminal and in shell scripts or other programming languages. Using an API or application programming interface, allows different software applications to communicate and share data with each other. Instead of cli commands and arguments programs make requests using specific methods like GET or POST to retrieve or send data.See: API on Wikipedia
Using an API for my Mac apps means they could use a protocol like HTTP, and make a request using GET (to retrieve data).
The magic parts of an API
API Client: The application making the request.
Endpoints: Specific URLs where the API can be accessed.
For the P5 Archive Overview app we need to use the specific API Endpoint for archive overview detailed by Archiware here which lucky for us is a simple call for data which our app can display, save as json, format as csv (for the spreadsheet!!) and stash in a SQLite database for historical searches.
However, the P5 Archive Search app has to make many calls to walk through the index tree which is an inventory by path of the files archived. So we ask the user to name the storage they want to search and we make a breadcrumb through the storage, storing everything in SQLite as well as saving json and csv snippets of what we find. A lot more API calls but perfect for an app to do in the background.
The P5 Archive Search app queries the P5 Archive Index Inventory REST API:
“`
GET http://{server}:{port}/rest/v1/archive/indexes/{archive-index}/inventory/{path}
When running macOS 15 and up jq is installed for free and can help make the csv files form the json, but if you’re running macOs 14 then you need to install it with homebrew, MacPorts, or on your own.
One funny story during the early testing, I had to fix the jq detection in my first version because it totally missed reading the unix path correctly and yeah, thanks to a friend on the MacAdmins Slack who had an issue when trying it out. I was able to go back and fix that. Friends help friends make better code.
I’m not done making apps, and I’ll keep tweaking these three I have so far and making new ones from the scripts I have. The goal is to manage data, get a better understanding of the data in the archives and let the clients and owners of the data to know what they have.
This is a blog post about an app, there are many of them but this is mine. How I made a swift app in Xcode but took the long way ’round to get there. And an even longer post to tell the story.
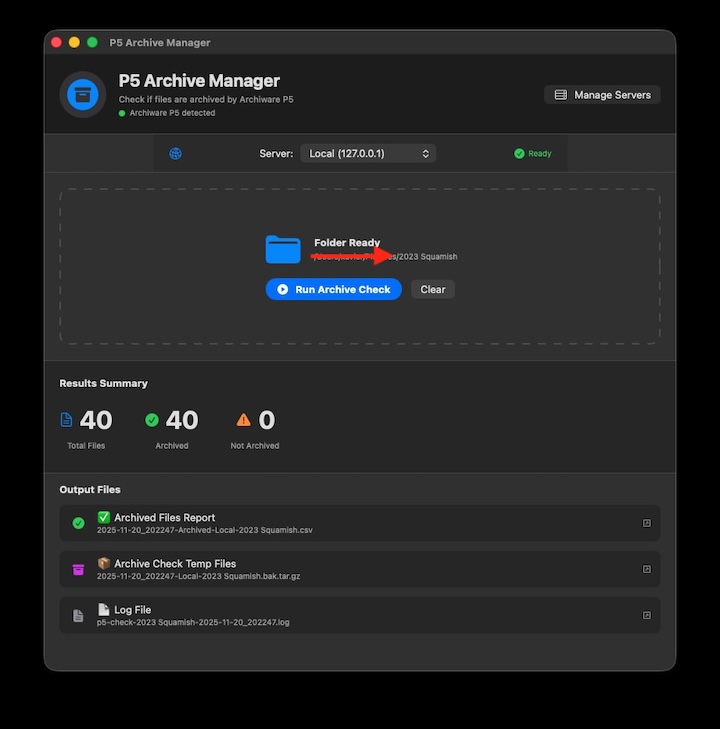
P5 Archive Manager, an app I created with AI tools to help check files archived with Archiware P5
I recently posted about some scripts I released on github to help other admins using Archiware P5 archive software to manage their servers and the data in the archive vault.
Claude: “How can I help you today?”
Using free credits in various AI tools will get you pretty far, but how far, really? Can you make an app? A useful app? Maybe, yes. Encouraged to transform some simple shell script projects and make a “proper” swift / swiftUI based Mac app I started using Claude as a test. The result is two apps for checking Archiware P5’s archive with a drag and drop tool that verifies files with local or remote servers. Code and apps on GitHub.
# Path to nsdchat
chatcmd="/usr/local/aw/bin/nsdchat -c"
Working with Microsoft’s Visual Studio Code app with co-pilot (tied to my GitHub account) and occasional ChatGPT coding sessions, when co-pilot ran out of free credits, I was surprised that I made a lot of progress on some more complicated scripts.
ChatGPT: “Ask anything”
It all started with shell scripts to help me automate some tasks with managing data and eventually I wanted to create a Mac app (or two) for my clients and me to use. I like scripts, but I have so many. And solving a problem in terminal and sifting through all those amazing scripts became more and more complicated, so maybe I needed a nice app that you can click and launch and be done with it to do that one thing. Single minded apps for single purpose objectives.
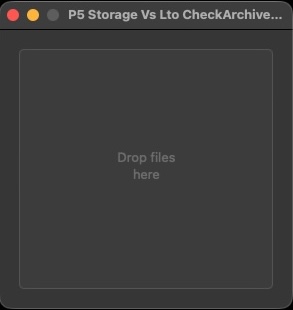
Platypus created app. Check if files are archived by drag and drop
I asked my friendly AI super tool to suggest a way to make an app from a shell script to see if it had any ideas, and it did have a few, although Mac specific ones were not plentiful. Looking through a list of possible methods, it suggested I use the excellent and awesome Platypus app. Now that’s a name I haven’t heard of it a while.
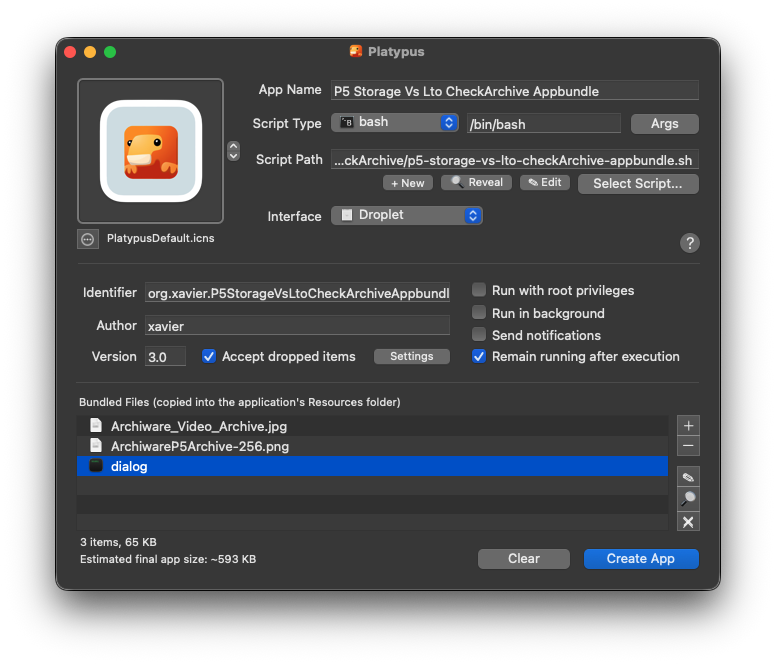
Platypus app UI. Pick a script, choose an interface and create an app.
#!/bin/sh

alias nuke="/Applications/Nuke5.2v1/Nuke5.2v1.app/Nuke5.2v1"
export NUKE_PATH="/Volumes/XSAN/District9/Foundry/Nuke/"
export OFX_PLUGIN_PATH="/Volumes/XSAN/District9/Foundry/OFX/"

/Applications/Nuke5.2v1/Nuke5.2v1.app/Nuke5.2v1
I used it many years back in VFX when working with Nuke and other pipeline tools but now I really needed it. Lucky for me it is still around and still works great. So I built a bunch of small Mac apps wrapped around simple shell scripts. Many of my scripts for P5 acted on a path (ie what folder of files do you need to examine) and making drag and drop app in Platypus was incredible easy. Add swiftDialog in the mix and you get nice messages to communicate progress.
Platypus app with embedded files, including swiftDialog.
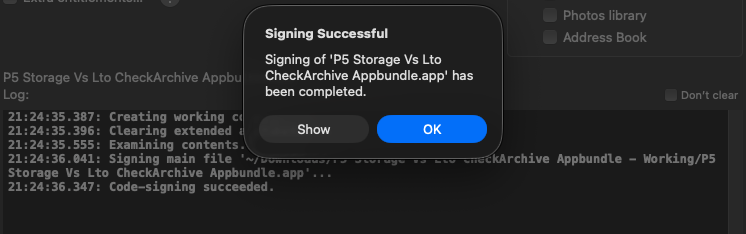
These Platypus born simple apps worked well but I wanted to sign and notarize them and honestly that’s always fun in part because Apple, like every company, changes the way to do it all the time so I often stumbled at this step and looked for more helper apps and guidance.
I previously used SD Notary Tool and while I had success in the past I got stuck somewhere in the process and couldn’t figure it out. Then I remembered someone had posted in the MacAdmins Slack about a cool new app they built called Signaro to help sign apps. I had looked at it and was initially confused (lots of buttons and options!) but now I needed it. So I tried again and it really helped.
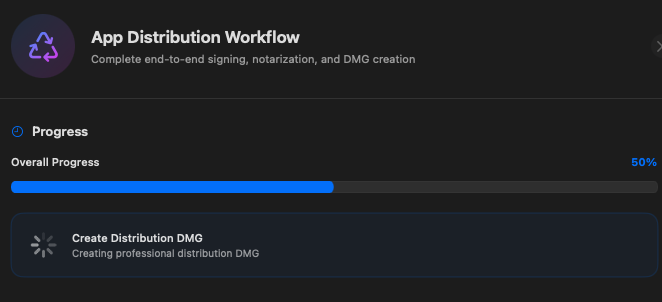
Signaro app for signing Mac apps, and notarizing and the whole app distribution workflow
At first I was stuck in the same step, and it was the app specific password that was my first main issue. I couldn’t figure it out and so re-created it with Apple and still nothing, then one more time and for some reason it worked. Success!
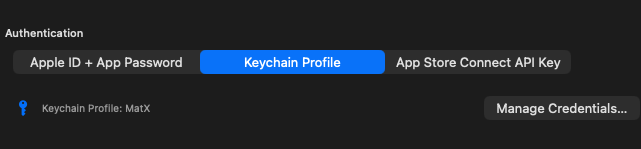
Small side story: I did find a small bug in Signaro when entering the AppleID and App password that I reported and it was fixed right away. In the process of submitting the bug I chatted with the author and I learned about the keychain profile option to make this step easier so thanks again for the helpers in this community.
xcrun notarytool store-credentials MacVFX

This process stores your credentials securely in the Keychain. You reference these credentials later using a profile name.
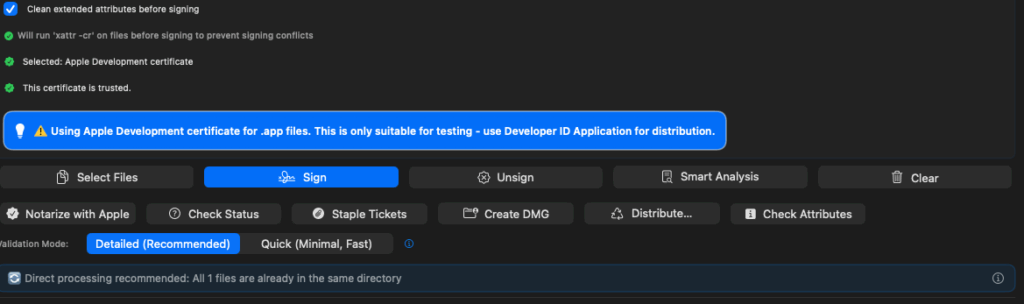
Another confusing part of signing and notarizing is that there are so many certificates you need so I was super pleased to have Signaro identify that I was using an incorrect cert and suggested how to fix the issue. The step by step process and the clear messaging is a big win in this app. It’s a Swiss army knife for signing, notarizing, making DMGs, and all the steps for preparing your app for distribution. Huge shout out to the author.
Signaro app certificate check.
So I’m pretty setup I have all the free AI coding tools to smash on my bash shell scripts, I have Platypus for creating the Mac app, bundled swiftDialog and other assets, and lastly a smooth signing and notarizing workflow with Signaro to distribute the apps. What else do I need? What about a native swift app built in Xcode?
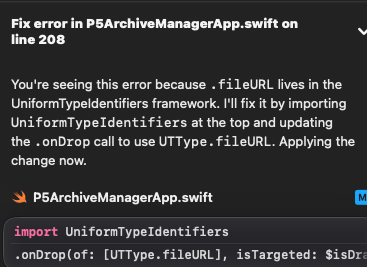
Again talking with the friendly author of Signaro he suggested why not make a swift Xcode app with some AI super tool? Hmm, I thought. Ok, and 3 hours later I’d built something that didn’t work and my “free credits” had run out. Surprisingly, Xcode has its own AI tool helper built-in to macOS 26 and I found it quite useful to fix small issues.
Xcode has built in AI tools to fix small mistakes.
When I ran into my first coding road block and free AI credit exhaustion, I also realized I needed lunch and some fresh air, even maybe a break from coding at my desk. As I took a short break I realized I could troubleshoot the old fashioned way and figure out what was not working while I waited for more “free credits” to re-materialize (or I could sign up!). After food and rest it only took me a few minutes to realize that my app did in fact work correctly, but I was testing it incorrectly!
So maybe you need fresh air and a break from the keyboard occasionally. Truth time. I finally did sign up for a month to test Claude out some more and it is great, but it also gets tired and reaches a maximum length of a conversation. Everyone needs fresh air.
Even with a simple app, and before running out of credits, you reach max length of conversation.
Background: I manage a few backup and archive servers for clients and these run the Archiware P5 suite of software (archive, backup and sync). To help manage these servers over the years I’ve written some P5 monitoring tools for Watchman and MunkiReport as well worked on helper scripts using the cli tools or more recently the API.
In an effort to share some simple examples of what is possible I have organized a few samples from my GitHub repos on the code.matx.ca page with some useful descriptions and text about usage and purpose of the scripts. They are hosted on in repo here:
I have more scripts of general and specific interest in my repo to P5 users or anyone managing files. See this post on find scripts.
The P5 code toolbox
The following P5 scripts are just a few examples and I have more to share, if there’s interest. I created most of these simple tools initially to run on the P5 server directly but I have since created, for my clients, versions which run from anywhere. Also, in some cases, a few scripts have now been built into easy to use Mac applications where it makes sense. If you want some help and you want to hire me to help with these things please reach out.
The scripts are in three categories:
1) P5 archive intelligence (all archive jobs from Db exported as a spreadsheet, or get recent archive jobs via REST API),
2) P5 housekeeping (make all full tapes read only, show all appendable archive tapes), and
3) P5 info backup (export all volumes into one csv, and export all volumes inventory as TSV with barcode as the name)
P5 Archive Intelligence
What do I mean by “archive intelligence”? Simply, I want to know about everything I’ve archived. One should consider the P5 Archive server as the ultimate source for all things archived but in some cases my clients don’t use the P5 server directly, or they want the information organized differently, like in a spreadsheet. And while the Archiware P5 suite of software is ever evolving, growing and adding features (even some lovely visual dashboards in v.7.4) I have been attempting to solve the perennial question of “what do we have archived?” in better and more useful ways.
P5 Information Backup
Related to archive intelligence is knowing what is in my P5 archive system entirely. I modified a provided shell script from the Archiware cli manual to output a csv of a list of all P5 volumes in the tape library (aka jukebox) so that I might know what is in the system at all times, and even if my P5 server is not running I have a record of every tape. This is one of the scripts I run with my periodic and backup workflows but more on my own special P5 backups (backups of the P5 Db and other metadata) in another post. The Archiware provided P5 volume list script inspired my own script to list full and appendable archive tapes which I have as a one-click desktop app for my clients. When they want to restore something P5 will tell them what to put in the tape library but if you have a lot of tapes maybe you want to know what to remove and so I have a list of candidates (ie take out the full tapes, and leave the appendable archive tapes). Helpful, yes.
P5 Inventory
There is a P5 cli command to export out the complete inventory and depending on how long you’ve been archiving and how much is in your archive this tool can take a long time to export a list of every file ever. And because of my mostly non-advanced super skills some times I’d find this process would time out. (There are ways around this but that’s another post). Basically, Too much archive! When it didn’t error out I had a big file… so one day a friend of mine suggested we use Jupyter notebook and yes, use Python!, to do some data analysis. A really fun project, great tool, but this is a hard problem to solve. We made a thing, it worked for a while then I wanted to find a better way. People liked my bar graphs and total amount archived but they also wanted spreadsheets. So let’s give them what they want.
Two (or three) approaches:
cli
api
db
I like lower case letters which are acronyms but let’s explore further.
cli
Using the cli (command line interface) usually in a shell script (but also in clever Mac apps) typically requires running the script with the Archiware P5 cli (nsdchat) locally on the P5 server and certainly this is what I did when I was testing scripts and various tools. It makes sense if you’re administering a server and you remote in (ssh or screenshare) and that’s where you start. After I wile I discovered the trick to make these cli based scripts run from anywhere which was handy if I wanted to connect to all my p5 servers at once in a script or have my client use an app on their desktop which talks to the P5 server. More on awsock in another post.
An example of a cli script using nsdchat I have a script for taking the inventory contents of each archive tape (LTO) and writing its contents to a TSV file (tab separated values) which is like a CSV (comma separated values).
nsdchat Volume names
Give me a list of p5 volumes (ie tapes)and tell me which one are archive tapes and that are readonly and what is the barcode.
api
Ok instead of a cli command dependent on the nsdchat binary installed somewhere we are doing http (web) magic with the API (application programming interface) — a set of known commands in a path based on GET, PUT, POST, DELETE. The API has a different way of doing things than the cli but you can ask a lot of the same basic questions.
In my api-archive-overview script I am sending one command then using jq to select elements to organize the info into a csv (spreadsheet). This example is set to run locally but this is easily modifiable to run from anywhere. For one client I have a script that talks to every P5 server, each in a different city and asks them all what they’ve been archiving then organizes it all into one spreadsheet. It’s fun, and it’s helpful.
db
The best for last. I mentioned above my attempts to use the inventory command which itself goes to all the relavant databases and gathers all the requested data about every archive file, its size and when it was archived etc. Yeah, that’s one way to do it. I’ve shown two examples above for the cli and api but a third is to just talk to the database directly. This is an advanced technique and should only be attempted by an expert. Ok, I’m kidding. As long as you’re not writing to the database and only reading from it, this is pretty safe. What you do with the info is another magic trick and one which I’ve been working on. Two db examples are dump all jobs in a csv file and the second, dump only archive jobs. I’ve got a more advanced script which takes the data and uses sql commands to organize into a csv of how much data archived per day per week per month per year and totals, which is nice for some people who like spreadsheets and want to know about everything ever done. Caution: once you look into the Db you’ll see a lot of things, and sorting through it takes time. I found when making more advanced and selective scripts that the cli jobs used by the very old P5 Archive app (by Andre Aulich) for example showed up as system jobs not archive jobs, so you have to be careful if you want to include those. Have fun.
There’s another category of scripts which I haven’t elaborated on but I do have a few examples in my repo. I do have scripts to prepare or examine files and folders going to be archived to LTO with P5 Archive. These scripts do various things like check for trailing space in the name or check file name length but maybe the most important ones I have are scripts which take the path of the archived projects and create html maps, file size directory listings and spreadsheets (again!) of the exif data of all files to keep for future. Clients do refer to the archive stub files (p5c) but they also find it handy to see the directory map and the file size of archived items without going into the p5 server. I’m not trying to replicate the P5 server, or replace it, but this falls into p5 housekeeping and p5 information backup.
That’s enough for now. If you’ve been reading and following along then let me know if you any questions or want any help with a P5 or other related projects. If you have better ways to do these things feel free to share. My scripts are always evolving and I love to learn.
Reference:
For more info on Archiware P5 scripting and building code to interact with it I’d recommend checking out the main P5 manual, as well as the CLI (command line interface) manual, and the API documentation, knowledge base (support). As well as the sample scripts and the Archiware blog, and the video series generally.
Had some fun creating a longer script to add a text header to some shell scripts, then because I wrote the wrong thing to all my shell scripts I had some more fun tweaking my script to find and remove this header. I’ve added it to my GitHub repo with a couple of other scripts based on the find command, one of my favourite unix tools since it is so handy.
Especially important with certain filesystems (certain encrypted filesystems) with file name “length limits”. So why not check for these files and zip them up and put them aside for safe keeping. In practise, the only files which push this limit are downloaded (purchased) from stock photos sites and write the file name with every keyword. Nice, but why can’t we have standard metadata handling these days? (I can dream!)
Archiware P5
The last two scripts I made with Archiware P5 in mind, as I manage many servers for clients with P5 Archive and I really do love this software and the team. More Archiware P5 inspired scripts are in other repos here or on my main P5 code site
Find A Trailing Space
In this case, besides it just being nice to clean up folder names with invisible trailing spaces before the archive job it was also necessary when using the P5 Companion (desktop) app which will not archive a top-level folder with a space at the end of the name.
Make (Only) One Thumbnail
This script makes only one image thumbnail per RDC folder, as they normally have a lot of R3D files which are part of the same shot. Also, I don’t want a lot of duplicates and only one is enough.
And while yes technically P5 Archive can make thumbnails and proxy videos when it is archiving (and I do use this feature) making proxies of RED files is an intensive process for older computers which means taking a long time, so pre-processing these R3D files ahead of time on faster computers can make the final archive job quicker. As part of some pre-processing before archiving to LTO (or wherever) is making sure some formats like R3D (aka RED) files have a thumbnail which will then end up in the P5 Archive created Archive index.
Ok, please steal this idea. The idea? To check all your Macs at one time, instead of each device, on device, one at a time.
What do I mean? Well, when I first heard about the SOFA feed which contained all the latest versions I didn’t know what to do with it honestly but soon after I realized that my clever script for checking XProtect version and which I made into a custom attribute in SimpleMDM and added to the dashboard was an incomplete idea.
Ok, I’m smart, I got the XProtect version on each Mac by running a script and then I got SimpleMDM to display it in a dashboard. But what’s missing? Context. Is it the latest version or not? So I added a SOFA check to the script then made SimpleMDM display both the local version and the latest version so I’d know if it was the latest or not. Great, right? Well, maybe.
The problem, I realized is that I wanted to do this for the macOS version too because I wanted to share info with a client/manager etc and realized the list of devices and info about macOS versions for example, lacked the context of whether it was the latest, and should we take action or not. That’s the point, right? collect info then do something about it, if action is required. Update your macOS now.
And then I wondered why I’m getting every Mac to ask itself what is its macOS or XProtect version, etc, when SimpleMDM was asking a lot of those questions already and putting it in a dashboard, accessible via API….
Then it happened, the idea that should be stolen by SimpleMDM and all other management tools. Don’t just display info about a Mac’s macOS version, show the latest version next to it, because I want to know if it should be updated. And also what is the latest that Mac can upgrade to. Maybe it’s running macOS 13.6, is that the latest or is 13.7.7, no wait it changed again, it’s 13.7.8. And by the way the latest compatible upgrade is 15.6.1, now that’s useful info.