While all my post production and media colleagues from around the world gather for NAB to discuss cool new storage hardware, and awesome backup and archive software (shout out to Archiware !!) I have been coding steadily at home working on my Media Trust Tools. Today I’m releasing v2.2. build 2 with many new features to help media professionals load up their camera cards and walk away, knowing they can Copy, Trust then Verify the results.
Coding Features and Building Products
What a fun learning experience it has been these last few months becoming a software developer and product manager.
My apps solve real world client problems, so keeping the features aligned with their workflow is the goal. You need to capture (ingest) camera footage on a lot of different camera cards after a film shoot, and you need to do a lot of it, and copy it everywhere safely and securely. That takes a special kind of software. Multi-source and multi-destination aware with ways of proving and certifying the copy afterwards. Show me the receipts!
While coding non stop with a little help from my AI friends I’ve been extending and expanding my existing apps and cli workflows into native macOS apps for my clients. Testing in production is crucial, proving that your code and apps work and make sense for end users. Along the way I’ve learned about creating shared code frameworks to optimise apps that share logic and features, creating tests in the code so original features don’t regress when new features are added, and a lot about Swift and Xcode and AI helper tools (Anthropic Claude is the best, while OpenAI’s Codex is not far behind).
Coding Tools Are Overconfident
In 5 months of Swift coding and building and testing Mac apps to do media copy things, it can be struggle to remain focussed on the specific features your clients need while accommodating various workflows. I found the trick is to iterate a lot, making small changes, only adding one or two features at a time, using git feature branches to test, using local git repos and remote GitHub main repos. And for sanity, lots of features and goals and next steps documentation to keep some ideas for tomorrow while I focus on today’s testing goals. Using Claude and Codex to tech audit each other helps, and review documentation vs actual code.
“The bug fixes you declared fixed were over confident in their declarations” said one AI tool of the fixes it documented to patch the bugs it created.
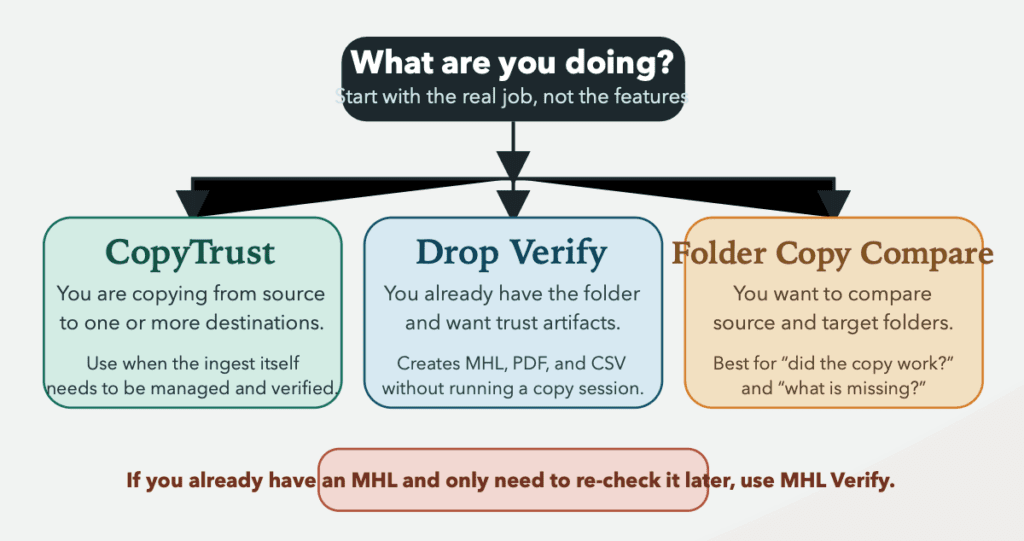
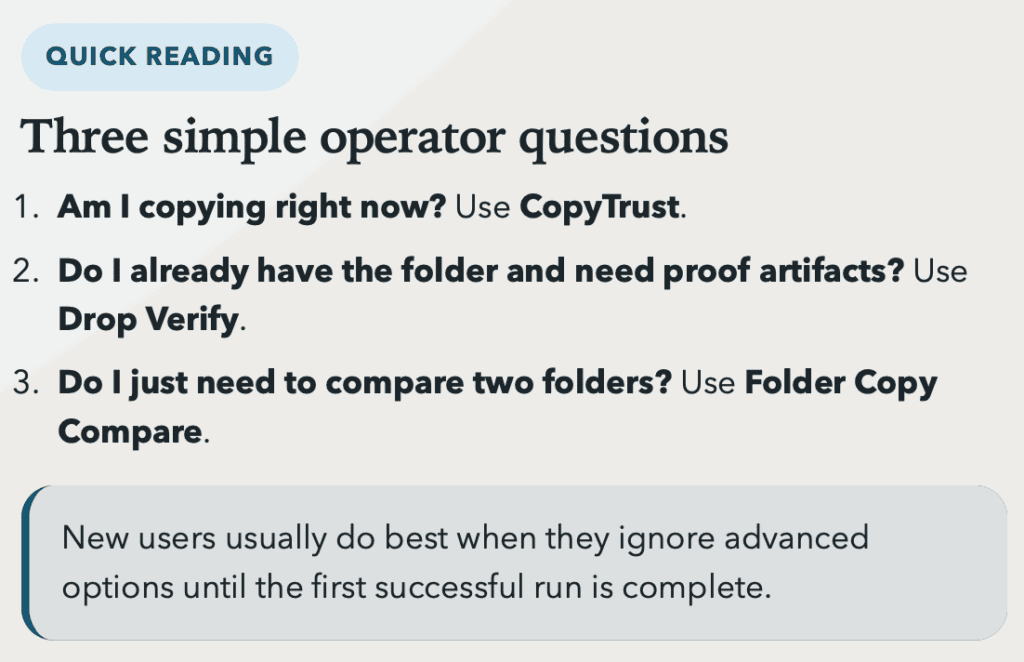
Adding to my apps to help manage Archiware P5 archives, I now have tools for camera card ingest workflows (CopyTrust) and MHL (media hash list) verification (MHL Verify, Drop Verify) and simpler sanity checks for copies made with other apps (Folder Copy Compare).
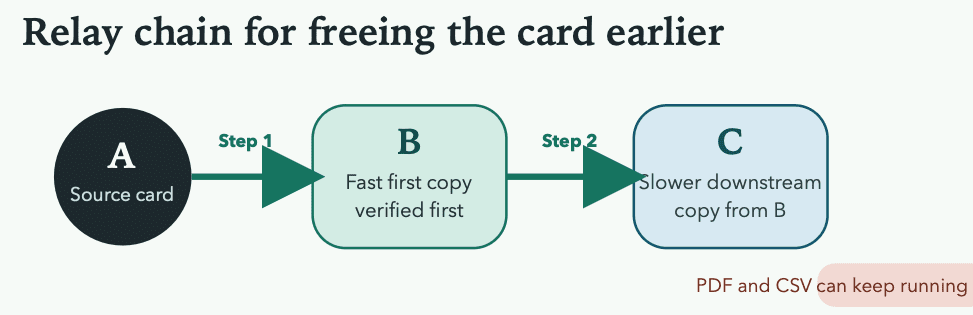
I’ll keep adding features when requested by my end users and keep testing in production. Right now with v.2.2 build 2 just released I can test the new relay chain feature which allows users to copy to the first and fastest storage then copy verified copies onwards to additional storage. With sending to Archiware P5 archives on LTO automatically in the future. Keep that planning list up to date of features to be considered once testing is happy these current features work properly. One thing at a time.
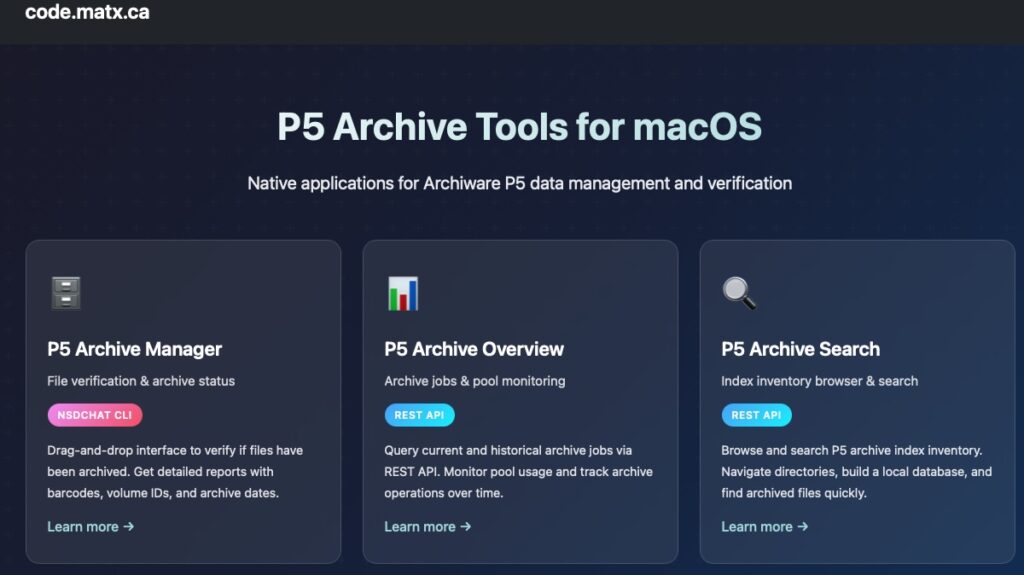
See the Archiware P5 apps and Final Cut Pro helper apps at code.matx.ca and more details for the Media Trust Tools specifically in GitHub.
Why I stopped worrying and built my own MHL verification apps
If you work in post-production long enough, you learn a simple truth:
Copying files is easy.
Trusting those copies is the hard part.
That is a big part of why I have been building tools at code.matx.ca for archive, verification, and post-production workflows. A lot of my recent work has been around practical trust tools for media handling: tools that help answer questions like:
Did this copy actually complete properly?
Are these media files still identical to the originals?
Can I prove that later?
Can I hand this off to someone else with confidence?
That is where MHL Verify and Drop Verify come in.
Why MHL matters
An MHL is a Media Hash List.
In practical terms, it is a manifest file that records hashes and metadata for media files so you can later verify whether the files still match. It is one of the clearest ways to move from “I think this copy is fine” to “I checked this copy against a known manifest.”
That matters on real jobs.
Media moves constantly:
from card to shuttle drive
from shuttle to RAID
from RAID to editorial
from editorial to archive
from archive back to restore
from one vendor or facility to another
At every stage, something can go wrong. Files can go missing. A copy can be incomplete. A file can change. Folder structure can drift. And sometimes everything looks fine until you actually verify it.
MHL helps catch that.
It is especially useful because it is not just some private internal log from one app. It is a real workflow format with broad industry relevance. If you want to read more about it, these are good starting points:
Sometimes you just want to drag a folder onto an app and get the trust artifacts you need.
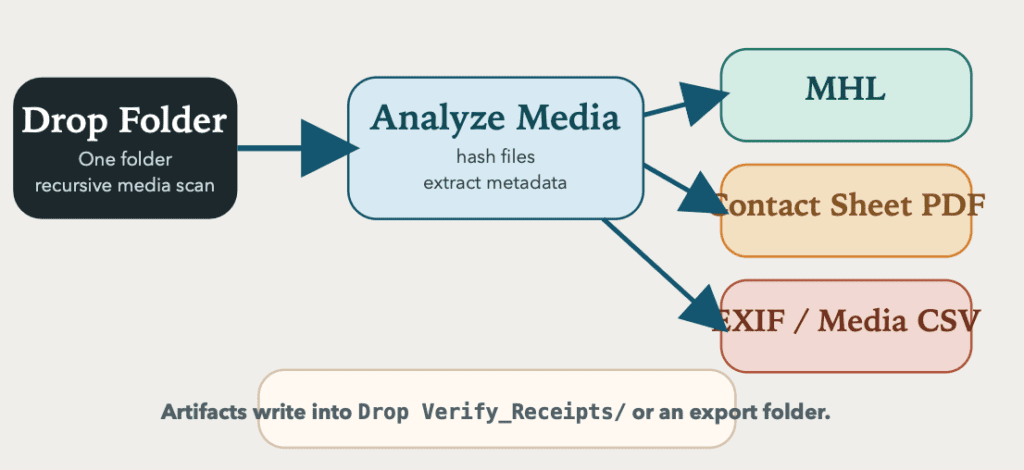
That is what Drop Verify is for.
Drop Verify is a simple one-folder tool that recursively scans media files and generates:
an MHL
a contact sheet PDF
an EXIF camera metadata CSV
So if you have already copied media and want to package it with useful reporting and verification artifacts, Drop Verify gives you a fast way to do that.
It is intentionally lightweight.
You drop in a folder, it does the work, and you get a clean artifact package you can keep with the media or send along with a handoff.
Why I built MHL Verify
Once you have an MHL, the next question is:
“Do these files still match it?”
That is the job of MHL Verify.
MHL Verify is for loading an existing MHL and checking a media set against it. That MHL might have been created by:
Drop Verify
another one of my tools
CopyTrust
Silverstack
OffShoot
YoYotta
another MHL-capable app
This makes it useful both for your own workflows and for incoming material from someone else.
If a vendor sends you media plus an MHL, MHL Verify gives you a direct way to test what you received.
If you created the MHL yourself with Drop Verify, MHL Verify becomes the follow-up tool for re-checking later copies, archive restores, or client-delivery storage.
For added bonus: I added a MHL QuickLook plugin with MHL Verify. Install one and you get both. Quickly view an MHL with QuickLook then open in MHL Verify.
How the two apps fit together
The simplest way to think about them is this:
Drop Verify creates the trust package
MHL Verify verifies the trust package
That separation is useful.
It keeps the workflow easy to explain:
Use Drop Verify to create an MHL and supporting artifacts from a folder.
Use MHL Verify to verify that MHL now or later.
Re-run verification on another drive, another machine, or another copy whenever you need confidence.
That can be useful for:
archive checks
delivery confirmation
transfer QA
post-copy validation
restoration testing
chain-of-custody confidence
How to test these apps
If you want to try them in a practical way, here is a simple test workflow.
Test 1: Create and verify your own MHL
Take a folder of media files.
Open Drop Verify.
Drop the folder into the app.
Let it generate:
MHL
contact sheet PDF
EXIF metadata CSV
Open MHL Verify.
Load the MHL created by Drop Verify.
Verify the same folder.
That gives you a clean baseline test: the manifest was just created, and the files should match.
Test 2: Verify a second copy
Duplicate that media folder to another drive or another location.
Open MHL Verify.
Load the original MHL.
Verify the copied folder.
Now you are using the MHL the way it is meant to be used: as a trust record across copies.
Test 3: Intentionally break something
Copy a media folder.
Change one file name, remove one file, or replace one file.
Run MHL Verify against that altered copy.
This is a great sanity check because it proves the verification layer is doing real work instead of just producing reassuring green text.
Test 4: Use Drop Verify for reporting only
Even when you already trust the copy, Drop Verify is useful for generating:
a contact sheet for visual review
a metadata spreadsheet for logging or production notes
a fresh MHL for your own package or archive workflow
That makes it handy not just as a verification tool, but as part of media prep and documentation.
Where CopyTrust fits in
There is also a third tool in this family: CopyTrust.
CopyTrust is the bigger ingest and verification app in this project. It is aimed at more advanced workflows and is growing toward a more complete camera-ingest model.
The direction there is a multi-source, multi-destination copy and verification tool with:
copy testing
MHL creation
MHL verification
receipt generation
stronger ingest workflow support
So in a way, these tools are becoming a small ecosystem:
Drop Verify for simple folder-based artifact generation
MHL Verify for focused manifest verification
CopyTrust for broader ingest and copy-validation workflows
Why I am making these tools
Because trust in media handling still matters, maybe more than ever.
Storage gets bigger. Copy workflows get faster. Teams get more distributed. But the underlying need stays the same: we need practical ways to know whether our files are actually what we think they are.
That is what these tools are for. Trust, but verify.
If you want to follow along with these tools and the rest of my post-production and archive work, you can find them at code.matx.ca.
A future blog post about using AI tools in production is coming up soon, but in the meantime building apps to solve everyday problems continues in my post-production video creation creative world. I’m the storage, workflow, backups, Mac management, techno healer. My clients are the creatives. They make cool stuff, so we have to safeguard it.
And while I don’t archive often, when I do, I use Archiware P5 🤩
And yes, that’s a joke because my clients backup and archive everyday and restore just as much. So keeping the P5 servers healthy is my job. And to help with this I made a P5 Health Check menu bar app (as well as mac app and bash script). To check drive cleaning status and uptime and a few things. In case anyone wants to be alerted of these things in the Menu bar. I know I want to know.
And for the fancy new Media List restore feature in P5 v.8 (which is very useful!) I created a FCPXMLD to FCPXML converter because the File -> Export menu in Final Cut Pro will give you a directory with XML inside of it, but I wanted to find those and rename them for use in P5 Archive, So yeah another app. Useful tools I use, my clients use, and now you can too.
I’m building tools to help me and my clients work with Archiware’s amazing and awesome P5 Archive product. It’s great. It archives, it restores, it has a great web UI, and it’s always getting better. So why build apps? Sometimes you want something different, in my case my clients wanted spreadsheets. Yup. Data in a sheet. To look at. So I poked at P5’s databases via cli (see P5 Archive Manager) and with the REST API. Here are the results, two new apps P5 Archive Overview and P5 Archive Search.
https://code.matx.ca/ is code on GitHub + Mac apps that help manage data in Archiware P5
Why API? And not cli
Usually the cli (command line interface) is perfect for working in Terminal and in shell scripts or other programming languages. Using an API or application programming interface, allows different software applications to communicate and share data with each other. Instead of cli commands and arguments programs make requests using specific methods like GET or POST to retrieve or send data.See: API on Wikipedia
Using an API for my Mac apps means they could use a protocol like HTTP, and make a request using GET (to retrieve data).
The magic parts of an API
API Client: The application making the request.
Endpoints: Specific URLs where the API can be accessed.
For the P5 Archive Overview app we need to use the specific API Endpoint for archive overview detailed by Archiware here which lucky for us is a simple call for data which our app can display, save as json, format as csv (for the spreadsheet!!) and stash in a SQLite database for historical searches.
However, the P5 Archive Search app has to make many calls to walk through the index tree which is an inventory by path of the files archived. So we ask the user to name the storage they want to search and we make a breadcrumb through the storage, storing everything in SQLite as well as saving json and csv snippets of what we find. A lot more API calls but perfect for an app to do in the background.
The P5 Archive Search app queries the P5 Archive Index Inventory REST API:
“`
GET http://{server}:{port}/rest/v1/archive/indexes/{archive-index}/inventory/{path}
When running macOS 15 and up jq is installed for free and can help make the csv files form the json, but if you’re running macOs 14 then you need to install it with homebrew, MacPorts, or on your own.
One funny story during the early testing, I had to fix the jq detection in my first version because it totally missed reading the unix path correctly and yeah, thanks to a friend on the MacAdmins Slack who had an issue when trying it out. I was able to go back and fix that. Friends help friends make better code.
I’m not done making apps, and I’ll keep tweaking these three I have so far and making new ones from the scripts I have. The goal is to manage data, get a better understanding of the data in the archives and let the clients and owners of the data to know what they have.
This is a blog post about an app, there are many of them but this is mine. How I made a swift app in Xcode but took the long way ’round to get there. And an even longer post to tell the story.
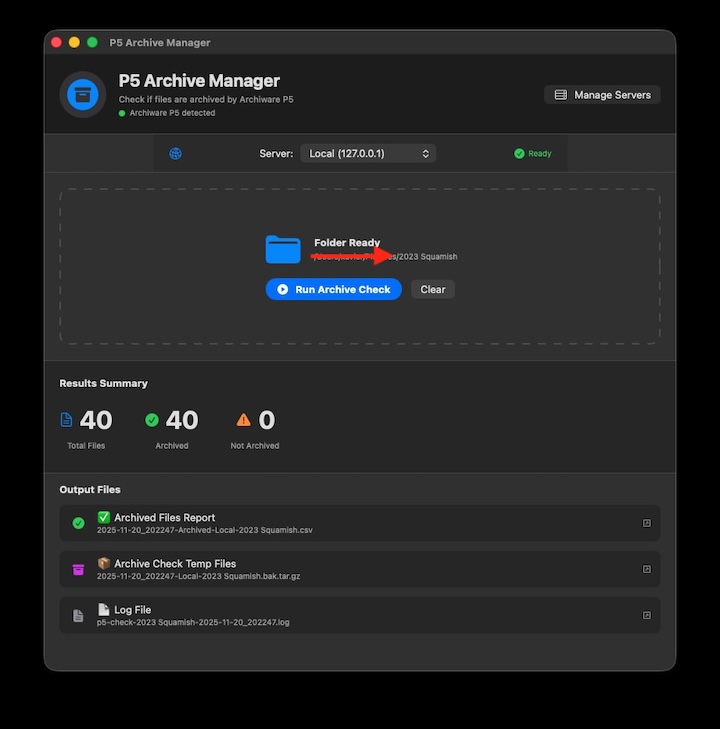
P5 Archive Manager, an app I created with AI tools to help check files archived with Archiware P5
I recently posted about some scripts I released on github to help other admins using Archiware P5 archive software to manage their servers and the data in the archive vault.
Claude: “How can I help you today?”
Using free credits in various AI tools will get you pretty far, but how far, really? Can you make an app? A useful app? Maybe, yes. Encouraged to transform some simple shell script projects and make a “proper” swift / swiftUI based Mac app I started using Claude as a test. The result is two apps for checking Archiware P5’s archive with a drag and drop tool that verifies files with local or remote servers. Code and apps on GitHub.
# Path to nsdchat
chatcmd="/usr/local/aw/bin/nsdchat -c"
Working with Microsoft’s Visual Studio Code app with co-pilot (tied to my GitHub account) and occasional ChatGPT coding sessions, when co-pilot ran out of free credits, I was surprised that I made a lot of progress on some more complicated scripts.
ChatGPT: “Ask anything”
It all started with shell scripts to help me automate some tasks with managing data and eventually I wanted to create a Mac app (or two) for my clients and me to use. I like scripts, but I have so many. And solving a problem in terminal and sifting through all those amazing scripts became more and more complicated, so maybe I needed a nice app that you can click and launch and be done with it to do that one thing. Single minded apps for single purpose objectives.
Platypus created app. Check if files are archived by drag and drop
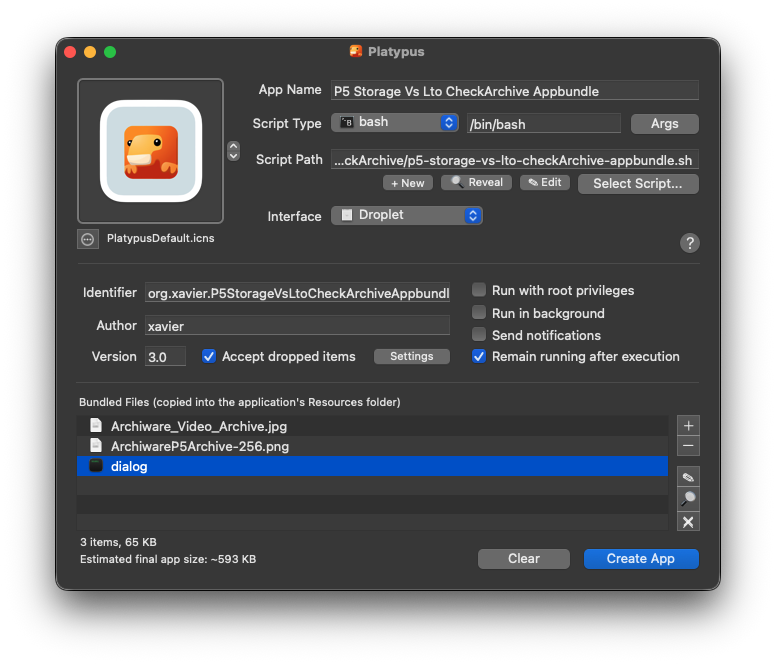
I asked my friendly AI super tool to suggest a way to make an app from a shell script to see if it had any ideas, and it did have a few, although Mac specific ones were not plentiful. Looking through a list of possible methods, it suggested I use the excellent and awesome Platypus app. Now that’s a name I haven’t heard of it a while.
Platypus app UI. Pick a script, choose an interface and create an app.
#!/bin/sh

alias nuke="/Applications/Nuke5.2v1/Nuke5.2v1.app/Nuke5.2v1"
export NUKE_PATH="/Volumes/XSAN/District9/Foundry/Nuke/"
export OFX_PLUGIN_PATH="/Volumes/XSAN/District9/Foundry/OFX/"

/Applications/Nuke5.2v1/Nuke5.2v1.app/Nuke5.2v1
I used it many years back in VFX when working with Nuke and other pipeline tools but now I really needed it. Lucky for me it is still around and still works great. So I built a bunch of small Mac apps wrapped around simple shell scripts. Many of my scripts for P5 acted on a path (ie what folder of files do you need to examine) and making drag and drop app in Platypus was incredible easy. Add swiftDialog in the mix and you get nice messages to communicate progress.
Platypus app with embedded files, including swiftDialog.
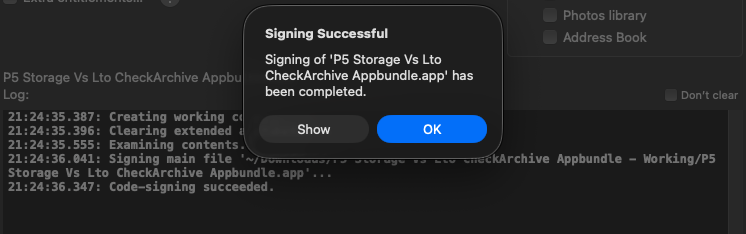
These Platypus born simple apps worked well but I wanted to sign and notarize them and honestly that’s always fun in part because Apple, like every company, changes the way to do it all the time so I often stumbled at this step and looked for more helper apps and guidance.
I previously used SD Notary Tool and while I had success in the past I got stuck somewhere in the process and couldn’t figure it out. Then I remembered someone had posted in the MacAdmins Slack about a cool new app they built called Signaro to help sign apps. I had looked at it and was initially confused (lots of buttons and options!) but now I needed it. So I tried again and it really helped.
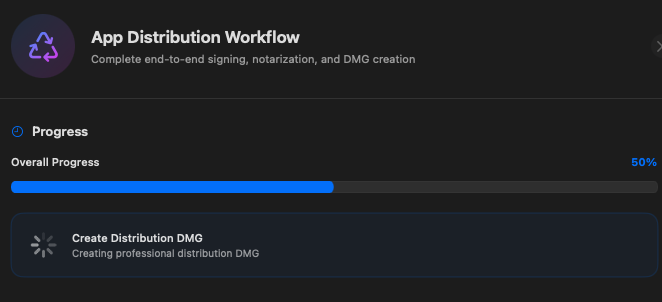
Signaro app for signing Mac apps, and notarizing and the whole app distribution workflow
At first I was stuck in the same step, and it was the app specific password that was my first main issue. I couldn’t figure it out and so re-created it with Apple and still nothing, then one more time and for some reason it worked. Success!
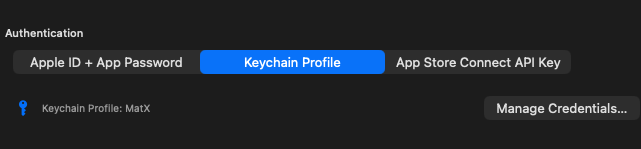
Small side story: I did find a small bug in Signaro when entering the AppleID and App password that I reported and it was fixed right away. In the process of submitting the bug I chatted with the author and I learned about the keychain profile option to make this step easier so thanks again for the helpers in this community.
xcrun notarytool store-credentials MacVFX

This process stores your credentials securely in the Keychain. You reference these credentials later using a profile name.
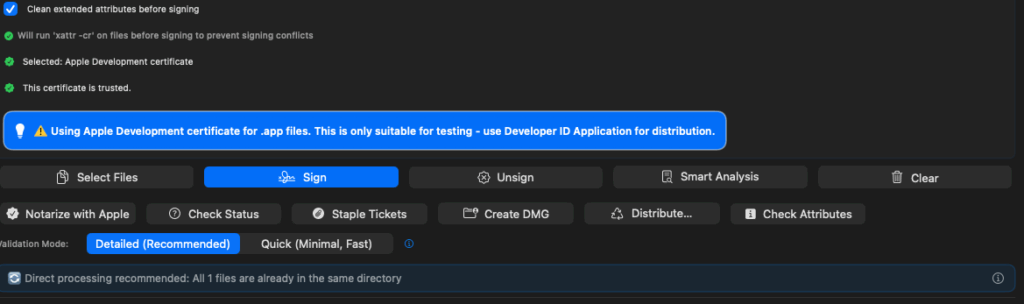
Another confusing part of signing and notarizing is that there are so many certificates you need so I was super pleased to have Signaro identify that I was using an incorrect cert and suggested how to fix the issue. The step by step process and the clear messaging is a big win in this app. It’s a Swiss army knife for signing, notarizing, making DMGs, and all the steps for preparing your app for distribution. Huge shout out to the author.
Signaro app certificate check.
So I’m pretty setup I have all the free AI coding tools to smash on my bash shell scripts, I have Platypus for creating the Mac app, bundled swiftDialog and other assets, and lastly a smooth signing and notarizing workflow with Signaro to distribute the apps. What else do I need? What about a native swift app built in Xcode?
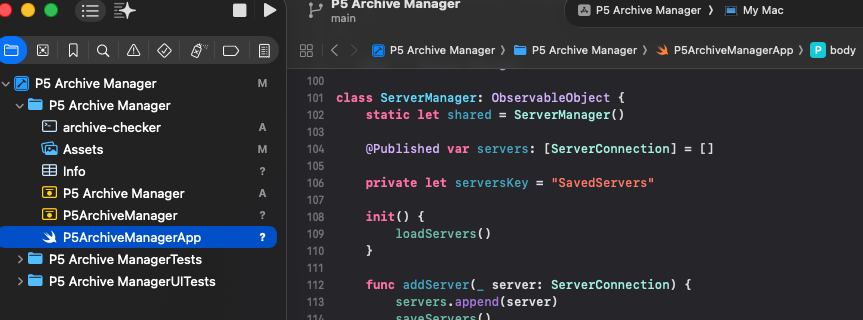
Again talking with the friendly author of Signaro he suggested why not make a swift Xcode app with some AI super tool? Hmm, I thought. Ok, and 3 hours later I’d built something that didn’t work and my “free credits” had run out. Surprisingly, Xcode has its own AI tool helper built-in to macOS 26 and I found it quite useful to fix small issues.
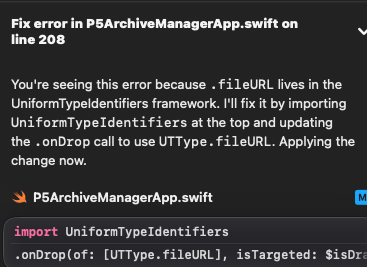
Xcode has built in AI tools to fix small mistakes.
When I ran into my first coding road block and free AI credit exhaustion, I also realized I needed lunch and some fresh air, even maybe a break from coding at my desk. As I took a short break I realized I could troubleshoot the old fashioned way and figure out what was not working while I waited for more “free credits” to re-materialize (or I could sign up!). After food and rest it only took me a few minutes to realize that my app did in fact work correctly, but I was testing it incorrectly!
So maybe you need fresh air and a break from the keyboard occasionally. Truth time. I finally did sign up for a month to test Claude out some more and it is great, but it also gets tired and reaches a maximum length of a conversation. Everyone needs fresh air.
Even with a simple app, and before running out of credits, you reach max length of conversation.
In the old days we used to forward ports. On your router the traffic for a server or service went to a port (where a number represents a service, some which are defined, but can be arbitrary) and to a destination IP address. Well, wouldn’t you know it, if ssh is port 22 or web traffic is on port 80 then everyone and their port scanner comes knocking. So then your firewall is tested, and then auto-ban and geo-block and emails go out. What if we could avoid that and not open (or forward) any port to make services work across the internet?
Tailscale is a mesh-VPN which uses WireGuard to securely establish a mesh (point to point) VPN of your devices. Suddenly your iPhone can securely send files to your Mac or raspberry Pi across the world. How cool is that? In today’s advanced lesson: you can backup and sync your Synology NAS using Archiware P5.
Step 1: Setting up Tailscale on Synology
It honestly used to be harder than this, these days you can simply add the Tailscale package via the Synology package center app and you’re done. Almost. There’s one more step.
Step 2: Set up Outgoing VPN access via Tailscale which requires editing some files (which necessitate Terminal and remote login access). This only has to be done once but future updates may require fixes. This was tested in DSM 7. Pro tip: only allow remote access to a restricted and time limited account so you don’t leave it on accidentally.
Step 3. Install Archiware P5 on Synology NAS
Using Archiware P5 to Backup and Sync your NAS is a good thing if you’re already using Archiware P5 to backup and sync all the other things, then at least you have only one dashboard to look at. I use P5 with my clients to backup their shared storage to LTO and it makes sense to backup all the things no matter where they are with P5 also. With Synology NAS package center it’s a simple one-click install for P5. Add your P5 clients to your P5 server via Tailscale and you’ve got a secure setup.
This post is just a quick overview of using Tailscale to set up your P5 clients (which is your Synology NAS in this case).
Backing up is nice, restoring is better. Slow backups, mean slow restores. Make good decisions, and backup only the files you want to keep to the fastest storage you have.
When working with a fast fibre channel or Thunderbolt SAN your first choice for fastest backup destinations is a Thunderbolt RAID. I recommend to have this onsite with an off site LTO and/or cloud disaster recovery setup (a replicated SAN or shared storage system is nice to have too).
A built-in option to copy Xsan files is cvcp (cv stands for centravision).
cvcp is fast. Really fast. And cli commands are scriptable. A very smart person (Jasper Siegers) wrote a script called cvcpSync which combined the power of rsync and cvcp. It was awesome. But there are limits to the best of scripts. For my clients I use Archiware P5 with large SAN and other shared storage to simplify the number of things which need to be monitored. One dashboard to monitor tape or cloud backups, tape archives and sync to nearline RAIDs or NAS.
With a recently Thunderbolt SAN deployment with Accusys T-Share I set up the Accusys Gamma Carry as a backup destination. I set up Archiware P5 to do the backup. It was fast. How fast? Over 1Gb/s. Fast backups are also fast restores. With the Gamma Carry I can run a backup then carry it off site. It’s an option as part of a complete backup strategy.
Archiware P5 backup 1.6TB in 53 minutes
(Luckily I have almost 2 TB of video from my Cycliq bike cameras to test backups. Sadly, after my last bike vs car incident I felt obliged to buy bike cameras for my safety. I edit small fun rides when I can. Sometimes traffic near-accidents too. Please be kind, don’t kill cyclists.)
Archiware P5 backup of a Thunderbolt SAN to a Thunderbolt Gamma Carry RAID
Note: In my tests I tested backup to a nearline RAID. I also like to use tape drives. LTO tape is another recommended option for backups or archives. Cloud or other offsite replication is also recommended if possible but is the slowest of all the options. Good to have slow and fast options, offsite and on premise, though any practical solution should be affordable and useful to help decision makers take the steps to preserve data and ultimately their own business.
LTO vs Cloud backup comparison: For LTO backups to one LTO7 drive I normally see 1TB in under 2 hours versus some recent cloud backups I did using rclone which took 9 hours for 1TB. Remember: restore times will equal your backup times. Want to restore 100TB? Got a spare 900 hours? 38 days for cloud restore vs 8 days with one LTO7 drive (much faster if you have more than one drive). Even faster if you restore from a Thunderbolt RAID. Only 2.5 days. Think about it.
Thunderbolt Xsan in a box. I’ve written about the Accusys T-share in 2020 (and in 2015 when I first found this cool tech). What’s different now? New year, new macOS. And a new challenge: can we build Xsan only using Terminal? No apps. It’s the journey that counts, right? One nerd’s journey to make an Xsan with macOS 11 Big Sur cli. Destination adventure with family fun, next stop a blinking cursor on a command line prompt.
make Xsan

make —Xsan —-bigger

reboot
Sudo make me an Xsan sandwich. I wish it were that easy! Stick around for the two or three commands you do need.
Xsan goes Terminal
Important commands for using Xsan have always been cvadmin and cvlabel (cv is short for centravision the original creators) but more recently xsanctl and slapconfig are important for creating the SAN and the OD (Open Directory) environment. Read the man pages, search the web, read some help documents. This blog is for entertainment and occasional learnings.
Lots of interesting cv (CentraVision) and sn (StorNext) commands in macOS (this list is from 10.15 Catalina). Besides binaries, what else is there? Examples. A ton of example files:
If you don’t have a fibre channel switch and fibre channel hardware RAIDs do not worry. You can build a useful Thunderbolt based Xsan with a little bit of effort. Just a little bit of peril It’s not too perilous, don’t worry.
Apple includes Xsan for free in macOS. Xsan is Apple’s fork Quantum’s StorNext SAN software. Want large fast storage made for Final Cut Pro editors, just add Xsan. Download Server.app from the Mac App Store and make your Xsan. Easy peasey. Right?
Why? Why are we doing this? Nothing beats fibre channel or Thunderbolt SAN speed for editing. Network attached storage (NAS) at 1GbE is barely usable. NAS at 10GbE is much better but still has road blocks for editors. Fibre channel or Thunderbolt with a big enough raid behind your SAN then life is great. Xsan can be shared by a small or media sized team of editors, producers and assistants.
Oh, ok. There is one problem. Apple did a major upgrade of Xsan (now version 7!) in macOS 11 Big Sur but apparently they took out the Xsan config in Server.app. (Note: This is what I was told early on and what seemed to be confirmed by Apple’s recent Xsan cli guide. It turns out that Xsan’s disappearance in Server.app to not be totally correct). Xsan is there in Server.app if you upgrade to macOS Big Sur but when you install Server on a clean macOS there is no Xsan visible in the app. Hmm. What do we do? Apple published a very nice handy guide about how to build Xsan in Terminal. So let’s get started. This is fun.
Accusys T-Share is a Thunderbolt SAN. Connect Macs with Thunderbolt cable.
What do we need? 1) Hardware raid. Ok check I have an Accusys T-Share. It’s a raid with Thunderbolt switch built in. 2) Mac. Ok I have a Mac Mini. 3) A network. Some cables, a switch and a DNS server. Ok I have a new raspberry Pi. That’s perfect.
Raspberry Pi 400 (the amazing linux computer shaped like a keyboard).
Step 1. Hardware raid. With the Accusys T-Share I just have to plug in some clients with a Thunderbolt 3 cable. Let’s fill the RAID with drives. I picked two different sizes. One group of larger disks for a data LUN (main production storage) and two smaller disks for a raid mirror to be used as metadata storage.
Step 2. A Mac running macOS Big Sur 11.5.2. Download the Accusys Mac installer on your Intel Mac (M1 is not supported with the T-Share yet as of this blog post).
Step 3. The network. Ok. This is the fun part. Let’s set up a DNS server. Ok, how do we do that? Remember that raspberry Pi you bought yourself for Christmas but never opened because you have been so busy and well you know life. Ok just me? Well, that one. Let’s use a raspberry Pi. A small inexpensive Linux computer. Install dns masq. It’s perfect for this.
The raid. Not only a great movie it’s the central part of this production media network for creatives. Once the drives are in the raid we have to make raid sets which become LUNs for Xsan. RAID5/6 for the data LUN and RAID1 (mirror) for the metadata LUN.
Read the label. Using Xsan cvlabel
Normally after we create RAID sets in the hardware raid utility we would open up Server.app and label the LUNs for Xsan use. But since we are now hardcore SAN architects we can use Terminal and the cvlabel the command to do this the hard way. Well, it’s not that hard but it can be intimidating the first few times. It’s much easier to label new LUNs than stare at a broken production SAN that has lost its labels. StorNext fun times. More about in another blog post.
Whether using Server.app in the good old days or cvlabel to label your LUNs now you should all be familiar with the command to list available LUNs. For larger SANs that won’t mount the first thing I’d check is see if the LUNs are all there. You don’t want a SAN to mount if it’s missing an important piece of itself.
cvlabel -l
This command lists available LUNs. It’s handy to know. Do this before trouble arises and you will be a cool dude when trouble happens. It does that occasionally. Prepare for the worst, hope for the best, IT motto.
To create labels for newly created RAID arrays use cvlabel to output a text file of the unlabelled LUNs, make some minor changes then label those LUNs. Create the template files first:
cvlabel -c
Edit the file. I like nano. Maybe you like vim. Or BBEdit. Or text edit. Change the name of LUNs from CVFS_unknown to whatever you like. I like to name LUNs based on the hardware they originate from so that I can find them, remove them, fix them or whatever I need to do for troubleshooting. Trust me. It’s a good idea.
cvlabel ~/Desktop/cvlabel
*WARNING* This program will over-write volume labels on the devices specified in the file "/Users/xavier/Desktop/cvlabel". After execution, the devices will only be usable by the Xsan. You will have to re-partition the devices to use them on a different file system.
Do you want to proceed? (Y / N) ->
Requesting disk rescan .
Congratulations this is the hardest part. You’ve labeled the RAID arrays as usable LUNs for Xsan. Ok, just kidding that’s not the hardest part. Have you ever heard of Open Directory? Do you fear LDAP and DNS? Well, maybe you should. It’s always DNS. Just saying.
DNS (domain name system) is just a fancy word for a list of IP addresses and host names. Using the raspberry Pi with dns masq installed we can populate the list of hosts for the Xsan and then we are golden. Hopefully if we did it right. Turns out we can make mistakes here too. Don’t use “.local” domain names. I did. It was late. I blame being tired. Changing them to “.lan” worked better.
Next up we finally create an Xsan in terminal. Or do we? let’s check the hostname first. It’s always DNS.
scutil —get HostName

CrazyMac.local

scutil --set HostName XsanMac.lan.
And now we make very big Xsan using the Xsan guide example
It was at this point that it started falling apart. It was late. I had messed up my DNS with “.local” and the Xsan wouldn’t go past this basic OD setup. I did what I always do and reach out to my Xsan colleagues and I got some curious feedback. “What do you mean Xsan isn’t in macOS Big Sur Server.app?” Hmm. I don’t see it on a fresh install. On an upgrade from 10.15 Catalina I do. So, uh, Where is it? And then it was revealed. In the View menu. Advanced. Ugh. It’s right there. Almost staring right at me. When I opened the app it said it couldn’t create an Xsan with my “.local”. That was helpful. Fixed that and Xsan with my pre-labeled LUNs was super quick to set up.
Xsan configuration in Server.app. “Ignore ownership” is the best thing ever for creatives. Trust me,
I’ll have to play with the cli set up again soon. Because there were some strange formatting it recommended to me when I tried some variations of the xsanctl createSan. I’ll dig into another day when I have more sleep. Ha ha.
There’s a lot of useful commands in macOS Big Sur Xsan which was upgraded to v7. You can check which version of Xsan you have in macOS with the cvversions command.
In Catalina (macOS 10.15.7)
File System Server:
  Server  Revision 5.3.1 Build 589[63493] Branch Head BuildId D
   Built for Darwin 19.0 x86_64
   Created on Tue Jun 22 21:08:03 PDT 2021
   Built in /AppleInternal/BuildRoot/Library/Caches/com.apple.xbs/Sources/XsanFS/XsanFS-630.120.1/buildinfo
In Big Sur (macOS 11.5.2)
File System Server:
  Server  Revision 7.0.1 Build 589[96634] Branch Head BuildId D
   Built for Darwin 20.0 x86_64
   Created on Wed Jun 23 00:32:35 PDT 2021
   Built in /System/Volumes/Data/SWE/macOS/BuildRoots/d7e177bcf5/Library/Caches/com.apple.xbs/Sources/XsanFS/XsanFS-678.120.3/buildinfo
There’s a lot of cool new binaries in Xsan v7. We will dig into those next post. For now enjoy this and go forth make some Xsan volumes with Thunderbolt or fibre channel storage. It’s fun.
I am so happy to install macOS Big Sur 11.5.1, now that it is a ready for production. Have fun with macOS Monterey those of you on the bleeding edge. For media professionals using Xsan in production storage environments August is a great month to update to the soon to be yesterday’s bad boy Mr. Big Sur.
Server.app v.5.10 in macOS Catalina 10.15.7
Upgrading to a new major version of macOS can be fraught with peril for a fleet of mac devices but it is potentially fatal for a production SAN environment. That is why we wait. We want a nice stable storage system for our Final Cut Pro editors and other media creatives so it is safe to be one version behind. Less drama that way. We prefer our dramas to be on AppleTV+
Watch TV Upgrade Xsan
It is not boring to watch AppleTV+ while upgrading Xsan
The Xsan upgrade to Big Sur was pretty much not exciting except for one funny roadblock that I had set up myself last as a kind of booby trap for “future me”. More about that later. First the boring stuff. The last few weeks have been very busy updating and re-writing documentation in Pages.app and running multiple redundant full and incremental LTO backups with Archiware P5, syncing to nearline archives, and archiving finalized projects to the LTO shelf in paradise (sounds more exciting when you put it that way don’t you think?). Updating and re-writing documentation can sound like a waste of time but “future you” will appreciate what “past you” was doing today. And today I had fun updating Xsan to macOS Big Sur. Now I must write down all my thoughts before I each too much vegan vanilla ice cream and slip into a food coma.
“Planning for disasters, while hoping for none” is the IT mantra. We planned hard and we were ready to restore Xsan from Time Machine, if we had to. Not a joke. The server is backed up by Time Machine. The data is backed up to LTO, nearline archives racked and stacked in a server room and on redundant thunderbolt RAIDs which are parked on electric trucks ready to blast off at the earliest sign of danger. Well, everything except for the last part. Would be nice. And cloud backups for those clients that want them. Plan for the worst, pay for what you can to keep your business operational and lessen the impact of mechanical failures, human oopsies, or ransomware. Sysadmins are indistinguishable from malware sometimes, but we mean well. More seriously, humans makes mistakes and break things (that, me!) but ransomware is real and my elaborate backup and archive planning has saved a few customers this year.
Xsan volumes are typically made of up fibre channel RAID arrays. Nice icon!
Preparation is key. Be prepared. Get ready. Psych yourself up. I used Greg Neagle’s installinstallmacos.py to download macOS Big Sur as a disk image and had that and the App Store’s Server.app downloaded beforehand and not be dependent on internet access (production SANs are not always internet accessible). It is both true and not true that you can setup Xsan in Big Sur with the Server.app. It is true you need the Server.app for an upgrade from macOS Catalina 10.15.7 but if you’re starting from scratch in macOS 11 you will be building your Xsan in Terminal. Have fun! (We will cover this in a future post).
Download macOS Big Sur and the Server.app. Keep old copies zipped up. Cvlabel is nice too
Server.app manages only three (3) services for an Xsan upgrade: Profile Manager, Open Directory and Xsan. In macOS Big Sur new setups of Server.app Xsan is gone. Why they haven’t taken out Profile Manager and not kept Xsan instead made me scratch my head. No one in their right mind is using Profile Manager to install or manage profiles, they’re using commercial MDM vendors. But Xsan in macOS Big Sur (11) is not only production ready storage SAN awesome it has been upgraded to be compatible with Quantum’s Stornext 7 (previously it was only v.5)
Profile Manager does not belong here. Long Live Xsan!!
Installing macOS 11 Big Sur and upgrading Xsan to v7 is compatible (in my testing) with macOS 10.14 Mojave, 10.15 Catalina and of course macOS 11 Big Sur. If you don’t believe me check out this not updated in forever Apple’s compatibility chart.
Ok, by this time you get the idea I’m an expert, right? I’m ready to upgrade. But I run into my first real road block. And I have only myself to blame. I can’t launch the macOS Big Sur install app. It is blocked. “Contact your administrator”?! I am the sysadmin. Oh, ok. That’s me. What have I done now? I installed Hannes Juutilainen’s Big Sur Blocker last year, that’s what.
Of course I installed that. With Munki. On all my Mac clients that were upgraded to macOS Catalina. (And of course my Xsan controller has Munki!). But no worries, let me read up on my last year’s blogpost about it to figure out how I installed it, there must be a launch daemon or something.
this is not how I expected it to go
Hmm, no didn’t mention there. And where is that pesky launch daemon that I can unload and get to this Big Sur install. Oh? It’s a launch agent. Unloaded. Hmm, still no. Ok, delete the app from /usr/local/bin, hmm, nope. ok kill the app process. Ok, now we can install macOS Big Sur. Sorry for the delay. I had told Munki to uninstall the bigsurblocker app and it did for every other Mac, I swear, really. It did.
Please proceed with the macOS Big Sur install
So ready for macOS Big Sur. Oh wait, we noticed that you’re running Server.app and well, we don’t do a lot of the same things anymore in the new Server.app so maybe this is a warning.
Warning. We noticed that you’re running Server.app and we don’t do those fun things anymore.
So a lot of progress bars and stuff. See my last upgrade blog post and it’s the same as installing macOS Big Sur on any Mac, except this Mac Mini is running an Xsan production SAN environment with a lot of RAID arrays in a server rack or two. Ok, yeah, just run the installer.
We noticed that Server app is no longer server app.
After macOS Big Sur is installed zip up your older server.app and drag in your new one (or use that fancy App Store app to do it for you if you’re lazy). Click a bunch of buttons (see all my old blog posts) and launch the new Server.app.
Profile Manager is updating. No one cares.
So we have to wait while the bag of scripts that is Profile Manager gets updated but no one uses it but it’s the most important app in Server.app now, no I am not bitter why do you ask. Xsan is awesome.
Time to restore from your old Xsan configuration. Wheee…..
Xsan restore configuration.
Activate your Xsan and carry on upgrading all your Mac clients. Note: I did test macOS Mojave 10.14, macOS 10.15 Catalina and of course macOS 11.5.1 Big Sur Xsan clients. All worked.
Xsan on. Power up.
Upgrading Xsan with macOS Big Sur is easy if you’re going from macOS Catalina. Starting from scratch is another story to be covered in another blog post. Also not covered is certificate issues from self-signed certs breaking when I upgraded my Munki and MunkiReport server. That’s definitely another blog post. It’s just a webserver. Just. A. Web. Server. What is so hard? haha
Technical Errata:
With more than one Xsan controller it used to be recommended to upgrade the secondary before the primary but it is now best practise to upgrade the primary first to maintain the sanity of the OD data.
Xsan Upgrade Step by Step:
Clone the controllers. (+ Time Machine backups) Turn off the clients. Stop the Xsan Volume. Run cvfsck on the volume. **Upgrade the primary. Confirm the secondary can see the primary. *Upgrade the secondary. Confirm the secondary can see the primary. Check SAN access on both controllers.
Apple’s Final Cut Pro has a new proxy workflow. It’s even easier than before. Make proxies on import, or transcode afterwards. Create a new proxy library or copy events with only proxies, so many options to fit the workflow you need. It’s quick to upload smaller proxies to the cloud and work remotely with your team. Re-connect to the original footage for outputs, colour grading and archiving your project when you’re done.
Final Cut Pro and the Proxy Workflow
“Take your creativity anywhere. Maximize portability and performance by creating proxy copies of your media — as low as 1/8 size — in ProRes Proxy or H.264. The latest proxy engine allows you to create a proxy-only copy of your library to share locally or via the cloud and displays original media if proxies aren’t available. Third party tools such as review and approval app frame.io can also generate and deliver proxies to a Final Cut Pro library.” (Apple.com)
I’ve written about another kind of proxy workflow before, but we will refer to that as the replace-originals-with-smaller-versions workflow and now we have the built-in easy proxy workflow. This new way is much easier. And it’s built-in.
I’ll go over the basic workflow for making proxies and getting your library ready for use with Postlab or other similar cloud collaboration tools…. Seriously, there are no other similar tools! But we’ll go over how to keep your library small and light.
Part One – Final Cut Pro
Final Cut Pro 10.5 is the newest version of Final Cut Pro (which drops the “X”). Ready for Apple Silicon Macs and backwards compatible with macOS 10.15.6 (Catalina).
This new proxy workflow is compatible with Final Cut Pro X v10.4.9 and 10.4.10 as well the newest version 10.5. There were extra bug fixes (LUT for proxies) and new methods (copy new library with proxies) in 10.5 but the addition of the automatic proxy creation on import started with 10.4.9.
Final Cut Pro version 10.5
Import Preferences
First step. Check your import preferences. Final Cut will refer to these when importing. The most important thing to check is that “leave files in place” is selected. This helps us keep the library light and portable. Especially important for editing with Final Cut Pro and Postlab. Keep all media and cache files outside of the library. The second this to check is to choose your proxy format (Pro Res Proxy or H264) at the size you want.
Final Cut Pro Import preferences window.
Choose how small or how large you want your proxies to be. Smaller proxies are faster to transfer and take up less storage but may not be ideal for editing your specific camera footage. Try to find a format that works best for your edit workflow.
Final Cut Pro – Proxy Frame sizes
You also have the option of creating proxies form footage that exists already in the library. Choose “Transcode Media” and select your options.
Final Cut Pro – Transcode Media (menu option)
Part Deux – Editing in the Cloud with Postlab
Once you launch Postlab and login you’ll want to create a production and a library to edit. You have the option of importing an existing library or create a new one. Remember, only import your library if it is super light weight and the media is stored outside (not inside) the library.
Importing a lightweight Final Cut Pro library involves creating a name, writing a description and choosing the media location. If editing off centrally shared storage (on premise) or in the cloud (i.e. Postlab drive) then use “Shared” option. If everyone is using their own storage (external hard drives, NAS, SAN, etc) then choose “Individual”.
If you are creating a new empty library in Postlab then be sure to check the Postlab preferences – Templates tab to select what version of Final Cut Pro for the default empty library and if you want to use a Final Cut Pro template you’ve created already. This is a powerful option for keeping a team working with standard set of tools.
Postlab Template Preferences
Now we start editing. Click “Start Editing” in Postlab. Final Cut Pro will open with your new library.
When you’ve made changes and want to check your Final Cut Pro project back into Postlab switch applications back to Postlab from Final Cut Pro and add a comment.
Postlab check-in (write a comment and upload your work)
Once you’ve checked your project in a few times you’ll notice the list of comments you or your team have made with each check in. These will help you decide what project to revert to, if you need to. The icons (on the right) will allow you to revert, open a copy or export out the version you select.
Postlab – List of comments
Lastly, there is the status menu which you can use to mark the progress of the project.
I hope this helps you get started with the Final Cut Proxy workflow and ready to use Postlab too.