Notarize it!

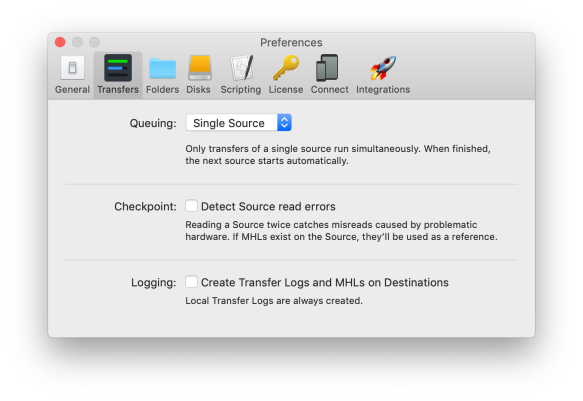
Apple’s notarization service allows Apple to verify apps distributed outside of the App Store system. If you make your own apps to distribute to customers, clients, family or friends then you will have to notarize them by submitting them to Apple. This avoids painful dialog boxes in macOS 10.15 Catalina that prevent your app from launching by default.
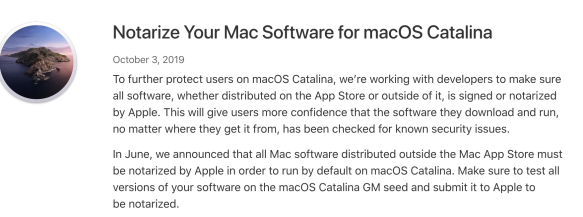
NotarizeYourApps-Apple-Oct2019

Notarization The Hard Way

I’d been putting off notarizing my apps created for my clients for three reasons,

1)  it isn’t a strict necessity because most users are on macOS 10.14 Mojave,

2) I use Munki to distribute and install software which bypasses the requirements, and

3) I’m lazy

But it is only a matter of time before this would be a strict requirement and necessity. Also the relaxed requirements for notarization of apps was about to change again in February 2020 and I said this is the moment to do something. What now? Check with Rich Trouton and his blog Der Flounder.

codesign –force –options runtime –deep –sign “Developer ID Application: Name (#H7373736)” “/Applications/Cool-App.app/”

Rich Trouton is the modern major general of documentation and a super awesome dude. His blog Der Flounder has documented this process and now it was time to revisit this. Step by step recipes well explained with comments. What’s not to love?! Well, I didn’t get far because I missed some ingredients. Signing the app failed. I couldn’t notarize it without signing it. Hmm…

error: The specified item could not be found in the keychain.

It didn’t work the hard way, so let’s try it another way.

Notarization Made Easy

A very awesome app from Late Night Software called SD Notary can help make this process go smoothly. Their app detects if you have the right cert to run this process. Something which I thought I had, but did not.

Certificates, Identifiers & Profiles

It’s no accident I got tripped up in the same place with the cli and with the SD Notary app to notarize my app. I was missing the correct certificate. When I tried to codesign as a first step that’s when I got an error that I puzzled over for a minute.

The SD Notary app stopped me also at the first step because it said it couldn’t find a Developer Signing ID. And that with the command line error finally made me realize I’d missed something. And here I thought creating the app specific password was the hard part. (It wasn’t hard, but you have to look in the right place!).

A quick run back to the Apple developer site and a trip to the “certs identifier and profiles” section to create a new “Developer ID Application” cert (I had the installer one previously) solved that. I also had some trouble creating an app specific password, mostly because I was looking in the wrong place (in my dev account, not my apple ID account) but that got sorted.
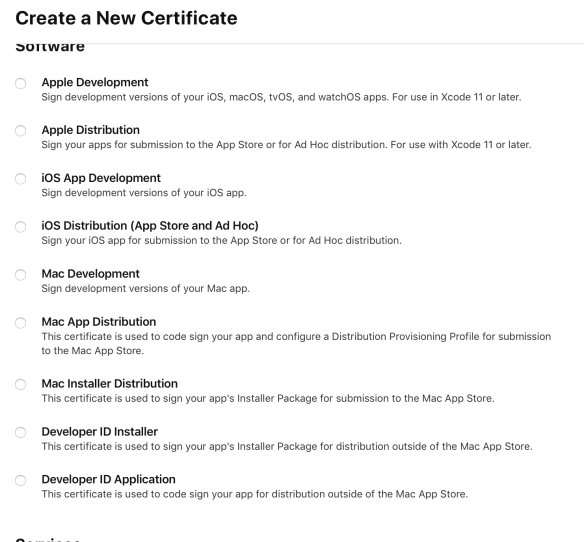
Notarize-Apple-CreateNewCertificate

The “Developer ID Application” is what I needed.. Of course to get this I need to generate a cert signing request. There’s always a few steps. But once these are done then you’re good to go.

Once the proper Application type cert is in place, and the app specific password then you’re able to notarize via cli or an app like SD Notary. I tested this in Terminal:

xcrun altool --notarize-app --primary-bundle-id "com.apple.automator.Cool-App" --username "memyself@email.com" --password "really-cool-passw0rd" --file "/Applications/Cool-App.app.zip" 

No errors uploading '/Applications/Cool-App.app.zip'.
RequestUUID = 12345f-567e-476f-a229-6789cef906b

And in less than 3 minutes I received an email declaring it done. “Your Mac software was successfully notarized.

Then I went back to SD Notary and tried again. It was also successful and after selecting the app the entire process of signing, zipping, submitting to Apple, then stapling was done seamlessly.

SDNotary-Stapling

Hope that makes sense to someone. And the next time I notarize an app I will be able to do it seamlessly thanks to the help of everyone who has provided documentation and cool apps. Cheers.

References:

SD Notary app — Notarizing made easy

Rich Trouton’s Der Flounder blog

Apple dev docs

Howard Oakley’s Eclectic blog

FCP7 to FCPX

If you used classic Final Cut Pro 7 for years then eventually moved to FCPX now what do you do when you want to restore an old project? Read on…

FCP7 to FCPX

In the beginning we set up an older iMac that had been sitting around and already had macOS 10.12 and Final Cut Pro 7 (and even an early version of FCPX). We used this iMac to open up old FCP7 projects from our projects archive which were restored from LTO tape archive created by Archiware P5.

This process of restoring from tape archive back to the SAN then copying to an external drive to attach to this older iMac to convert worked but was cumbersome and not convenient. Opening old projects in FCP7 and then exporting out the XML was easy. Using SendToX to convert to FCPX XML was also easy. But getting the project to this old Mac off the main network was a drag.

Retroactive app

Use Retroactive app to install Final Cut Pro 7

Then one day I heard of this project that allowed to install iTunes on macOS 10.15 (Catalina) which only had the new Music app. Weird flex, but OK. Reading further it also allowed FCP7 to be installed on macOS 10.14 (Mojave)! Now this was a useful revelation. The app is called Retroactive and it would be very useful to us. Now FCP7 could be installed on the same Mac as FCPX. It would then have access to the network and the SAN where do all our editing and where we restore archive from LTO archive. Awesome.

The best part was that we moved from a dedicated old iMac running macOS 10.12 to a newer iMac Pro with macOS 10.14 on the Xsan and can run FCP7 thanks to that new app that makes it work. And then FCP7 to XML to sendtoX to FCPX is not too bad.

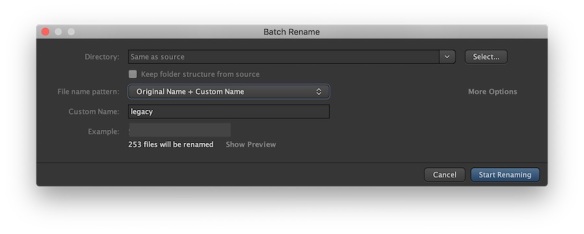
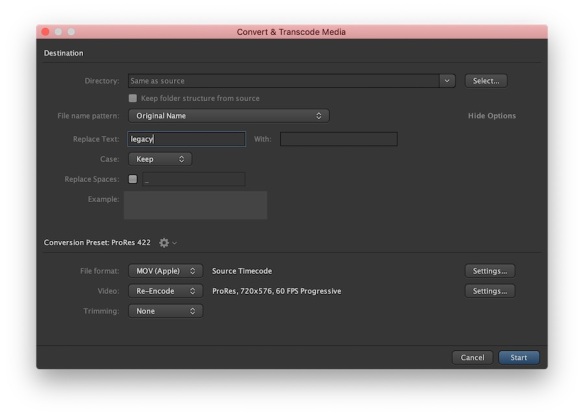
We also used Kyno to drill down into all the restored projects to identify en masse all the restored footage that it incompatible with FCPX. Renamed and then reconverted. All is well again for now. Archive restored, FCP7 projects converted to FCPX. Yeah, happy times.

Kyno batch rename dialog box

Kyno batch rename

Kyno FCPX incompatible files reanaming converting

Kyno convert and transcode

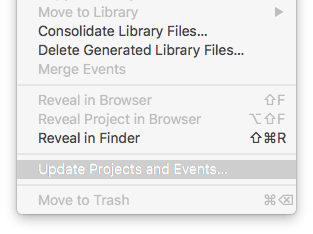
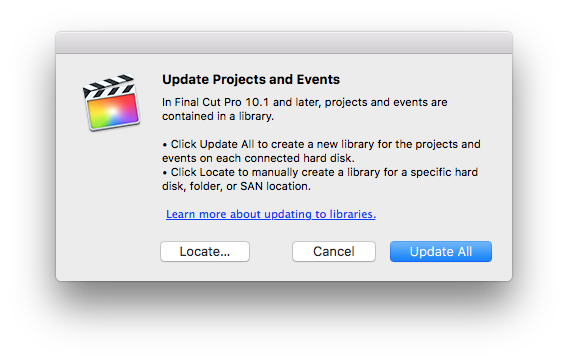
We had one minor snag in the process. Some of the restored projects didn’t use FCP7 they used early versions of FCPX with their events and projects folders separated (not the current library structure). Latest version of FCPX 10.4 did not know what to do with these projects that were also some times stored on sparse disk images (oh how the Xsan did not like these projects at the time). There was a menu for a while to convert these projects but it was now gone. What to do?

Back to the old iMac and we used FCPX 10.2.3 to convert these projects from 10.0 version to 10.2.3 library which can then be converted to the latest FCPX 10.4 format. Almost easier to convert FCP7 to FCPX in one shot but it worked and we were happily editing old projects in the latest version of FCPX.

fcpx 10.2.3 dialog box to update projects

fcpx 10.23. update projects and events dialog

Editing old projects in new FCPX

We have a way to restore old projects from LTO tape thanks to Archiware P5, a way to identify, rename and bulk convert old footage in an easy fashion thanks to Kyno and now also a way to convert FCP7 with SendToX and Retroactive to make it more seamless.

Hope this helps anyone else if want to do the same thing good luck.

Automate those apps. Get some robot love 🤖 ❤️!

If only one person needs an application then I think about using Munki to deploy that app. If more than one person should have it then Munki is definitely the way to automate app deployment. And really, if you’re going to take the time to download an app from a website, mount a disk image or un-pack a ZIP archive, run an installer, type an admin password, close that installer … then for the love of all that is good just put the app into your Munki repo and be done with it. Automate it.

Using Munki to solve problems makes sense. Automation helps everyone in this case. But if you’re putting in one off applications into your Munki repo more often than you need to, you need to get those apps into Autopkg. Using Autopkg recipes to download the latest apps and put them into your Munki repo automatically is an automation love fest, but if your apps don’t have recipes what are you going to do? Manually add your apps to Munki? No way. We need a robot 🤖❤️. Recipe robot, that is.

Using Recipe Robot we can build Autopkg recipes for most apps then add the recipes to the Autopkg community to enjoy. Everyone wins.

I recently created recipes for two important apps in my media workflow: Kyno and Hedge. I’ll show an example of this workflow using Recipe Robot and Munki Admin to demonstrate the workflow.

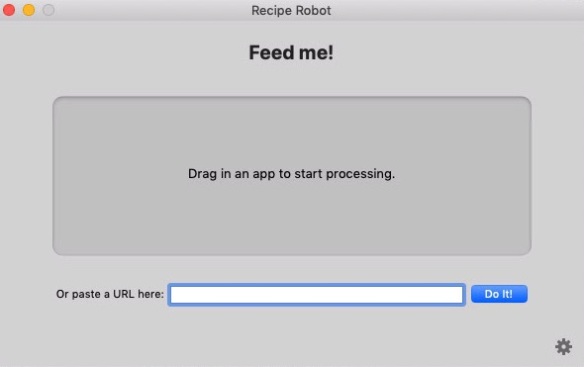
Step 1. Feed the robot.

Drag and and drop the app you want to create your Autopkg recipes.

RecipeRobot-FeedMe

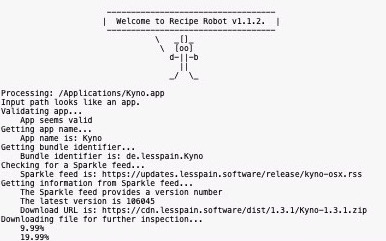
Step 2. Watch the robot do it’s work

RecipeRobot-start

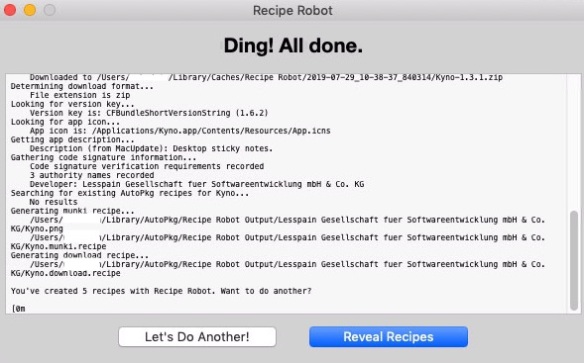
Step 3. Robot is done. Recipes made.

RecipeRobot-Done

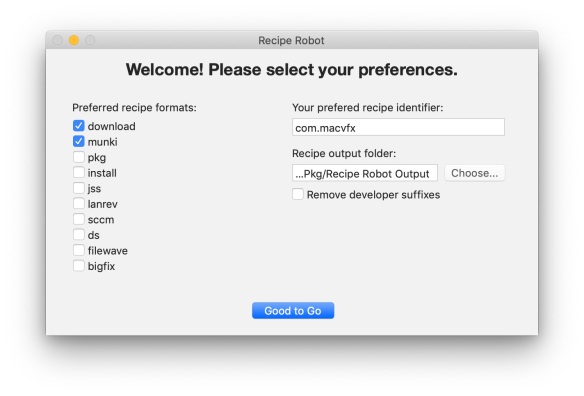
Various type of recipes can be made. I chose download and munki because those are what I am using to automate adding apps to my Munki repo. But there are other options: jss, Filewave, or “install” for example.

reciperobot-options.jpg

Step 4. Run those Recipes

You can use your recipes locally with Autopkg. Run them in Terminal or use Autopkgr , a very nice GUI app for automating the collection and scheduling of recipes. Note: Autopkg and Munki can all be run via cli (command line interface) but for this demo we are showing the GUI apps that are there provided by outstanding members of the community. Many Thanks to them and the contributors to their projects.

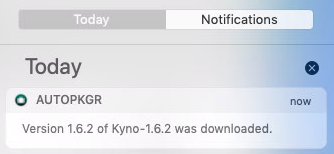
Autopkgr-notification

Autopkgr app can send notifications in macOS, emails, or post to your Slack group.

Step 5. See the recipes, Use them wisely

MunkiAdmin-Recently ChangedPKGS

Here is an example of newly imported Kyno and Hedge apps in our Munki repo (via Munki Admin GUI).

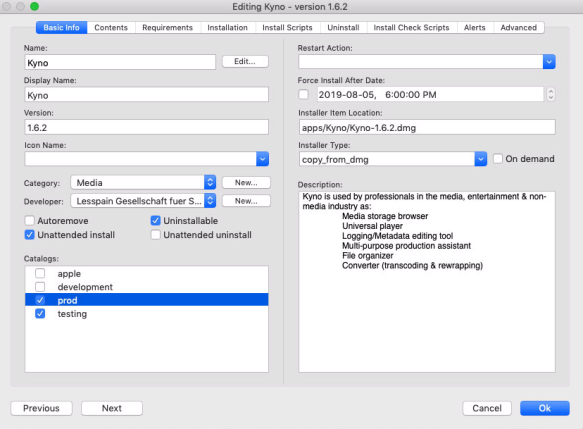
MunkiAdmin-Description

Add a display name, choose which catalogs the apps will reside in, and check that the description will help explain what the app is.

References:

Elliot Jordan – Autopkg talk at MacDevOps:YVR

https://youtu.be/Q_cvgGtJ71M

Elliot Jordan – Recipe Robot talk at MacDevOps:YVR

https://youtu.be/DgjO1mfMHtI


Compressor Tips and Tricks


Issue: Stuck job in Apple’s Compressor app.

Resolution: Remove the historical jobs in your local home folder.

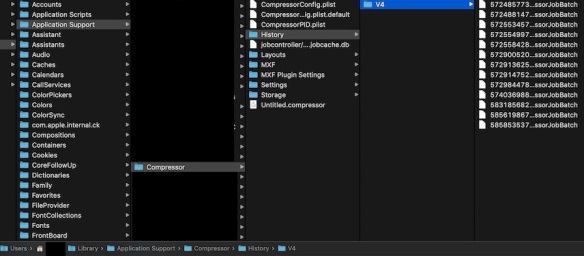
~/Library/Application Support/Compressor/History/V4

Compressor-History2

Note: to get to your home folder hold down the OPTION key and select the Go menu in the Finder.

Compressor is the best sidekick to Apple’s Final Cut Pro X and it gets used a lot. But occasionally something goes awry. It’s software running on a computer. So we troubleshoot. What looked like a stuck running job was mostly leftover evidence of an old job. The Apple support document I found didn’t mention this tip but instead talked about zipping up your settings folder which has all your custom compressor settings for things like YouTube outputs or anything custom. Didn’t seem useful to me to remove but this historical stuff, don’t need it and POOF this solved the issues. It’s not always this easy but something you just take the win and go with it.

Reference:

Resolve an issue in Compressor: Learn how to isolate, troubleshoot, and fix issues in Compressor.

https://support.apple.com/en-ca/HT203476

The case of the strange disappearing drive space

Recently I was asked to look at a 4TB drive that was only showing less than 2TB available…. No problem, I said, this is easy to fix. Famous last words.

Just open up Disk Utility and resize the partition, or reformat the disk, right? Easy Peasey. Well, it took some troubleshooting to time to figure out and a trip to Terminal was required to solve this weird case, plus I learned a new command along the way. Fun.

The Problem:

Buying a 4TB hard drive then putting it into your external drive case for backups should be simple,  but what if instead you got a nasty surprise and it showed up as less than 2TB?

Troubleshooting the issue:

4TB drives were presented to me and when I loaded them into an external SATA dock then showed as 4TB drives with a partitioned volume of less than 2TB.

I tried to delete the phantom partition, and I tried resize the volume to use the empty space in Disk Utility.app but it refused to budge. This needed a trip to Terminal.

man diskutil

Using “man” or “info” commands you can find out more about almost any particular command. Maybe some useful options or arguments would be listed or at least some examples would help.

NAME

     diskutil -- modify, verify and repair local disks

SYNOPSIS

     diskutil [quiet] verb [options]

DESCRIPTION

     diskutil manipulates the structure of local disks.  


To find out more about what we’re faced with let’s ask diskutil what it sees:

diskutil list
/dev/disk2 (external, physical):

   #:                       TYPE NAME           SIZE       IDENTIFIER

   0:      GUID_partition_scheme               *4.0 TB     disk2

   1:                    EFI                   209.7 MB   disk2s1

   2:        Apple_HFS Backup                  1.8 TB     disk2s2

Looking through the man page the “resizeVolume” command caught my eye. Also the “limits” option seemed interesting. How

diskutil resizeVolume disk2s2 limits

Resize limits for partition disk2s2 Backup:

  Current partition size on map:         1.8 TB (1801419800576 Bytes)

  Minimum (constrained by file usage):   846.4 MB (846426112 Bytes)

  Recommended minimum (if used for macOS):26.8 GB (26843545600 Bytes)

  Maximum (constrained by map space):   4.0 TB (4000442028032 Bytes)

The Answer:

Reading through the man page revealed that the best way, and new to me, was to resize the partition to use all available space with “R”. Of course, so intuitive.

sudo diskutil resizeVolume disk2s2 R

I did get some errors. But repairing the disk fixed those issues. And I was able to resize the disk in Terminal with diskutil where Disk Utility.app had failed.

sudo diskutil resizeVolume disk2s2 R

Resizing to full size (fit to fill)

Started partitioning on disk2s2 Backup

Verifying the disk

Verifying file system

Volume was successfully unmounted

Performing fsck_hfs -fn -x /dev/rdisk2s2

Checking Journaled HFS Plus volume

Checking extents overflow file

Checking catalog file

Checking multi-linked files

Checking catalog hierarchy

Checking extended attributes file

Checking volume bitmap

Checking volume information

The volume Backup appears to be OK

File system check exit code is 0

Restoring the original state found as mounted

Resizing

Modifying partition map

Growing file system

Finished partitioning on disk2s2 Backup

/dev/disk2 (external, physical):

   #:                       TYPE NAME          SIZE       IDENTIFIER

   0:      GUID_partition_scheme              *4.0 TB     disk2

   1:                        EFI             209.7 MB   disk2s1

   2:                  Apple_HFS Backup      4.0 TB     disk2s2

And lastly, the issue may have been caused by the old drive dock which refused to see the 4TB volumes even when correctly resized. A newer drive dock was required.

Zoom in on Privacy and Security

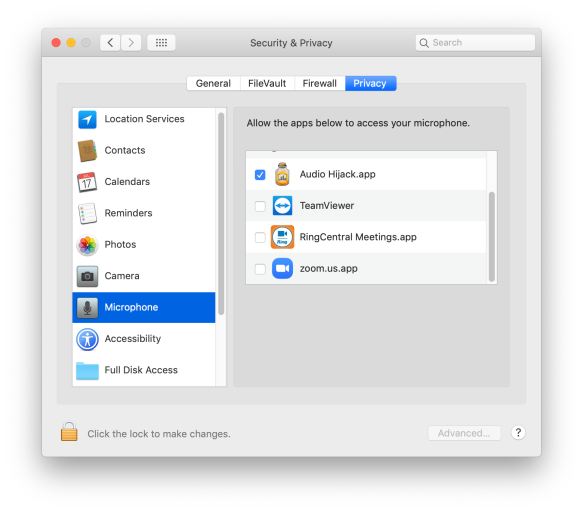
Recent attention on video conferencing app Zoom and security exploits brings attention to the various Privacy and Security settings on your Mac. Currently macOS 10.14.5 Mojave defines microphone and camera settings which should be verified periodically if they’re not being managed by MDM (mobile device management) and even in those case, just to verify.

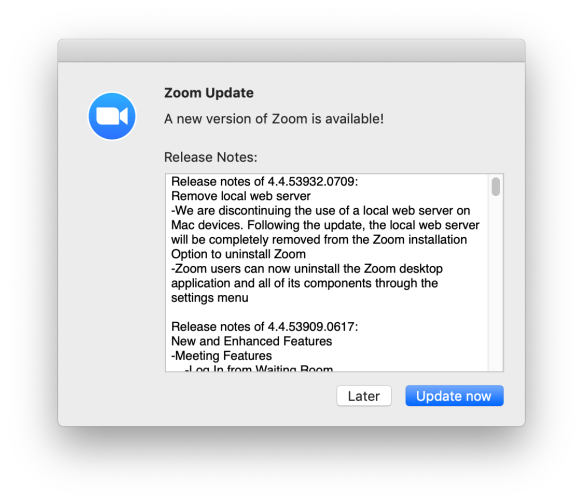
Zoom update

If you’ve ever had Zoom installed you must launch it and then update it manually, unless you have Munki or other patching solution to manage your Mac.


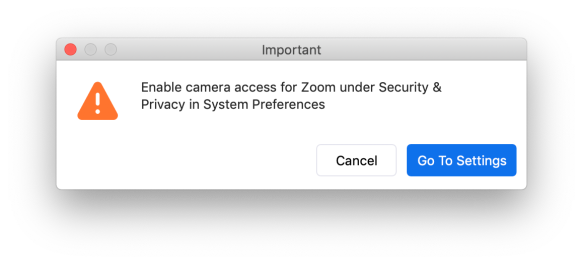
Zoom Enable camera access

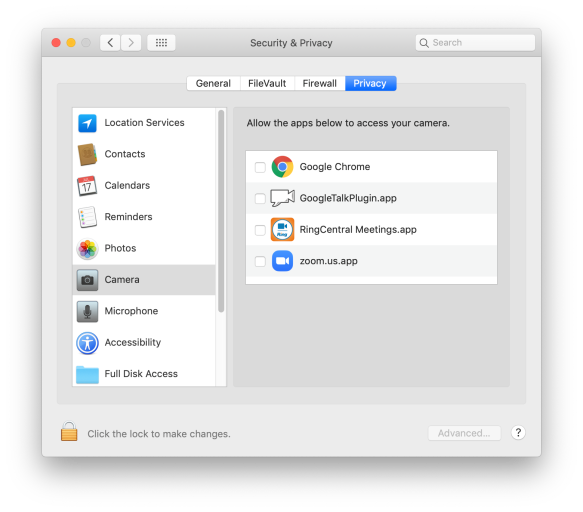
If you want Zoom to have access to your camera (useful for video conferencing) then enable it or leave it disabled until the moment you actually need it.

Privacy-Camera-OFF-Settings.pngMaybe this is a good time to review what apps have previously been granted access and disable them or not after you review the situation.
Privacy-MIC2-Settings.png

Check your microphone access as well. What apps are in your list?

Further research:

Check out Objective See’s excellent security tools such as Oversight to protect yourself from unwanted access to your camera.

Also check out this past talk at MacDevOps:YVR 2018 by Kolide’s Zach Wasserman about osquery and at the 11min mark where he talks about another app BlueJeans and how to investigate it with osquery.

The MacDevOps:YVR videos from past talks contain many security related talks as well as other awesome troubleshooting tech talks.


Use Munki to install a screensaver

Use munki-pkg to package up stuff and make your life easier when managing Macs using munki. Here is an example of installing a screensaver.

Why use munki-pkg? How else do you install stuff using munki, run scripts, and version your testing buildings all in one easy to use application? This is all possible with munki-pkg.

Munki-pkg makes package (PKG) installers, Munki likes pkg installers. Munki will also install apps, run scripts, install profiles, and do many things but packages are useful because we can put files in specific places, such as the main computer level screensaver folder, then run a script to set it as a default.

Download munki-pkg and create a working project folder.

Step 1.

Create the folders you need and place your files (payloads) in the right places.

munkipkg-payload.png

Step 2.

Create your post install script if you need one. Example: setting the screensaver you just installed as the default.

#!/bin/sh

defaults -currentHost write com.apple.screensaver moduleDict -dict moduleName Brooklyn path /System/Library/Screen\ Savers/Brooklyn.saver/ type 0


munkipkg-postinstall.png

Step 3. Build your package

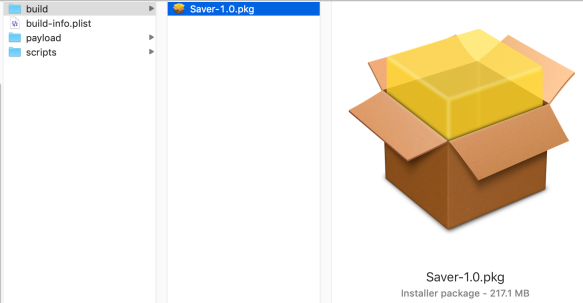
Run munki-pkg on the command line and build your package. If you make changes then version up in your build-info.plist and build again.

munkipkg-build.png


PostLab ❤️ Hedge

Great news everyone. Hedge has acquired PostLab and with this news the main developer Jasper Siegers joins the Hedge team. Great things will come of this collaboration. The brilliant idea of using version control for FCPX project sharing simplifies the whole process that has usually been left to huge media asset management systems that control data and projects. This is project sharing simplified and it’s about to get a lot more awesome with more developer time and a company to support it.

I am equally excited about Jasper coming to MacDevOps:YVR in June to talk about how and why he developed this app using GitLab and Docker and how version control for editors is useful and necessary.

Hedge is a small company in the Netherlands that makes the Hedge software to securely copy camera cards. I’ve incorporated this software with my Final Cut Pro X clients to secure their original footage on location as well as back in the office. Workflow post explains more.

I first wrote about PostLab last year

Some recent articles published about the news:

Fcp.co

Hedge announcement

Automate it! Hedge API example apps

Quick post to talk about some fun I’ve been having with the new Hedge API.

Background: Hedge is an awesome app for securely copying Camera Cards to multiple destinations to ensure data integrity and safety of the original footage. Hedge is one part of a workflow I build for my clients. Hedge is the first step in ensuring an easy and convenient transition from the cameras to the SAN to the tape archive powered by Archiware P5.

TL;DR

Using AppleScript and Automator I have built some apps to quickly set the file naming and data integrity preferences as we want them to be.  And also quickly change them to something else depending on the needed workflow.

API or Clickety click click

Copying camera cards copies is what we use Hedge for. Certain preferences like logs or receipts are great to have to ensure the copy succeeded. Also file naming conventions are good to have. Set and forget, right? But what if you did forget? Or if you’re new and don’t know the convention or you don’t read documentation. What do we do? One way to solve this is build an app that launches Hedge and sets the correct preferences. And if we want to copy USB sticks or something else then we can launch another app that prepares Hedge with a different set of preferences.  For extra points we just ask the user what they want with a nice dialog box and just do that.

hedge

Automator

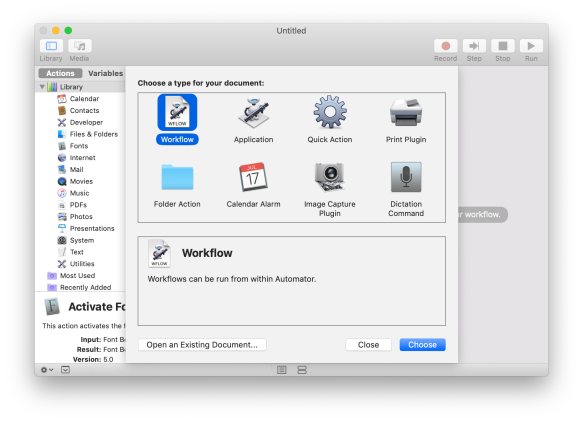
Automator is awesome. Create workflows, apps, or services amongst many other things. For more info on Automator check out Apple’s official docs or this unofficial website of resources.

Automator.png

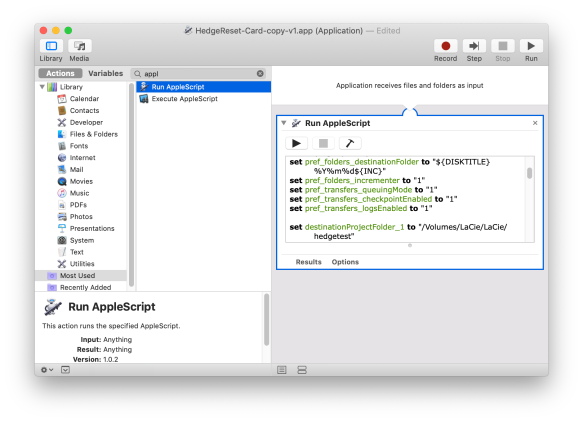
For this quick testing I used two AppleScripts with different preferences and settings defined. One for camera card copying and another for USB sticks that need different preferences set. The fancy automator app just calls the needed AppleScript. Make two apps and you have two different workflows without having to explain to users which prefs get set for what, or how the file naming should go to be consistent.

Example 1: Cam Card script (snippet)Hedge-Automator.png

Example 2: USB card copy (snippet)

Hedge-ApplesriptUSB.png


Automator can do many things. Call AppleScripts, Run shell scripts, pop-up dialog boxes etc and this is just a simple example of building single purpose apps to set Hedge via its new API. Very cool and so many possibilities.

AppleScript

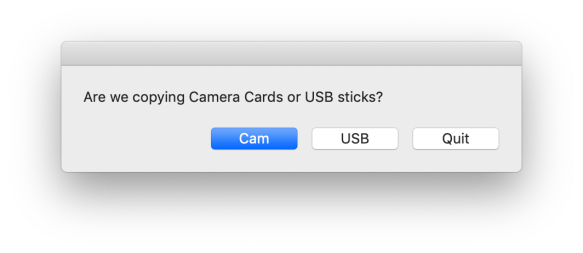
What if we could just build one app which asked the user what they wanted to do? We can do that!

AppleScript-DialogQuit.png

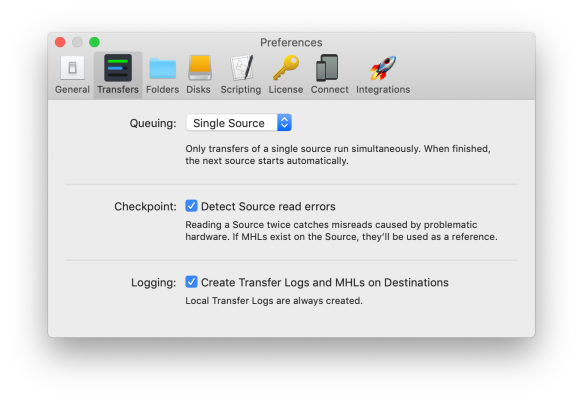
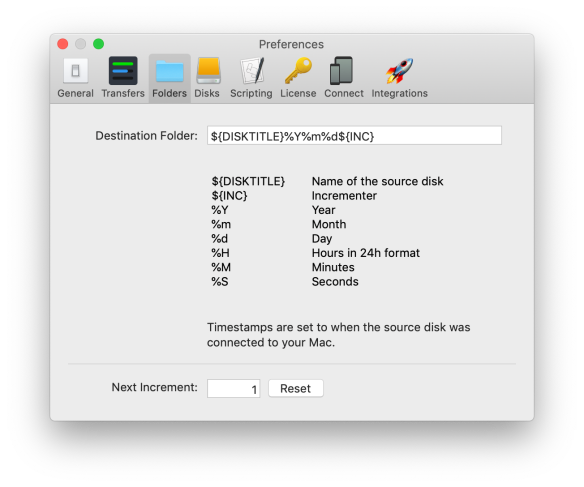
Choose “Cam” and the appropriate preferences are set and file naming conventions applied.

Hedge-CamCard-Prefs.png

Hedge-CamCard-FileNaming.png

Choose “USB” and a different set of preferences are set. Magic.

Hedge-USBCard-Prefs.png

Hedge-USBCard-FileNaming.png

How do we do this? This piece of AppleScript chains an action to a response or button choice. Run a script or choose an action. The possibilities are endless. And thanks to the Hedge API we can set preferences on or off, and set destinations or many other things. We can do them programmatically and we can ensure they are set correctly. Fun times!

Hedge-API-Script-Quit.png

AppleScript vs POSIX:

I updated my AppleScript code with the POSIX path of the scripts it wants to load. It’s a major improvement! I had packaged up my scripts and my Hedge Setup app with munkipkg then deployed through Munki but when I demoed it — nothing worked…. because the start up disk drive was named something else. The fix: set a variable to be the POSIX path (Unix path in AppleScript friendly format).

Scripting and App Building

I hope that helped. We can do a lot of the same things with Python and in my testing I was working with a script written in python3 but since that’s not shipping on Macs in the current version of macOS by default (not yet!) then AppleScript was the quickest way to get this done. This is not restricted to AppleScript. Using Automator and your favourite scripting language you can build apps for your clients, co-workers, friends and family.

A note about the Hedge API:

There are two major calls I use in my scripts “setDestination” and “setPreferences”

The “setDestination” call looks like this:

open ‘hedge://actions?json=[{“setDestination”:{“path”:”/Volumes/LaCie/Testing/Test1″}},{“token”:”1234567890123345555″}]’

Note: the token is generated for you when you have a Pro license.

The “the setPreferences” call uses plist keys.

Note: I’ll have more say about using the actual Hedge API after it is officially announced.

No NetBoot, No problem: installr and bootstrappr

It’s 2019, and NetBoot is almost dead. All new Macs have T2 chips. Sent from the future to protect us from …. ourselves? No more NetBoot, no problem!!

When NetBoot first appeared and I was able to boot entire labs of Macs across the network I was amazed and overjoyed. It was awesome. Spinning globe, spinning…

Netboot-GlobeSpin.jpg

But in the years since I’ve moved on to no-imaging. Using Munki to manage software means no more imaging, just install Munki and a small config change to point to the Munki server, thereafter the software that should be there goes on, and what’s not supposed to be there goes away. Simple. Just install one package, well, maybe two, then you’re good.

Well, what if you want to streamline or automate these things? What if these are new Macs which don’t have users configured? What if we could do all this from recovery mode? Hmm… Enter bootstrappr and installr!!

bootstrappr

This awesome project allows to add packages to install in one step while booted in recovery mode. Plug in a USB stick with the bootstrapr script to run the package install magic or mount a disk image over http. Create a DMG with the included script make_dmg.sh. And now this is the best part: in recovery mode open the Terminal app from Utilities and type:

hdiutil mount http://server/yourDMG.dmg

Then:

/Volumes/bootstrap/run

When it’s done you can Reboot the Mac and you’ll have a set up customized to your liking with Munki installed and configured with custom settings.

installr

The installr script works in the same way but adds the macOS installer to the party. You can also mount the DMG over http and re-image a Mac and then add your custom packages. It’s awesome. Truly amazing.

One note: Added packages in Installr must be in a special format. From the installr site: startosinstall requires that all additional packages be Distribution-style packages (typically built with productbuild) and not component-style packages (typically built with pkgbuild)

productbuild --package component.pkg --version x.y --identifier com.example.component distribution.pkg

In one of my first tests with installr and pycreateuserpkg I was caught up by this, even though it is properly mentioned in the read me. Packages that work in Bootstrappr or munki directly don’t necessarily work when called by the macOS installer (startoinstall). Armin Briegel was helpful in the MacAdmins Slack and reminded me of this. Thanks Armin and thanks everyone on the MacAdmins Slack.

Many Thanks to Greg Neagle for creating these tools and Munki. Looking forward to hearing him speak at the next MacDevOps:YVR conference June 12-14, 2019. Greg will be speaking about his efforts to port some parts of Munki from Python to Swift. More info on the conference and speakers here: https://mdoyvr.com/speakers/

Also a shout out to Graham Gilbert who has worked on Imagr (MDOYVR talk), over the years, an imaging and automation tool which was also an inspiration (along with bootstrappr and installr) to Tim Perfit and his MDS project.

Update: corrected the names of installr and bootstrappr in the title because… autocorrect.