Why build an app to check macOS updates?
Managing a fleet of macOS devices through SimpleMDM often requires constant vigilance over security updates, encryption status, and OS versions. What started as a practical shell script for checking device security status evolved into a full-featured native macOS application. This is the cold/flu season inspired adventure of a crazy idea that a simple shell script could become a Swift app and live in the Mac App Store.
With enough help from friends and current AI tools those fever dreams can become real. Join us on a long detailed rant from a 278-line Bash script to a modern SwiftUI app with secure credential management, intelligent caching, and a semi-decent and mostly functional user interface.
The Beginning: A Shell Script Solution
The original tool was born from a simple need: cross-reference SimpleMDM device data against the SOFA (Simple Organized Feed for Apple Software Updates) macOS security feed to identify which devices needed macOS updates. The shell script was straightforward but capable enough to export a spreadsheet for clients to review in a simple presentation:
```bash

#!/usr/bin/env bash

set -euo pipefail


# Fetch devices from SimpleMDM

# Compare against SOFA feed

# Export CSV reports

```
What the Shell Script Did Well
The shell script handled several complex tasks more or less efficiently:
1. **API Pagination**: Properly implemented cursor-based pagination for SimpleMDM’s API, handling potentially thousands of devices across multiple pages with retry logic and exponential backoff. Note: the very first version I posted didn’t do this at all, but thanks to a reminder from a helpful MacAdmin I remembered I needed to implement pagination and do it properly. Thanks!
2. **Smart Caching**: Cached both SimpleMDM device lists and SOFA feed data for 24 hours, reducing API calls and improving performance.
3. **Comprehensive Security Tracking**: Monitored FileVault encryption, System Integrity Protection (SIP), firewall status, and OS version compliance.
4. **Flexible Exports**: Generated three types of CSV reports and full JSON exports with timestamps, automatically opening them in the default applications.
5. **Version Intelligence**: Compared devices against both their current major OS version’s latest release and the maximum compatible OS version for their hardware model.
The Pain Points
However, the shell script approach had limitations:
– **API Key Management**: The API key had to be entered each time or set as an environment variable—no secure storage mechanism.
– **Single Account**: No support for managing multiple SimpleMDM accounts or environments.
– **Limited Search**: Finding specific devices required opening CSVs and using spreadsheet search.
– **No Visual Interface**: Everything was command-line based, requiring users comfortable with terminal operations.
– **Manual Execution**: I had to remember to run it periodically.
The script even had a TODO comment acknowledging its destiny:
```bash

# to do: make into a native swift/swiftUI app for macOS

# with better UX saving multiple API key entries into

# the keychain with a regular alias
“`
The Transformation: Building a Native macOS App
The decision to create a native macOS application wasn’t about abandoning what worked—it was about preserving that core functionality while addressing its limitations. And most importantly, being nerd-sniped by a colleague saying why not make it into a Swift app using current AI tools. I thought I could try it. How hard could it be? haha. What do I know about Swift, and what do I know about what is possible? Let’s see. The goal was clear: maintain 100% feature parity with the shell script while adding the convenience users expect from modern macOS software. And simplicity. I wanted a simple app to use to make all our lives easier. At least, this one part.
Architecture Decisions
The app was built using SwiftUI with a clear separation of concerns:
**AppState.swift** – The Brain
```swift

@MainActor

class AppState: ObservableObject {

    @Published var apiKeys: [APIKeyEntry] = []

    @Published var devices: [SimpleMDMDevice] = []

    @Published var sofaFeed: SOFAFeed?

    @Published var searchText = ""

    @Published var showOnlyNeedingUpdate = false

}

```
This centralized state manager coordinates all data operations, making the UI reactive and keeping business logic separate from presentation.
**KeychainManager.swift** - Secure Storage

```swift

class KeychainManager {

    func saveAPIKey(_ key: String, for alias: String) throws {

        // Store in macOS Keychain with kSecAttrAccessibleWhenUnlocked

    }

}

```
One of the shell script’s biggest weaknesses became one of the app’s strongest features. API keys are now stored securely in macOS Keychain, never exposed in plain text, and protected by the system’s security model.
**DatabaseManager.swift** - Intelligent Caching

```swift

class DatabaseManager {

    func getCachedDevices(forAPIKey alias: String) -> [SimpleMDMDevice]? {

        // Query SQLite with 24-hour cache validation

        // Indexed for fast search

    }

}

```
The file-based JSON caching from the shell script evolved into a SQLite database with indexed search capabilities. Each API key gets its own cached dataset, and the 24-hour cache duration from the original script was preserved.
**APIService.swift** - Network Layer

```swift

class APIService {

    func fetchAllDevices(apiKey: String,

                        apiKeyAlias: String,

                        forceRefresh: Bool) async throws -> [SimpleMDMDevice] {

        // Same pagination logic as shell script

        // Same retry mechanism with exponential backoff

        // Same User-Agent header pattern

    }

}
“`
The API fetching logic was ported almost line-for-line from the shell script. The same pagination handling, the same retry logic, even the same User-Agent pattern. If it worked in Bash, it works in Swift. And the User-Agent pattern came from a helpful Issue submitted in GitHub about making the shell script a better part of the SOFA ecosystem. Thanks again!
What Got Better
**Multiple API Key Support**
The single biggest improvement was supporting multiple SimpleMDM accounts. IT administrators often manage multiple clients or environments. The app now stores unlimited API keys with custom aliases:
– “Production” for your main environment
– “Testing” for sandbox testing
– “Client A“, “Client B” for MSPs managing multiple organizations
Each API key appears as a tab in the interface, with separately cached data for instant switching.
**Real-Time Search and Filtering**
The shell script required exporting to CSV and searching in a spreadsheet. The app provides instant, full-text search across all device attributes:
```swift

var filteredDevices: [SimpleMDMDevice] {

    var result = devices


    if showOnlyNeedingUpdate {

        result = result.filter { $0.needsUpdate }

    }


    if !searchText.isEmpty {

        result = result.filter { device in

            name.localizedCaseInsensitiveContains(searchText) ||

            deviceName.localizedCaseInsensitiveContains(searchText) ||

            serial.localizedCaseInsensitiveContains(searchText) ||

            // ... and more fields

        }

    }


    return result

}

```
Type a serial number, see the device instantly. Toggle “Needs Update” to focus on out-of-date machines. Sort by most columns with a click. Note: I did run into a limitation with the number of sortable columns in the Swift code, many iterations and trials and eventually I found something that worked. Yeah Swift!
**Automatic Refresh with Progress**
The shell script required manual execution. The app handles refresh automatically:
– Background refresh respects the 24-hour cache
– Progress indicators show API fetch status
– Force refresh option bypasses cache when needed
– Errors display in-app with clear messaging
What Stayed the Same (Intentionally)
Certain aspects of the shell script were functional and useful so they were copied in the app:
**Export Format Compatibility**
The CSV exports use the exact same format as the shell script:
```csv

"name","device_name","serial","os_version","latest_major_os",

"needs_update","product_name","filevault_status",

"filevault_recovery_key","sip_enabled","firewall_enabled",

"latest_compatible_os","latest_compatible_os_version","last_seen_at"

```
Users who had automated workflows processing these CSVs didn’t need to change anything.
**Output Directory Structure**
Files still export to `/Users/Shared/simpleMDM_export/` with the same naming convention:
“`
simplemdm_devices_full_2025-12-11_1430.csv
simplemdm_devices_needing_update_2025-12-11_1430.csv
simplemdm_supported_macos_models_2025-12-11_1430.csv
simplemdm_all_devices_2025-12-11_1430.json
“`
**Cache Duration**
The 24-hour cache validity period was retained. It’s a sensible balance between API rate limiting and data freshness for device management.
**SOFA Integration Logic**
The algorithm for matching devices against SOFA feed data remained identical:
1. Build a lookup table of latest OS versions by major version
2. Match each device’s hardware model against SOFA’s compatibility data
3. Determine both “latest for current major” and “latest compatible overall”
This dual-version approach is valuable for planning: devices might be current on macOS 13.x but capable of running macOS 15 or macOS 26. It’s good to know.
Technical Highlights
Security Model
The app runs fully sandboxed with carefully scoped entitlements:
```xml

<key>com.apple.security.app-sandbox</key>

<true/>

<key>com.apple.security.network.client</key>

<true/>

<key>com.apple.security.files.user-selected.read-write</key>

<true/>

```
API keys use Keychain with `kSecAttrAccessibleWhenUnlocked`, meaning they’re protected when the Mac is locked.
Data Flow
1. **Launch**: Load API key metadata from UserDefaults, actual keys from Keychain
2. **Refresh**: Check SQLite cache validity, fetch from APIs if needed
3. **Process**: Merge SimpleMDM and SOFA data using the same algorithm as the shell script
4. **Cache**: Store in SQLite with timestamp and API key association
5. **Display**: Render in SwiftUI Table with reactive filtering
Test Mode Feature
A unique addition not in the shell script: a test mode that generates dummy devices for demonstrations and screenshots:
```swift

func toggleTestMode() {

    testModeEnabled.toggle()


    if testModeEnabled {

        let demoEntry = DummyDataGenerator.createDemoAPIKeyEntry()

        apiKeys.insert(demoEntry, at: 0)


        let dummyDevices = DummyDataGenerator.generateDummyDevices(count: 15)

        // ... process with real SOFA data

    }

}

```
This allows testing the full UI without a SimpleMDM account—perfect for App Store screenshots or demos. And it turns out a requirement for the App Store review process since the alternative was giving them API keys to real data to test with, which I could not do, of course, and which brought us to generating test data. A perfect plan.
Lessons Learned
What Worked
**Preserve the Core Logic**: The shell script’s API handling, caching strategy, and data processing were good enough and worked. Porting them to Swift rather than redesigning saved time and avoided regressions.
**Prioritize Security from Day One**: Building Keychain integration first made everything else easier. API keys are sensitive, and getting that right early prevented technical debt.
**SwiftUI for Rapid UI Development**: Building the table view, settings panel, and navigation in SwiftUI was dramatically faster than AppKit would have been. But since my experience was using an app like Platypus for simple app creation using SwiftUI was definitely more flexible and possible with help from current tools.
What Was Challenging
**Async/Await Migration**: The shell script’s sequential curl calls had to become proper async Swift code with structured concurrency.
**SQLite in Swift**: While more powerful than file caching, setting up proper SQLite bindings and schema management added complexity. and app sandbox rules moved the location of the cache and added a wrinkle in testing.
**Tab-Based Multi-Account UI**: The shell script only handled one API key. Designing an intuitive interface for switching between multiple accounts required several iterations.
Performance Comparison
**Shell Script**:

- Initial fetch: ~8-12 seconds for 100 devices

- Subsequent runs (cached): ~2-3 seconds

- Search: N/A (requires opening CSV)


**Swift App**:

- Initial fetch: ~8-12 seconds for 100 devices (same API calls)

- Subsequent launches: <1 second (SQLite cache)

- Search: Real-time (indexed database queries)

- Switching API keys: Instant (cached data)
The Result
The final application preserves everything that made the shell script valuable while transforming the user experience:
– **Same data, better access**: All the security metrics, none of the manual CSV searching
– **Same exports, more secure**: Identical CSV format, Keychain-protected credentials
– **Same caching, faster searches**: 24-hour cache retained, SQLite indexed queries added
– **One account to many**: Support for unlimited SimpleMDM accounts. Good for testing.
– **Terminal to GUI**: From command-line to native macOS interface
The app isn’t just a shell script wrapped in a window—it’s a giant leap into Swift app production which challenged me enormously for troubleshooting and app testing. This app is a small step in the code adventures that await us all when we want to take an idea, from shell code to Mac app.
Future Enhancements
While the current version achieves feature parity and then some, there’s room to grow:
– **Scheduled Auto-Refresh**: Background fetching on a schedule
– **Push Notifications**: Alerts when devices fall out of compliance
– **Export Automation**: Scheduled exports to specific directories
– **Custom Filters**: Save filter configurations for different report types
– **Device Groups**: Tag and organize devices into custom categories
– **Trend Analysis**: Historical tracking of fleet compliance over time
This is not the end
The journey from shell script to native app demonstrates that nerd-sniping does work and we can be pushed to try new things. The shell script’s core logic—its API handling, caching strategy, and data processing—was already ok, somewhat decent, and at least functional. The leap to all Swift was about making that functionality more accessible, more secure, while making testing and troubleshooting more difficult and confusing, but also a valuable learning opportunity. Xcode 26.1 has some basic code fixing abilities that we tested many times. It helped!
For IT administrators managing Mac fleets, the app delivers what the script did (device security monitoring and reporting) with what the script couldn’t (multi-account support, instant search, secure credential storage, and a native interface).
The script’s final TODO comment has been fulfilled:
```bash

# to do: make into a native swift/swiftUI app for macOS

# with better UX saving multiple API key entries into

# the keychain with a regular alias

```
✅ Done.
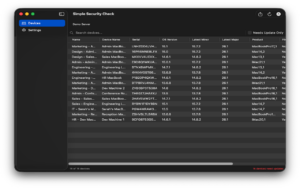
**Simple Security Check** is available for macOS 15.0 (Sequoia) and later from the Mac App Store. The original bash source code and architecture documentation can be found in the project GitHub repository.
*Built with SwiftUI, powered by the same bad logic that served IT admins well in its shell script form, now with the wild woodland scent of a native macOS application.*


