Friends don’t let friends install macOS High Sierra in production. Don’t get High, Sierra.
macOS 10.13 was released on Sep 25, 2017, and almost two months later with only one point release update, it’s still too new for production. Download it on a test machine or two or more, test it with your apps and systems, file bug reports and radars, but for the love of all that is Python and Monty! don’t run it on your production Xsan. Well, at least not yet. Wait until next year. Or as long as you can. Or until the new iMac Pro is released with 10.13 pre-installed or wait until they ship the new Final Cut Pro X 10.4 that may or may not require macOS High Sierra.
With that out of the way, I’ve just upgraded the production Xsan to … macOS Sierra. Yes, macOS 10.12.6 is stable and it’s a good time to install last year’s macOS release. Time to say good bye to macOS el Capitan 10.11.6, we hardly knew ya. Besides guaranteed security updates, stability and the annoying newness of a changed macOS, what else is there? In Xsan v5 they introduced a new “ignore permissions” checkbox for your Xsan volumes. Looking forward to that feature in production. No more Munki onDemand nopkg scripts to run chmod. No more tech support requests for folders, files, FCP X projects that won’t open because someone else used it, owns it, touched it. We’ll see how that pans out. I’ll let you know.
Upgrading Xsan to v5
Step 1. Back up your data
You’re doing this, right? I’m using Archiware P5 Backup to backup the current projects to LTO tape. I’m using Archiware P5 sync to sync the current Xsan volumes to Thunderbolt RAIDs, and using Archiware P5 Archive (and Archive app) to archive completed projects to the LTO project archive. That’s all I need to do, right?
Step 2. Back up your servers
Don’t forget the servers running your SAN! I use Apple’s Time Machine to backup my Mac Mini Xsan controllers. External USB3 drive. I also use another Mac Mini in target disk mode with Carbon Copy Cloner to clone the server nightly. (Hat tip to Alex Narvey, a real Canadian hero). And of course I grab the Xsan config with hdiutil and all the logs with cvgather. Because, why not?! For Archiware P5 backup server I also have a python scripts to backup everything, another scripts to export a readable list of tapes, and BackupMinder to rotate the backups. Add some rsync scripts and you’re golden.
Step 3. Upgrade the OS
Unmount the Xsan volume on your clients or shut them down, disconnect the fibre channel. Do something like that. Stop your volume. Download the macOS Sierra installer from the App Store. Double click upgrade. Wait. Or use Munki. I loaded in the macOS 10.12.6 installer app into Munki and set it up as an optional install to make this portion of the upgrade much quicker and cleaner.
In my case after the OS was upgraded I checked the App Store app for any Apple updates (you can also use Munki’s Managed Software Center to check) and of course there were some security updates. In this case the security upgrade hung on a slow network connection and the server crashed. Server down! I had to restore from Time Machine backup to the point where I just upgraded the server. It took some extra time but it worked (can’t wait for next year’s mature APFS / Time Machine and restoring from snapshots instead).
Step 4. Upgrade Server
After macOS is upgraded you’ll need to upgrade the Server.app or just upgrade the services used by Server (even those not used by Server get upgraded).
Step 5. Upgrade the Xsan
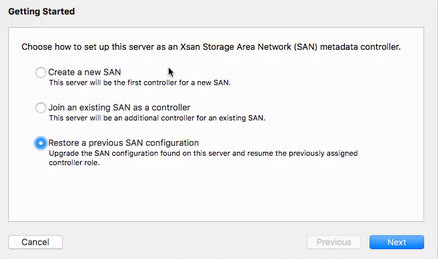
Bur first we have to restore the Xsan config. Don’t panic! It may invoke bad memories of data loss and restoring from backups. Xsan PTSD is real.

Step 6. Upgrade the rest
Next you have to upgrade the Xsan volumes.

New version of Xsan, ch-ch-changes! Ignore permissions check box will remount the xsan with the “no-owners” flag. Let’s test this out.
Upgrade the OS and Server app on the backup controller. Upgrade the OS on the clients using Munki or App Store if you like doing it the hard way. Ha Ha.
Step 7. Enjoy
Plug those Thunderbolt to Fibre adapters back in, mount those Xsan volumes and be happy.
Step 8. Wait for the complaints
The next day the editors walked in and went straight to work with Final Cut Pro X. No one noticed anything. Xsan upgraded. Workstation macOS upgraded. Everything appeared to be the same and just worked. Thankless task but well worth it.
Reference: Apple’s iBook guide here


