Hello Big Sur! See ya later Monterey

I am so happy to install macOS Big Sur 11.5.1, now that it is a ready for production. Have fun with macOS Monterey those of you on the bleeding edge. For media professionals using Xsan in production storage environments August is a great month to update to the soon to be yesterday’s bad boy Mr. Big Sur.

Server.app v.5.10 in macOS Catalina 10.15.7

Upgrading to a new major version of macOS can be fraught with peril for a fleet of mac devices but it is potentially fatal for a production SAN environment. That is why we wait. We want a nice stable storage system for our Final Cut Pro editors and other media creatives so it is safe to be one version behind. Less drama that way. We prefer our dramas to be on AppleTV+

Watch TV Upgrade Xsan

It is not boring to watch AppleTV+ while upgrading Xsan

The Xsan upgrade to Big Sur was pretty much not exciting except for one funny roadblock that I had set up myself last as a kind of booby trap for “future me”. More about that later. First the boring stuff. The last few weeks have been very busy updating and re-writing documentation in Pages.app and running multiple redundant full and incremental LTO backups with Archiware P5, syncing to nearline archives, and archiving finalized projects to the LTO shelf in paradise (sounds more exciting when you put it that way don’t you think?). Updating and re-writing documentation can sound like a waste of time but “future you” will appreciate what “past you” was doing today. And today I had fun updating Xsan to macOS Big Sur. Now I must write down all my thoughts before I each too much vegan vanilla ice cream and slip into a food coma.

“Planning for disasters, while hoping for none” is the IT mantra. We planned hard and we were ready to restore Xsan from Time Machine, if we had to. Not a joke. The server is backed up by Time Machine. The data is backed up to LTO, nearline archives racked and stacked in a server room and on redundant thunderbolt RAIDs which are parked on electric trucks ready to blast off at the earliest sign of danger. Well, everything except for the last part. Would be nice. And cloud backups for those clients that want them. Plan for the worst, pay for what you can to keep your business operational and lessen the impact of mechanical failures, human oopsies, or ransomware. Sysadmins are indistinguishable from malware sometimes, but we mean well. More seriously, humans makes mistakes and break things (that, me!) but ransomware is real and my elaborate backup and archive planning has saved a few customers this year.

Ok, now for the fun part. How to upgrade an Xsan to macOS Big Sur (11.5.1). Maybe go read last year’s blog post on upgrading the Xsan to macOS Catalina 10.15.6 which was detailed and thorough. Or read Apple’s new Xsan Management Guide. It’s got all the fundamentals explained.

Xsan volumes are typically made of up fibre channel RAID arrays. Nice icon!

Preparation is key. Be prepared. Get ready. Psych yourself up. I used Greg Neagle’s installinstallmacos.py to download macOS Big Sur as a disk image and had that and the App Store’s Server.app downloaded beforehand and not be dependent on internet access (production SANs are not always internet accessible). It is both true and not true that you can setup Xsan in Big Sur with the Server.app. It is true you need the Server.app for an upgrade from macOS Catalina 10.15.7 but if you’re starting from scratch in macOS 11 you will be building your Xsan in Terminal. Have fun! (We will cover this in a future post).

Download macOS Big Sur and the Server.app. Keep old copies zipped up. Cvlabel is nice too

Server.app manages only three (3) services for an Xsan upgrade: Profile Manager, Open Directory and Xsan. In macOS Big Sur new setups of Server.app Xsan is gone. Why they haven’t taken out Profile Manager and not kept Xsan instead made me scratch my head. No one in their right mind is using Profile Manager to install or manage profiles, they’re using commercial MDM vendors. But Xsan in macOS Big Sur (11) is not only production ready storage SAN awesome it has been upgraded to be compatible with Quantum’s Stornext 7 (previously it was only v.5)

Profile Manager does not belong here. Long Live Xsan!!

Installing macOS 11 Big Sur and upgrading Xsan to v7 is compatible (in my testing) with macOS 10.14 Mojave, 10.15 Catalina and of course macOS 11 Big Sur. If you don’t believe me check out this not updated in forever Apple’s compatibility chart.

Ok, by this time you get the idea I’m an expert, right? I’m ready to upgrade. But I run into my first real road block. And I have only myself to blame. I can’t launch the macOS Big Sur install app. It is blocked. “Contact your administrator”?! I am the sysadmin. Oh, ok. That’s me. What have I done now? I installed Hannes Juutilainen’s Big Sur Blocker last year, that’s what.

Of course I installed that. With Munki. On all my Mac clients that were upgraded to macOS Catalina. (And of course my Xsan controller has Munki!). But no worries, let me read up on my last year’s blog post about it to figure out how I installed it, there must be a launch daemon or something.

this is not how I expected it to go

Hmm, no didn’t mention there. And where is that pesky launch daemon that I can unload and get to this Big Sur install. Oh? It’s a launch agent. Unloaded. Hmm, still no. Ok, delete the app from /usr/local/bin, hmm, nope. ok kill the app process. Ok, now we can install macOS Big Sur. Sorry for the delay. I had told Munki to uninstall the bigsurblocker app and it did for every other Mac, I swear, really. It did.

Please proceed with the macOS Big Sur install

So ready for macOS Big Sur. Oh wait, we noticed that you’re running Server.app and well, we don’t do a lot of the same things anymore in the new Server.app so maybe this is a warning.

Warning. We noticed that you’re running Server.app and we don’t do those fun things anymore.

So a lot of progress bars and stuff. See my last upgrade blog post and it’s the same as installing macOS Big Sur on any Mac, except this Mac Mini is running an Xsan production SAN environment with a lot of RAID arrays in a server rack or two. Ok, yeah, just run the installer.

We noticed that Server app is no longer server app.

After macOS Big Sur is installed zip up your older server.app and drag in your new one (or use that fancy App Store app to do it for you if you’re lazy). Click a bunch of buttons (see all my old blog posts) and launch the new Server.app.

Profile Manager is updating. No one cares.

So we have to wait while the bag of scripts that is Profile Manager gets updated but no one uses it but it’s the most important app in Server.app now, no I am not bitter why do you ask. Xsan is awesome.

Xsan is off. Don’t panic.

Xsan is off. Don’t panic. Where’s my towel? Panic now!

Time to restore from your old Xsan configuration. Wheee…..

Xsan restore configuration.

Activate your Xsan and carry on upgrading all your Mac clients. Note: I did test macOS Mojave 10.14, macOS 10.15 Catalina and of course macOS 11.5.1 Big Sur Xsan clients. All worked.

Xsan on. Power up.

Upgrading Xsan with macOS Big Sur is easy if you’re going from macOS Catalina. Starting from scratch is another story to be covered in another blog post. Also not covered is certificate issues from self-signed certs breaking when I upgraded my Munki and MunkiReport server. That’s definitely another blog post. It’s just a webserver. Just. A. Web. Server. What is so hard? haha

Technical Errata:

With more than one Xsan controller it used to be recommended to upgrade the secondary before the primary but it is now best practise to upgrade the primary first to maintain the sanity of the OD data.

Xsan Upgrade Step by Step:

Clone the controllers. (+ Time Machine backups)
Turn off the clients.
Stop the Xsan Volume.
Run cvfsck on the volume.
**Upgrade the primary.
Confirm the secondary can see the primary.
*Upgrade the secondary.
Confirm the secondary can see the primary.
Check SAN access on both controllers.

Upgrade the clients as desired.

Thunderbolt Xsan: Set up a T-SAN

Setting up your very own Xsan at home… What could be more exciting? Nothing like SAN storage to cure those stacks of hard drive blues. Don’t have a spare fibre channel switch or fibre channel storage at home? No problem Grab some thunderbolt storage from Accusys and join the fun.

I am testing the A12T3-Share 12-drive desktop Thunderbolt RAID solution to build my Xsan. Accusys also have a 16 drive rack mounted raid storage box if you want to install a nice pro set up in the server room you have tucked neatly in your home office. Ha ha. Seriously, the 12 drive unit is whisper quiet and would be a great addition to any home lab or production storage setup. I mean, aren’t we all doing video production at home these days? And even if we are doing a proxy workflow in the clouds, we still need to store the original footage somewhere before it goes to LTO tape, or backed up in the clouds (hopefully another cloud). A few years ago I tested the Accusys 16 drive Thunderbolt 2 unit and it worked perfectly with my fibre channel storage but this time I am testing the newest Thunderbolt 3 unit. Home office test lab is GO!

It is a pretty straight forward setup but I ran into some minor issues that anyone could run into and so I want to mention them and save you all the frustration by learning from my mistakes. Always be learning. That’s my motto. Or “break things at home not in production”, but if your home is production now, then break things fast and learn very quickly.

First step is to download the software for the RAID and you’ll find it on the Accusys website.

(I found the support downloads well organized but still a bit confusing as to what i needed)

The installer is not signed which in our security conscious age is a little concerning, but examining the package with Suspicious package should allay any concerns.

The installer installs the RAIDGuard X app which you will need to configure the RAID.

Of course, RAIDGuard X needs a Java Runtime Environment to run. Why is this still a thing? Hmm…

RAIDGuardX will allow you to configure your connected Thunderbolt hardware.

Configure the array as you like. I only had four drives to test with. Just enough for RAID5.

Choose your favourite RAID level. I picked RAID5 for my 4 drives.

The first gotcha that got me was this surprisingly simple and easy to overlook section. “Assign LUN automatically” asks you to choose which port that LUN (the configured RAID) will be assigned to. If you don’t check anything like I didn’t in my first run through then you configure a RAID5 array that you’ll never see on your connected Mac. Fun, right? Ha ha.

Xsan requires a sacrifice…. I mean, a LUN (available RAID array). Check your Fibre Channel in System Information. Yes, this is from the thunderbolt storage. Hard to believe, but it’s true!

Setting up enterprise grade SAN storage requires a trip to the Mac App Store. Server.app

Open Server.app, enable Xsan, create a new volume and add your LUN from the Accusys Thunderbolt array. Set the usage to “any” (metadata and data) since this is a one LUN test setup.

Pro tip: connect your Xsan controller to your Open Directory server. Ok, just kidding. You don’t have an OD server in your home office? Hmm… Create an entry in /etc/hosts instead.

If you’ve set up your SAN volume then you will see it listed in the Finder.

Easy shareable SAN storage is possible with thunderbolt RAID arrays from Accusys. No more Fibre channel switches needed. Small SAN setups are possible for creative teams without a server room. This setup was a quiet 12 drive RAID and a Mac mini. Add some Thunderbolt cables. There are four thunderbolt 3 connections and you can add more with an additional RAID. Up to 8 connections with one of them for the Mac Mini running the SAN. Not bad at all. And Xsan is free. Add a Server app from the App Store, but the Xsan client is free and built-in (Xsan has been included with macOS since 10.7 so many years ago). Fibre channel protocol (even through Thunderbolt) is faster than network protocols and great for video production. Fast and shareable storage at home. Or in your office. Thunderbolt Xsan. T-SAN.

Xsan Upgrade and Big Sur Prep. Hello Catalina!

Big Sur summer testing time!

Summer time is beta testing time. A new macOS beta cycle with Big Sur is upon us. Test early, and test often. With all the excitement of Big Sur in the air, it’s time to look at Catalina.

Our day to day production Xsan systems do not run beta software, not even the latest version of macOS, they only run tested and safe versions of macOS. I always recommend being a revision behind the latest. Until now that meant macOS 10.14 (Mojave). With the imminent release of macOS Big Sur (is it 10.16 or macOS 11?) then it’s time to move from 10.14.6 Mojave to 10.15.6 Catalina. It must be safe now, right? 

Background

Xsan is Apple’s based Storage Area Network (SAN) software licensed from Quantum (see StorNext), and since macOS 10.7 aka Lion it has been included with macOS for free (it was $1,000 per client previously!).

Ethernet vs Fibre Channel vs Thunderbolt

A SAN is not the same as a NAS (Network attached storage) or DAS (direct attached storage). A NAS or other network based storage is often 10GbE and can be quite fast and capable. I will often use Synology NAS with 10GbE for a nearline archive (a second copy of tape archive) but can also use it as a primary storage with enough cache. Lumaforge’s Jellyfish is another example of network based storage.

Xsan storage is usually fibre channel based and even old 4GB storage is fast because … fibre channel protocol (FCP) is fast and the data frames are sent in order unlike TCP. It is more common to see 8GB or 16Gb fibre channel storage these days (though 32GB is starting to appear). And while fibre channel is typically what you use for Xsan you can also use shared Thunderbolt based storage like the Accusys A16T3-Share. I have tested a Thunderbolt 2 version of this hardware with Xsan and it works very well. I’m hoping to test a newer Thunderbolt 3 version soon. Stay tuned.

Xsan vs macOS Versions

We’ve discussed all the things that the Xsan is not and now what is it? Xsan is often created from multiple fibre channel RAID storage units but the data is entirely dependent on the Xsan controller that creates the volume. The Xsan controller is typically a Mac Mini but can be any Mac with Server.app (from Apple’s App Store). The existence of any defined Xsan volumes depends on the sanity of its SAN metadata controllers. If the SAN controllers die and the configuration files go with it then your data is gone.  POOF! I’ve always said that Xsan is a shared hallucination, and all the dreamers should dream the same dream. To make sure of this we always recommend running the same version of macOS on the Mac clients as well as the servers (the Xsan controllers). And while the Xsan controllers should be the same or at a higher macOS version level it can sometimes be the opposite in practise. To be sure what versions of macOS are interoperable we can check with Apple’s Xsan controllers and clients compatibility chart and Xsan versions included in macOS for the rules and exceptions. Check the included version of Xsan on your Mac with the cvversions command

File System Server:
  Server  Revision 5.3.1 Build 589[63493] Branch Head BuildId D
   Built for Darwin 17.0 x86_64
   Created on Sun Dec  1 19:58:57 PST 2019
   Built in /BuildRoot/Library/Caches/com.apple.xbs/Sources/XsanFS/XsanFS-613.50.3/buildinfo

This is from a Mac running macOS 10.13

Host OS Version:
 Darwin 17.7.0 Darwin Kernel Version 17.7.0: Sun Dec  1 19:19:56 PST 2019; root:xnu-4570.71.63~1/RELEASE_X86_64 x86_64

We see similar results from a newer build below:

File System Server:
  Server  Revision 5.3.1 Build 589[63493] Branch Head BuildId D
   Built for Darwin 19.0 x86_64
   Created on Sun Jul  5 02:42:52 PDT 2020
   Built in /AppleInternal/BuildRoot/Library/Caches/com.apple.xbs/Sources/XsanFS/XsanFS-630.120.1/buildinfo

This is from a Mac running macOS 10.15.

Host OS Version:
 Darwin 19.6.0 Darwin Kernel Version 19.6.0: Sun Jul  5 00:43:10 PDT 2020; root:xnu-6153.141.1~9/RELEASE_X86_64 x86_64

Which tells us that the same version of Xsan are included with macOS 10.13 and 10.15 (and indeed is the same from 10.12 to 10.15). So we have situations with Xsan controllers running 10.13 and clients running 10.14 are possible even though macOS versions are a mismatch, the Xsan versions are the same. There are other reasons for keeping things the macOS versions the same: troubleshooting, security, management tools, etc  To be safe check with Apple and other members of the Xsan community (on MacAdmins Slack).

Backups are important

Do not run Xsan or any kind of storage in production without backups. Do not do it. If your Xsan controllers die then your storage is gone. Early versions of Xsan (v1 especially) were unstable and the backups lesson can be a hard one to learn. All later versions of Xsan are much better but we still recommend backups if you like your data. Or your clients. (Clients are the people that make that data and pay your bills). I use Archiware P5 to make tape backups, tape archives, nearline copies as well as workstation backups. Archiware is a great company and P5 is a great product. It has saved my life (backups are boring, restores are awesome!).

P5-Restore-FCPX.png

Xsan Upgrade Preparation

When you upgrade macOS it will warn you that you have Server.app installed and you might have problems. After the macOS upgrade you’ll need to download and install a new version of Server.app. In my recent upgrades from macOS 10.13 to macOS 10.15 via 10.14 detour I started with Server.app 5.6, then install 5.8 and finally version 5.10.

After the macOS upgrade I would zip up the old Server.app application and put in place the new version which I had already downloaded elsewhere. Of course you get a warning about removing the Server app


Xsan-ServerApp-ZipRemovalDetected.png

Install the new Server app then really start your Xsan upgrade adventure.

Serverapp-setup.png

Restore your previous Xsan setup.

This slideshow requires JavaScript.

If everything goes well then you have Xsan setup and working on macOS 10.15.6 Catalina

Xsan-Catalina-Upgrade-Success

Camera Archives

For editing clients with a proper SAN this is the setup I like to use a watch folder on the SAN that sends to tape the camera archives automatically on a timed interval.

This requires

  1. proper SAN
  2. a watch folder setup with Archiware P5 archive
  3. camera archives, created in FCP X from the camera cards

Note: you can also use Adobe Prelude, Shotput or Resolve to create verified copies of camera cards. Use what you trust and works for you. The idea is not to copy by hand and avoid the perils of corrupt files.

Bonus: multiple drives to enable multi-streaming and parallelizing of your data. Why not makes cloned tapes copies and stream lots of data to all four (yes, four !) drives. See the illustration below.


Screen Shot 2016-08-03 at 10.35.40 AM

2015 in review

The WordPress.com stats helper monkeys prepared a 2015 annual report for this blog, but nobody wants to read no stinkin’ reports so let me just sum it all up: Xsan, Munki, Thunderbolt, Archives. Or is that all one word? Thunderbolt Xsan Munki Archives! That’s better.

Here’s an excerpt from the report that no one will read:

The concert hall at the Sydney Opera House holds 2,700 people. This blog was viewed about 20,000 times in 2015. If it were a concert at Sydney Opera House, it would take about 7 sold-out performances for that many people to see it.

Surprisingly, or not, that opera would be about Xsan. Yes, Apple’s Xsan is still alive, and Apple even added new features with OS X 10.11 El Capitan. I’m still building Xsan shared storage SANs and upgrading old ones to new versions. That was one of the good news stories of 2015 for me.

You can build an Xsan with one or two Mac Minis and add your storage of choice. That used to mean more often than not the fibre channel storage from Promise. A great choice for larger deployments, the x30 Vtraks are solid.

But the real shocker for me in 2015 was stumbling upon the Accusys Thunderbolt SAN RAID, the A16T2-Share. For more than half off the price of a similar fibre channel storage RAID here’s a magical box powered by unicorns that has four (4) Thunderbolt connections. Plug one Thunderbolt cable into that Mac Mini, format the raid, setup Apple’s Xsan, and then plug the other three (3) Thunderbolt cables into iMacs, Mac Pro, MacBook Pros or any Xsan clients. Wow. Awesome.

Suddenly we have a game changer. An affordable SAN storage RAID for real block-level storage. Now more than ever we can afford to have true collaborative workflows for video editors and anyone in the creative. If you need to work together with fast connections to a shared pool then building an Xsan got much more attractive.

Disclaimer: I got a chance to test the Accusys A16T2-Share. And I would be crazy to recommend something without testing it thoroughly. This was used for several weeks by video editors in production. It was much faster than our 4GB fibre channel storage, of course, but it was also faster than our 8GB FC storage. Speed tests showed we got close to 1GB/sec, and even when it was 97% full we got 700MB/sec. Sa-weet.

I look forward to seeing what Accusys bring to NAB in 2016. What new box will they show up with? I hope for more than 4 client ports and faster Thunderbolt 3. Only 82 more sleeps till we all find out.

Apple’s Xsan and Accusys Thunderbolt storage A16T2-Share were big stars of 2015, but what else stood out? The two other bright shiny lights were Archiware’s new P5 Archive app, and Vidispine’s VidiXplore cloud based MAM. More on those in posts to follow. Both of these products have transformed workflows for editors. Stay tuned!

Move over El Capitan, hello Yosemite!

With all this talk about El Capitan, Apple’s as of yet unreleased version 10.11 of OS X, and its wondrous new features in Xsan, I think it might be time to upgrade to last year’s breakthrough version of OS X, Yosemite. Sure, you might be excited by the press releases for the built-in DLC in El Capitan but seriously sane folks stay 1-year behind the bleeding nose upgrades provided by Apple. So if OS X 10.11 is all the rage before its released it must be time to seriously consider upgrading that working Xsan running OS X 10.8 or OS X 10.9.

In my case, I upgraded a working Xsan running on Mac Minis and OS X 10.8.5. Here are some screenshots from the process. As always think worked better than I could have expected, and it is a much easier process that one expects. But stay sharp kids, danger lurks when you wake the dreamer…. Upgrading a SAN is serious business and doing anything like this without proper backups is taking your life in your own hands. In my case, full disk backups on Promise Pegasus RAIDs and full tape backups using Archiware P5.

Download the Yosemite installer form the App Store. Install. Download the new Server.app from the App Store. Install. Now upgrade your Xsan. That’s it. You’re done. No surprises, aren’t you happy? Ha ha. I’m kidding. The fun is just getting started.

If you’re actually following along, this isn’t a step by step recipe. Go to Apple’s site and read this Kbase and check out the migration guide.

Restore Xsan

Restore Xsan

Step 1 is to launch the new Server.app, find Xsan Admin. Just kidding, it isn’t there. Enable Xsan, and choose to Restore a previous SAN configuration. That wasn’t hard. High five! Actually, we’re not done yet. Set up OD now. Go!

Step 2. Set up your Xsan controller as an Open Directory (OD) master. Does’t matter if it’s joined to another domain, Xsan keeps itself organized in OD, so you need it.

Set up OD

Set up OD

Step 3. Admire your upgraded SAN, “how lovely the flowers do smell…. life is good.”

XSAN LIST

Xsan list

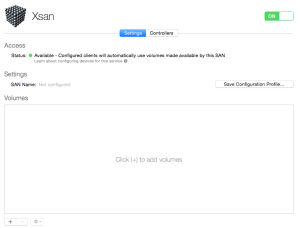
Step 4. Where did my Xsan admin go? Where do I add clients? Where are my clients? Huh? What? Why did I upgrade a perfectly working SAN to this version? Ha ha.

Take it all in, take a good look at what you’ve done to your Xsan. What? Just so the editors could have the latest version of Final Cut Pro (v.10.2.1) which is only compatible with OS X 10.10.4. I see what you’ve done Apple, very clever indeed. Hmm…

Click on the “Save configuration profile” button and download the profile somewhere. Use this to set up the SAN on your clients. Distribute via Profile Manager or install it manually. Up to you. I haven’t gotten it to work with Munki quite yet. Installing it requires the admin password for the Xsan controller. How convenient.

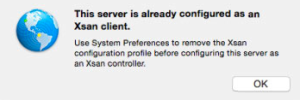
When you client is configured you’ll see a Profile in System Preferences. Remove it and your client is un-configured. No more Xsan.prefpane to list volumes and mount or unmount them. Nope. That would be too easy. Learn to love “xsanctl”, as in “xsanctl mount Xsan”. Read some xsanctl tips in this Kbase

Step 5. Set up a backup Xsan controller. You have one of those, right? In my case, I had a client which I wanted to promote to be a controller.  But first what to do about its status a client of the Xsan?

backup cannot be client

backup cannot be client

Open Server.app, enable Xsan, join current Xsan as a backup controller and set up a replica OD. Confirm, confirm, confirm. Think about what you’re doing, then do it!

confirm OD replica

confirm

Apple wizards are the best wizards, uh, i mean Setup Assistants. No wizards here…. So, you’ve setup a backup Xsan controller, and OD replica, and now look in Server.app. How amazing is that… wait, what? Where’d my Xsan volumes go? Huh? Where are the controllers? Weird. Very strange. Not comforting at all.

Xsan 4 no SAN list crop 122815

The Xsan window eventually shows the volumes and controllers, bur geez, almost gave me a heart attack. It’s not like I never seen Xsan go bad before. Xsan 1 nightmare still haunt me. They do. Backups. Need more backups. Archiware P5 Backups, do it now!

OK, you’ve survived the uncertainty of Xsan upgrades…. But wait more minute… cat the fsnameservers (no, it’s not the name of a band, it’s a command). Check it out. Holy smokes, batman. Xsan 4 by default will set your metatadata network to the public LAN, something that’d would be laughed at years ago, but they do it now by default. Of course, upgrading our SAN kept out metadata network the same. But strangely the Xsan backup controller is set to use the public for metadata when the primary controller is not. WTF.

Change your metadata network. Read the Kbase, and once again wield xsanctl like a boss.

Affordable Shared Storage: Accusys A16T2-Share Thunderbolt SAN

Accusys A16T2-Share Thunderbolt SAN storage

Accusys A16T2-Share Thunderbolt SAN storage

I’ve mentioned the Accusys A16T2-Share Thunderbolt SAN storage before. I first encountered it at NAB 2015 back in April. It was truly a magical find. A 16-drive RAID unit with 64TB raw storage and ready to be part of your Apple Xsan using Thunderbolt connectors. No Thunderbolt to fibre channel adapters necessary, nor is a fibre channel switch required. Just plugin a Mac Mini as your Xsan controller, and there’s room for 3 other clients to plugin with Thunderbolt. Pretty neat.
It’s not for everyone. There’s a limit to the length of Thunderbolt optical cables. And there’s only 3 clients possible using one last Thunderbolt connection for an Xsan controller. But this could work well for small work groups. The magical 4-seat SAN setup is finally here. Bob Kite, master SAN builder, would be happy.

I’ve just gotten word that this unit is available for sale now, as it was recently certified by both Apple and Intel. I believe the street price is approximately $9900 USD, but don’t quote me on that. Information is still emerging on this new product. I do hope to get my hands on one to do some real world application testing. Including testing resilience to failure (drive removals, raid rebuilds, etc).

If the reliability of the Accusys hardware is good, and backed up with solid support then this could be a great product.
Of course, it kinda goes without saying that all storage, including Shared SAN storage, needs solid backups. My preference where possible is a second tier disk (NAS/SAN/DAS) and tape. My preferred vendor is Archiware which makes the very excellent product P5.
With over 10 years of experience with Xsan and setting up storage systems I have learned to always setup excellent backups. Restoring files when a RAID or SAN fails is crucial. Using an a RAID, such as the Accusys Thunderbolt A16T2-Share, as a SAN would be come with a recommendation from me to all my clients to have a secondary Thunderbolt RAID unit of the same size to sync it daily and to use P5 Backup with LTO 6 tape drives (preferably in a tape library). You never can be too paranoid with a client’s data. That’s what my clients pay me for. To plan for failure. I love setting them with excellent SAN storage, but I must counsel them to build also an excellent backups system. Better safe than sorry.
The price point on this A16T2-Share Thunderbolt RAID is attractive, and when it is released many clients in small shops may very well consider it. At approximately $10K US for 64TB of shared storage with free Xsan 4 it is a pretty sweet deal. Add another $5-10K for a large backup RAID drive, and another $5K for a tape library and $2K for Archiware P5 Backup and the cost adds up. But having an affordable price for the main SAN storage makes this a very real possibility for some clients who have been struggling with editing video on NAS like QNAP, Synology or Drobo.

Xsan 4 in OS X 10.10 (Yosemite)

Apple released Yosemite (OS X 10.10) today.  The big news for me is the built-in version of Xsan is v.4. But don’t get too excited and upgrade your OS without some planning (and backups). If your systems are in production then please leave them as is. Install OS X 10.10 on a test system first. Install a test Xsan and play with that. Don’t test in production. ‘Nough said.

What you need to know is, if you upgrade your Mac to 10.10 then it is officially incompatible with Xsan 3. You can NOT have Xsan 3 (10.9) clients on a 10.10 Xsan, and I don’t think that 10.10 (Xsan 4) clients will work on a Xsan 3 based SAN. There may be a hack to get incompatible versions working together but that’s left to imaginative tinkerers and not useful for production where deadlines are involved.

I’ve done some basic testing with Xsan 4 and it does away with the Xsan Admin app, all setup is done in the Server.app. Also, it depends on Open Directory (and DNS, of course). If there is no OD master set up then it will create one (same with DNS). If you have OD then join your Xsan controllers to it as replicas or else they will create a new OD master on the first Xsan controller and a replica on the second. You were warned.

To configure the clients you export a config profile and install it on the clients, or alternatively you can enrol the Xsan controller in MDM (Profile Manager, for example) and push out the config to the clients.

I have not tested Xsan 4 with StorNext but I expect there is compatibility, as usual.

In Summary:

More testing is needed, but strictly speaking Xsan 4 is not going to work with Xsan 3 and vice versa. If an Xsan 3 (10.9 client) is part of Xsan 4 (10.10) then it may work but commands and configs will not come across (unmount / mount the volume, the volume is destroyed stop looking for it, etc).

And now for some screenshots of the actual setup.

Step 1. Install Server. Turn on Xsan and get ready to rumble.

Screen Shot 2014-10-15 at 2.02.06 PM

Step 2. Change your name. If you’re using dot-local change it.

Change-dot-local-name-Xsan4

Step 3. Set up valid DNS

Setup-DNS-if-you-dont-have-none

Step 4. Set up a new SAN

Set-up-new-SAN

Step 5. Choose a SAN name

Choose-SAN-Name

Step 6. Configure Users and Groups (OD)

Config-users-groups

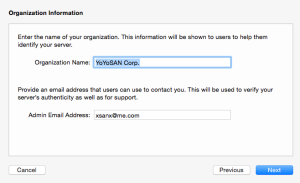
Step 7. Choose your organization name

OD-name

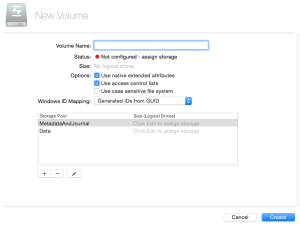
Step 8. Create the Xsan volume

Add-Xsan-volume2

Step 9. Add LUNs to your storage

Edit-storage-pool-add-LUNs

Step 10. Save a configuration profile

Save-mobile-config

Step 11. Deploy config to clients

Use MDM or manually deliver the file to your clients.

Stay tuned.

Automatic Archive in Archiware P5

Let’s say you work in the media and entertainment industry, perhaps in Post production, and maybe, just maybe, you shoot a lot of digital film (R3D, Arri RAW, XDCAM, etc), and just maybe you have a SAN. And maybe you’re lucky and you set up a nice backup system using Archiware P5, for example. What about archive? What about finished projects, what do you do about that? Even more importantly, what do you do about the camera archives? That’s the digital film footage that comes in and gets copied to the SAN before creative work begins… it seems like important stuff. Very important to backup, and even better, to archive! How can we set up an automatic archive in Archiware P5?

DEFINITION: What is the difference between backup and archive? In the media and entertainment industry I would define backup as a continuous data protection of live data on a production volume, while archive is a copy of a finished project or original media that will be removed from the production volume and must kept safe for future retrieval. Backups will roll over (a new full backup every week, or month) and if that is all we had, then footage or projects that are done and gone off the SAN would be then lost. Archive separates out the finished projects or source material as needing an independent safekeeping. P5 Archive also has the option of creating a mini-MAM type database of proxy files that can be easily viewed in a web browser for quick identification of files to be restored.
So, how do we set up an automatic archive in Archiware P5? We want it to be automatic so we don’t have to think about it, since manually archiving like backups can be forgotten. If we set up a watch folder on the SAN then we just have to instruct everyone to drop their camera masters and other source files into the folder when they copy to the SAN and P5 will automatically archive them to an incremental tape archive. Wow. That’s awesome.

Tips and Tricks: If you edit with Final Cut Pro X then I recommend using it to make Camera Archives (a verified copy of the footage from the original card or drive) then placing this in the watch folder. If you’re using Adobe’s Premiere workflow, then Prelude can make a verified copy as well, but not in the same way exactly. This will be the subject of another post. Stay tuned.

What does an automatic archive look like?

P5 Archive watch folder

P5 Archive watch folder

Requirements:

  1. Pool (designated tapes, or a disk, for archive)
  2. Index (could be the archive default index, or a unique new index)
  3. Plan (an archive plan specifies the pool and index used as well as the what and how)

P5 Archive General Setup Screen Shot 2014-05-13 at 1.46.50 PM

Tips and Tricks: If you’re generating QT previews then you’ll want to move your index off of the default, or else you might fill up your system hard drive with movie files and then your backup server won’t boot. No, I never done this. OK, trust me it will happen 🙂

Tips and Tricks: Make sure to set up a backup job of the Archive index. This is a safety measure. The archive index is not saved to the tape in the same way backup jobs information. You need to create a backup job specifically to save your archive index. But you’re already running a backup job to backup your Archiware main index, right? Uh huh, thought so.

Tips and Tricks: When creating the archive pool set it at 512KB media block size for faster archiving of big video files.

Archive Index:

Use the advanced options to create a new Archive Index, select its location and optionally create new additional fields to help searching for archived projects.

P5 Archive Db config Screen Shot 2014-05-13 at 1.45.53 PM

Archive options:

Incremental or full? QT previews, yes or no? For an automatic archiving set up I suggest incremental archive and no QT previews. Using previews is up to you (and your disk space available), so plan accordingly.

P5 Archive Options Screen Shot 2014-05-13 at 1.46.59 PM

P5 Archive Preview Gen Screen Shot 2014-05-13 at 1.47.02 PM

If you have any questions or need help setting this up please do not hesitate to contact me. In the meantime, I’ll work on a nice PDF doc to summarize the setup. Download a demo of Archiware P5 and give it a whirl. You’ll see that it’s super easy to create an automatic archive location on your SAN and your editors will thank you when you can restore their files that they need (when they need it!).