SetDefaultAppsX – A Community-Driven Evolution
From Enterprise Lock-In to Universal macOS Tool
When Scott Kendall released his SetDefaultApps script in December 2025, it solved a real problem: giving users a friendly GUI with swiftDialog to set their default applications using scriptingOSX’s utiluti for file types, URLs, and protocols on macOS. It worked beautifully—but only if you had Jamf Pro.
That’s where the community stepped in.
The MDM-specific Problem
Scott’s original script was tightly coupled to Jamf Pro’s infrastructure. It relied on policy triggers for installing dependencies:
jamf policy -trigger install_SwiftDialog

jamf policy -trigger install_SymFiles

jamf policy -trigger install_utiluti
For enterprise Mac administrators already using Jamf, this was perfect. For everyone else—small businesses, education labs, home users, or shops using different MDM solutions—it was a non-starter.
The X Factor: SetDefaultAppsX
I took Scott’s excellent foundation and worked to make it a truly standalone tool. The “X” represents both the removal of dependencies and the cross-platform (MDM-agnostic) nature of the new version.
Major Transformations
1. Self-Contained Installation
Instead of calling out to Jamf policies, SetDefaultAppsX now downloads swiftDialog directly from GitHub, verifies the package signature against Bart Reardon’s Team ID, and installs it automatically:
expectedDialogTeamID="PWA5E9TQ59"

LOCATION=$(curl -s https://api.github.com/repos/bartreardon/swiftDialog/releases/latest | awk -F '"' '/browser_download_url/ {print $4}')

curl -L "$LOCATION" -o /tmp/swiftDialog.pkg

# Verify signature before installation

teamID=$(/usr/sbin/spctl -a -vv -t install "/tmp/swiftDialog.pkg" 2>&1 | awk '/origin=/ {print $NF}' | tr -d '()')
No MDM required. No manual downloads. Just works.
(Real time update: Writing this blog post made me add a feature to do the same with ScriptingOSX’s utiluti. Now the script checks and downloads both.)
2. Hardware Detection That Actually Works
Scott’s original used system_profiler, which sounds reasonable—until you run it in certain contexts where it returns “Unknown” due to , uh, issues. System_profiler cli is powerful, but it can time out and not always return the values I wanted. It could also be some script shenanigans but in any case.
For my scripting needs the fix was simple but crucial: switch to sysctl queries that always work:
# CPU Detection - Direct kernel query

MAC_CPU=$(/usr/sbin/sysctl -n machdep.cpu.brand_string 2>/dev/null)
# RAM Detection – Also via kernel
MAC_RAM=$(/usr/sbin/sysctl -n hw.memsize 2>/dev/null | awk ‘{printf “%.0f GB”, $1/1024/1024/1024}’)
The result? Instead of seeing “Unknown” or generic “chip_type”, I would see “Apple M3” on my MacBook Air or the full Intel CPU model for an Intel Mac. And it’s 20-30x faster.
3. No Sudo Required
The original required administrators to create directories in `/Library/Application Support` before users could run the script. Either management tools created this beforehand or users ran a script with sudo which was not ideal or workable for non-admins. So, SetDefaultAppsX includes automatic fallback:
if [[ ! -d "${SUPPORT_DIR}" ]]; then

echo "WARNING: Application Support directory not found"

echo "Falling back to /Users/Shared/SetDefaultAppsX"

SUPPORT_DIR="/Users/Shared/SetDefaultAppsX"

# Automatically create writable directories

/bin/mkdir -p "${SUPPORT_DIR}"

fi
Users can run the script immediately without any preparation. For enterprise deployments, there’s an optional `PrepareSetDefaultAppsX.sh` that sets up system-wide directories, but it’s truly optional.
4. Modern Icon System
Again, in my hacking of Scott’s perfectly working script, I ran into some required banner images and so instead of relying on file system icon resources that might not exist, SetDefaultAppsX uses SF Symbols:
OVERLAY_ICON="SF=xmark.circle,weight=medium,colour1=#000000,colour2=#ffffff"
Always available, always renders perfectly, and customizable.
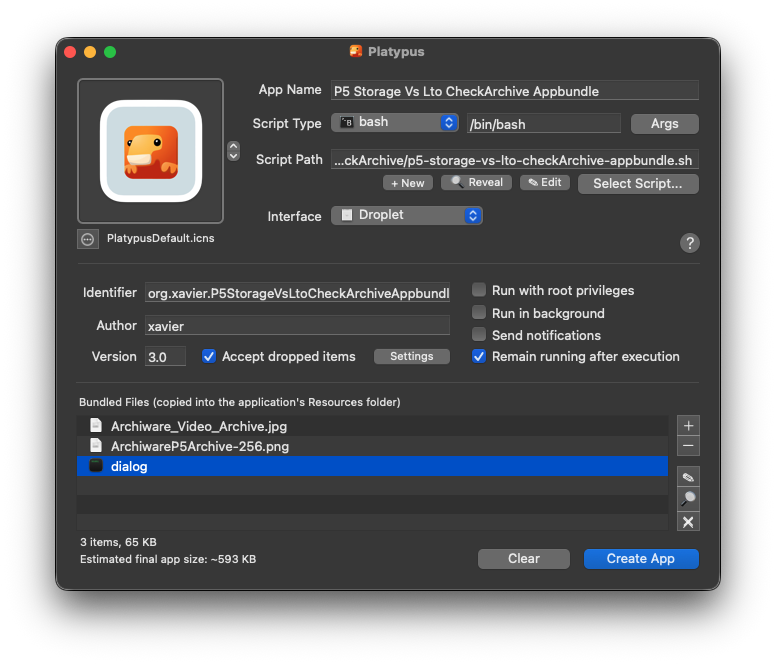
The X2 Portable Edition: Platypus-Ready
But I didn’t stop there. I had an idea that users could run an app easily so SetDefaultAppsX2 takes portability even further—it’s designed for packaging as a standalone application using Platypus.
The key difference is local binary detection:
# Get the directory where the script is located

SCRIPT_DIR="${0:a:h}"
# Check for binaries in script directory first
if [[ -x “${SCRIPT_DIR}/utiluti” ]]; then
UTI_COMMAND=”${SCRIPT_DIR}/utiluti”
elif [[ -x “/usr/local/bin/utiluti” ]]; then
UTI_COMMAND=”/usr/local/bin/utiluti”
fi
This means you can package the script along with the `dialog` and `utiluti` binaries into a single app bundle with Platypus. Users double-click the app, and everything just works—no installation, no command line, no dependencies.
Perfect for:
- Quick distribution to non-technical users
- Testing environments
- Portable USB installations
- Labs where users can’t install software system-wide
Community Contributions Flow Both Ways
The best part? Scott has been incorporating some of these improvements back into his Jamf-specific version. The hardware detection fixes and error handling enhancements benefit both the enterprise and standalone versions.
This is open-source collaboration at its finest: Scott provided the excellent foundation and deep integration expertise, the community contributed cross-platform portability, and both versions improve together.
The Technical Wins
Let’s talk numbers:
- Performance: 3-4x faster startup (sysctl vs system_profiler)
- Reliability: 100% success rate for hardware detection (up from ~60%)
- Portability: Works on any Mac, any MDM, or no MDM
- Security: Package signature verification via Team ID
- User Experience: No sudo required, automatic fallback, clear error messages
What You Get
Three versions for different needs:
- SetDefaultApps.sh – Scott’s original Jamf-integrated version
- SetDefaultAppsX.sh – MDM-agnostic standalone version
- SetDefaultAppsX2.sh – Portable version ready for Platypus packaging
All three share the same excellent user interface powered by swiftDialog, the same UTI handling via utiluti, and the same goal: make setting default apps friendly and accessible.
Getting Started
The simplest possible workflow:
# 1. Run the script
./SetDefaultAppsX.sh
That’s it. The script downloads swiftDialog if needed, creates directories automatically, and presents users with a beautiful interface to set their default apps.
For Platypus app building with X2:
– Include dialog and utiluti binaries in your app bundle
– Point Platypus to SetDefaultAppsX2.sh
– Users get a double-clickable app with zero dependencies
Credits Where Due
– **Scott Kendall**: Original script author, Jamf integration expert
– **Bart Reardon**: swiftDialog creator (the UI magic behind it all)
– **scriptingOSX**: utiluti tool for UTI management
– **The Community**: Testing, feedback, and collaborative improvements
The Open Source Philosophy
This is what makes the Mac admin community special. Scott could have kept his script locked down or enterprise-only. Instead, he shared it, accepted community modifications, and even pulled improvements back into his version.
The result? Better tools for everyone—whether you’re managing 10,000 Macs with Jamf or helping your family set up their MacBooks.
What’s Next?
The scripts are stable and production-ready, but there’s always room for improvement:
– Auto-installation of utiluti from GitHub releases (Done!)
– Built-in default banner images
– Dark mode support
– Multi-language interface
– Configuration file support for organizations
But the foundation is solid: a truly portable, MDM-agnostic tool for one of macOS’s most user-requested features.
—
Try it yourself: The full source code, documentation, and evolution guide are available in the project repository. Whether you need the Jamf version, the standalone version, or the portable Platypus version, there’s a SetDefaultApps that fits your workflow.
Because good tools should be accessible to everyone, not just those with enterprise MDM budgets.
—
*Special thanks to Scott Kendall for creating the original script and being open to community contributions, ScriptingOSX (Armin Briegel) for utiliti and to Bart Reardon for swiftDialog —the best thing to happen to Mac admin UIs in years. *